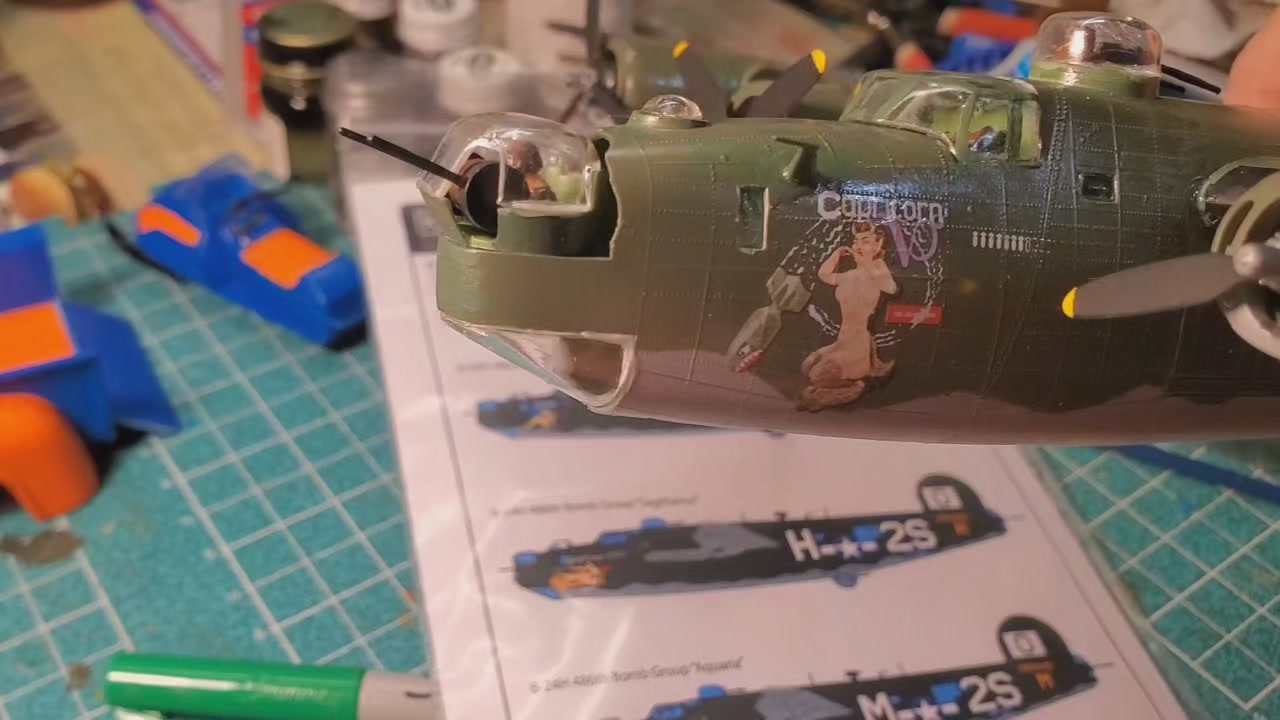
Finally, an 11 month late birthday bomber build, another ancient Airfix B-24J Liberator is done! But, I now believe both of the old-skool 1/72 scale Airfix Liberators I built have an inherent molding problem, possibly the result of being produced in France:
The old Airfix kit is way outdated, having been first produced in the mid-1960s, however, I think it has one thing going for it; it’s raised rivet details.
If you look at war time photos of bare metal versions of the real thing you will see clearly that the Liberator is covered in noticeable raised rivets, and the old Airfix engineers were obviously obsessed with capturing that look.
This recent Airfix bomber kit build, and the other B-24 bomber I completed a year prior, suffered from the same problems; misshapen/warped fuselage parts. I realized both these kits were from the time period when Airfix was under new ownership that had moved production from merry ol’ England to France!
To deal with the warped/misshapen fuselage halves I had to cut off the mounting pins, then use plastic bread bag clips as ledges to force the starboard half to meet-up with the port half. The back half was glued first, then after dry the front half was glued.
Bread bag clips:
Unfortunately, the tail end of the fuselage is short on the starboard side and has to be fixed with putty and sanding. This problem is also found on the original Made in England issue of the kit.
I have an original 1960s Made in England kit which does not appear to have the fuselage warpage problems:
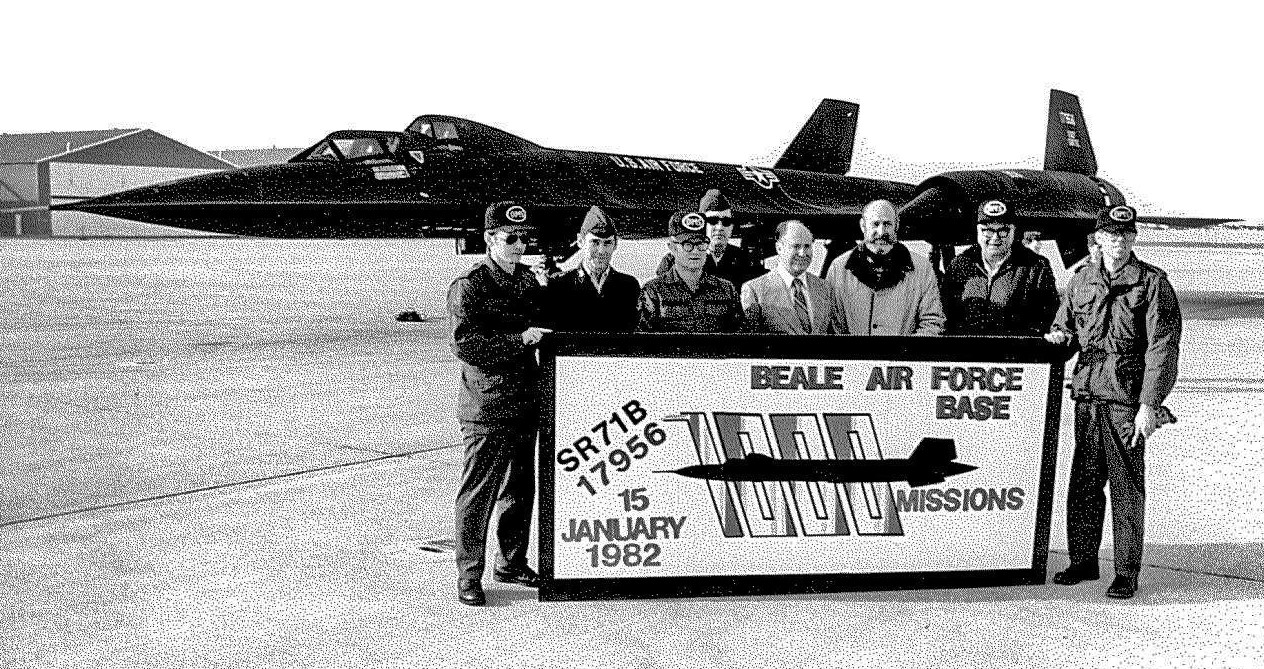
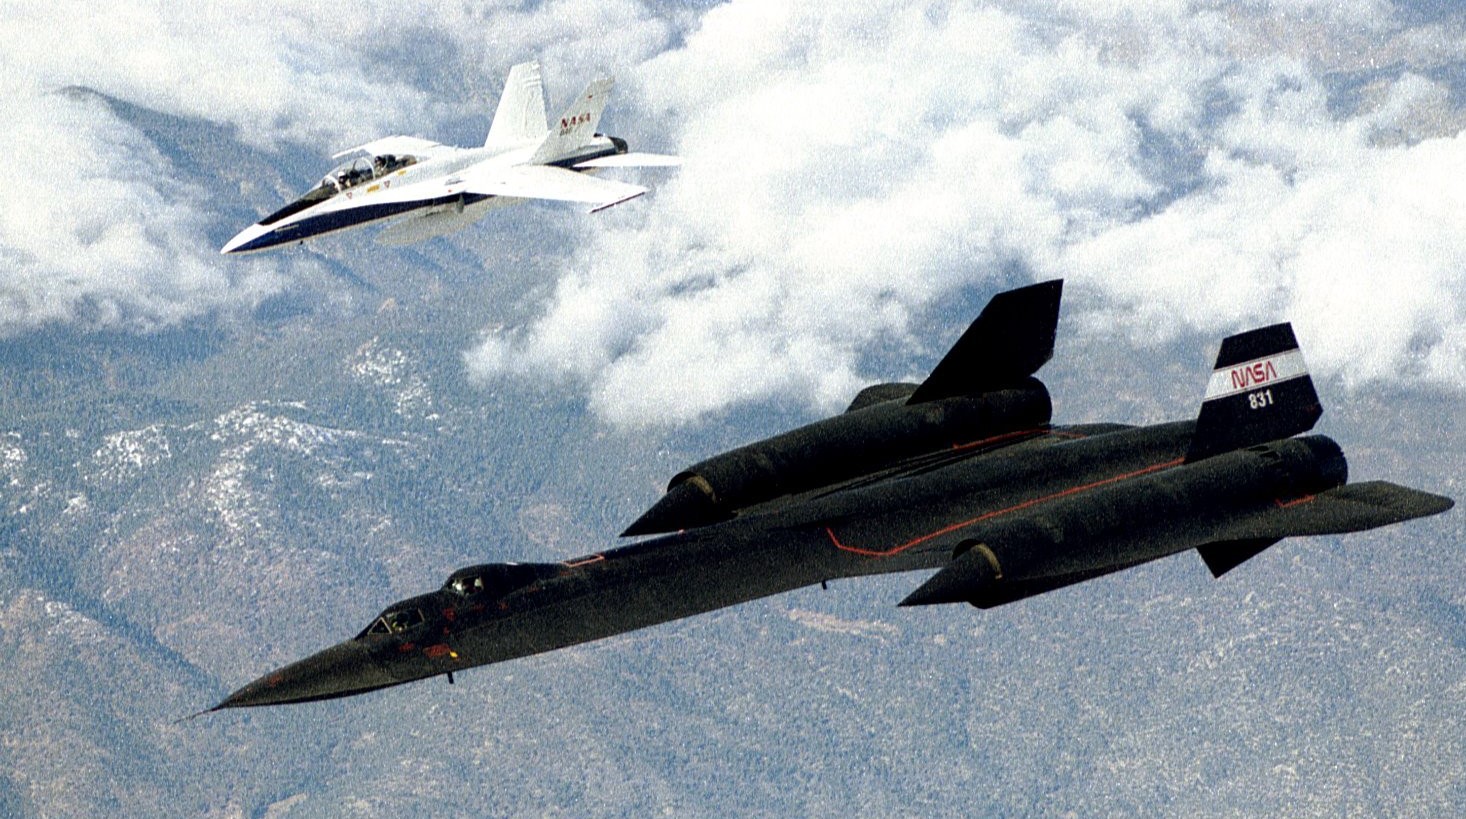
The SR-71B that would become NASA 831. U.S. Air Force photo by Airman Luis Ruiz-Vazquez, 15JAN1982.
SR-71B #61-7956, on the day of its delivery to NASA, 24JUL1991.
NASA photo of SR-71B #831, July 1991. The ‘B’ version of the Blackbird has ventral fins on the nacelles, like the YF-12A.
Silent take-off video from 1991:
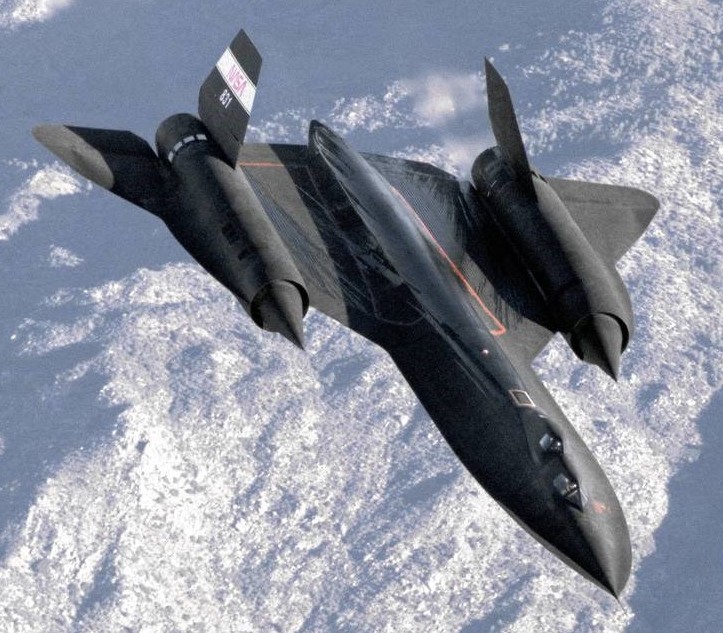
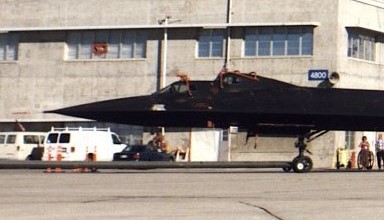
In July 1991, NASA began using the last of two SR-71B trainers (the other SR-71B was lost in a crash in 1968), #61-7956, also known as NASA 831.
Silent refueling video from 1991:
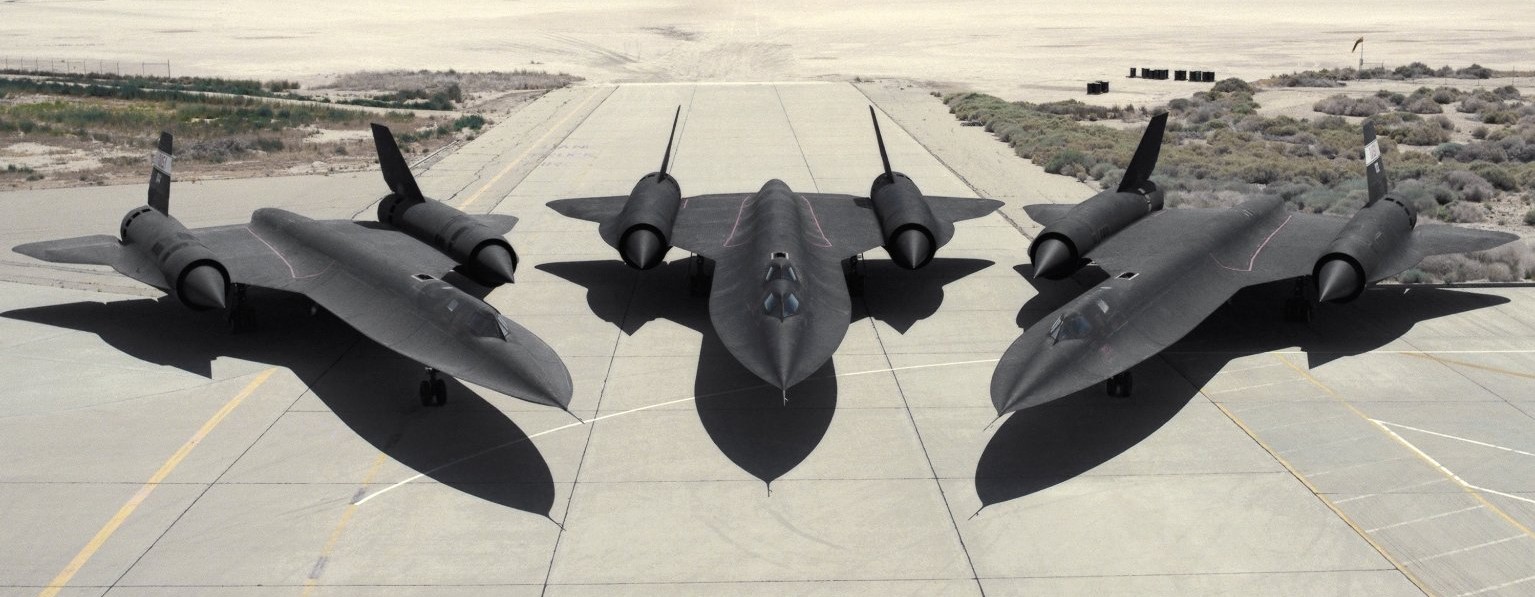
NASA photo from 1992, showing-off the three SR-71s they got ‘on loan’ from the U.S. Air Force. NASA 831 is in the middle.
Silent take-off video from 1992:
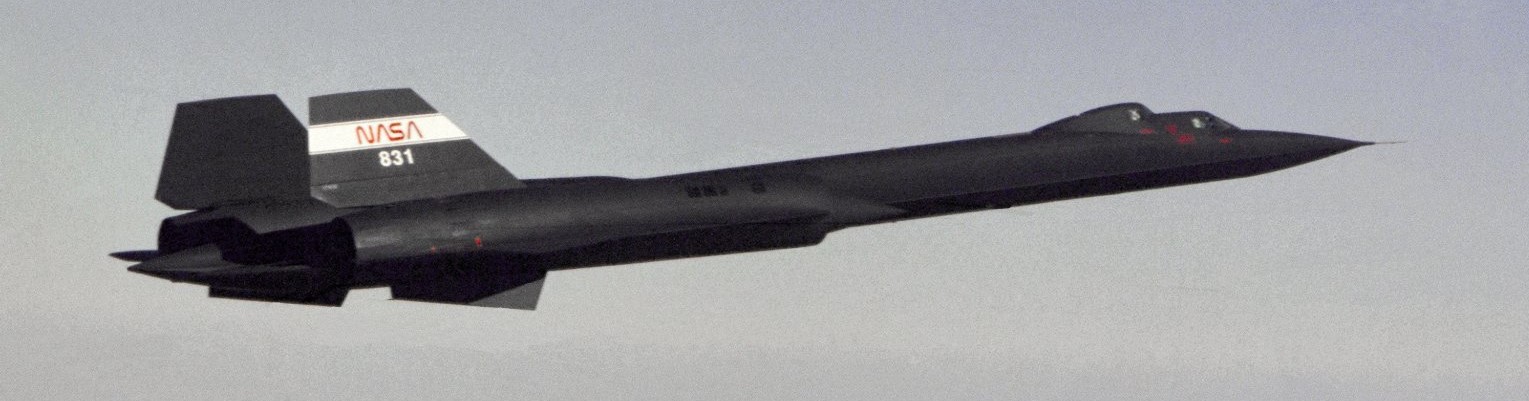
SR-71B ‘831’, photo via NASA, 1994.
NASA photo of 831, March 1996.
831 was used for crew training and various research programs on Dryden Flight Research Center (now called Armstrong Flight Research Center, on Edwards Air Force Base), California, until October 1997.
This NASA photo was made in July 1997, just a few months before 831 was retired.
NASA photo from August 1997, in the foreground is SR-71A carrying the Linear Aerospike experiment, behind it is retiring SR-71B 831.
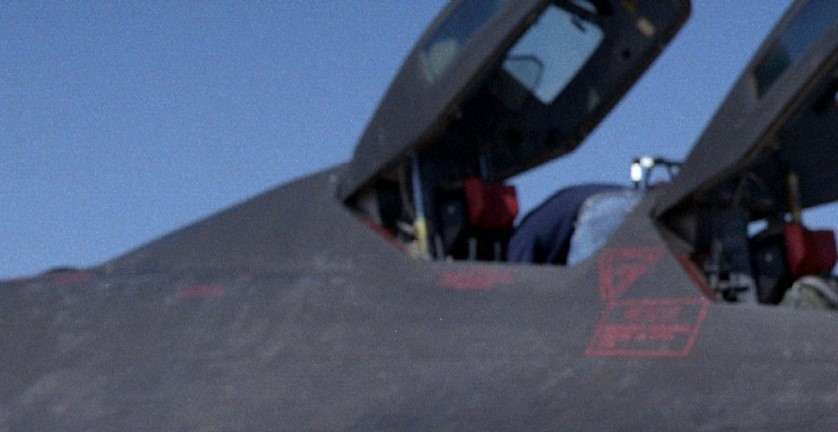
Same photo but I zoomed in to show the apparatus on the canopies of 831.
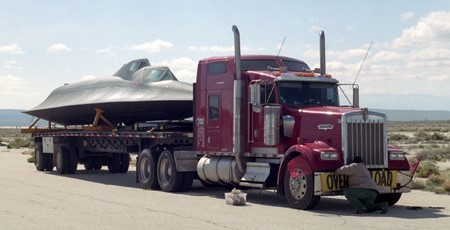
At the end of 2002, pieces and parts of NASA 831 were loaded onto tractor-trailers at Edwards AFB (Dryden Research Center), California, for the trip to Michigan. Photo via NASA.
To confuse things even more, some aviation blogs claim the Evergreen Aviation & Space Museum in McMinnville, Oregon, has NASA 831! The museum’s own SR-71 FAQ section states they’ve had the SR-71 since 2002! They post three photos; two are NASA photos, with one being of 831, and the other being an SR-71A being configured for the Linear Aerospike experiment. The third photo is of the museum’s SR-71 and it is clearly an SR-71A, not the B or even 831.
At this point, the Kalamazoo Aviation History Museum is the only location that has photographic proof that they have NASA 831. Not only does their website have lots of detailed photos of NASA 831, but they got lots of photos of other Blackbirds.
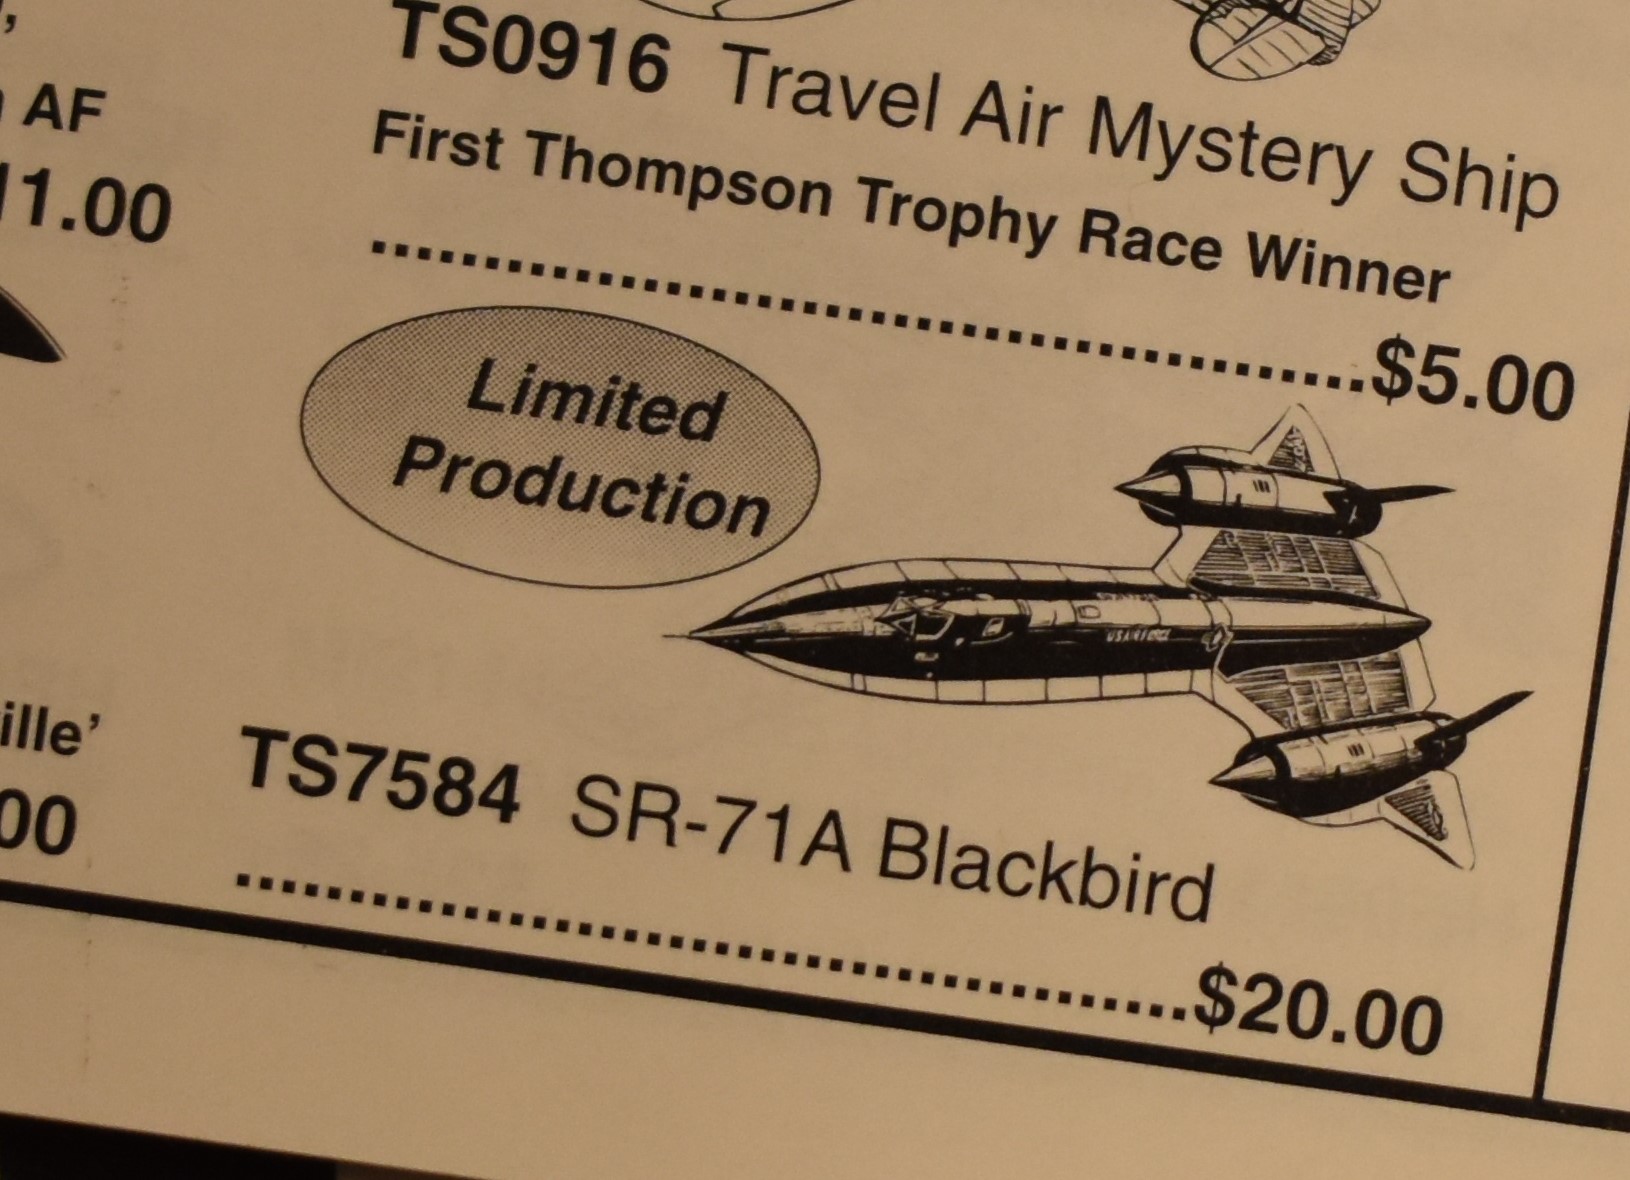
Testors SR-71 built as the ‘B’ version, NASA 831. I had to scratch build an aerial refueling door as Testors did not provide it.
After 25 years in my stash-pile, and realizing that the outrageous prices being fetched for an old Testors SR-71 might be due to Testors ceasing to exist, and the fact that the new Revell-Germany SR-71 does not include parts for the ‘B’ version, I decided it was time to build it.
NASA photo, July 1995.
The first problem I came across with the kit itself, was that Testors molded the refueling door in the open position and did not provide a door for the closed position, I wanted it closed so I had to use plastic sheet to cover the open fuel receptacle. Perhaps Testors got confused, photos of parked SR-71s do show the refueling door open, but that is because the hydraulics have relaxed, in-flight the door is closed, except when refueling.
I still have a mail-order catalog showing the MSRP of $20 back in 1996-97. I realized that the kit was not promoted as being able to build the B version.
I bought the Testors kit back in 1997, when it was a whopping $20 brand new, and I got it on discount for less than $19!
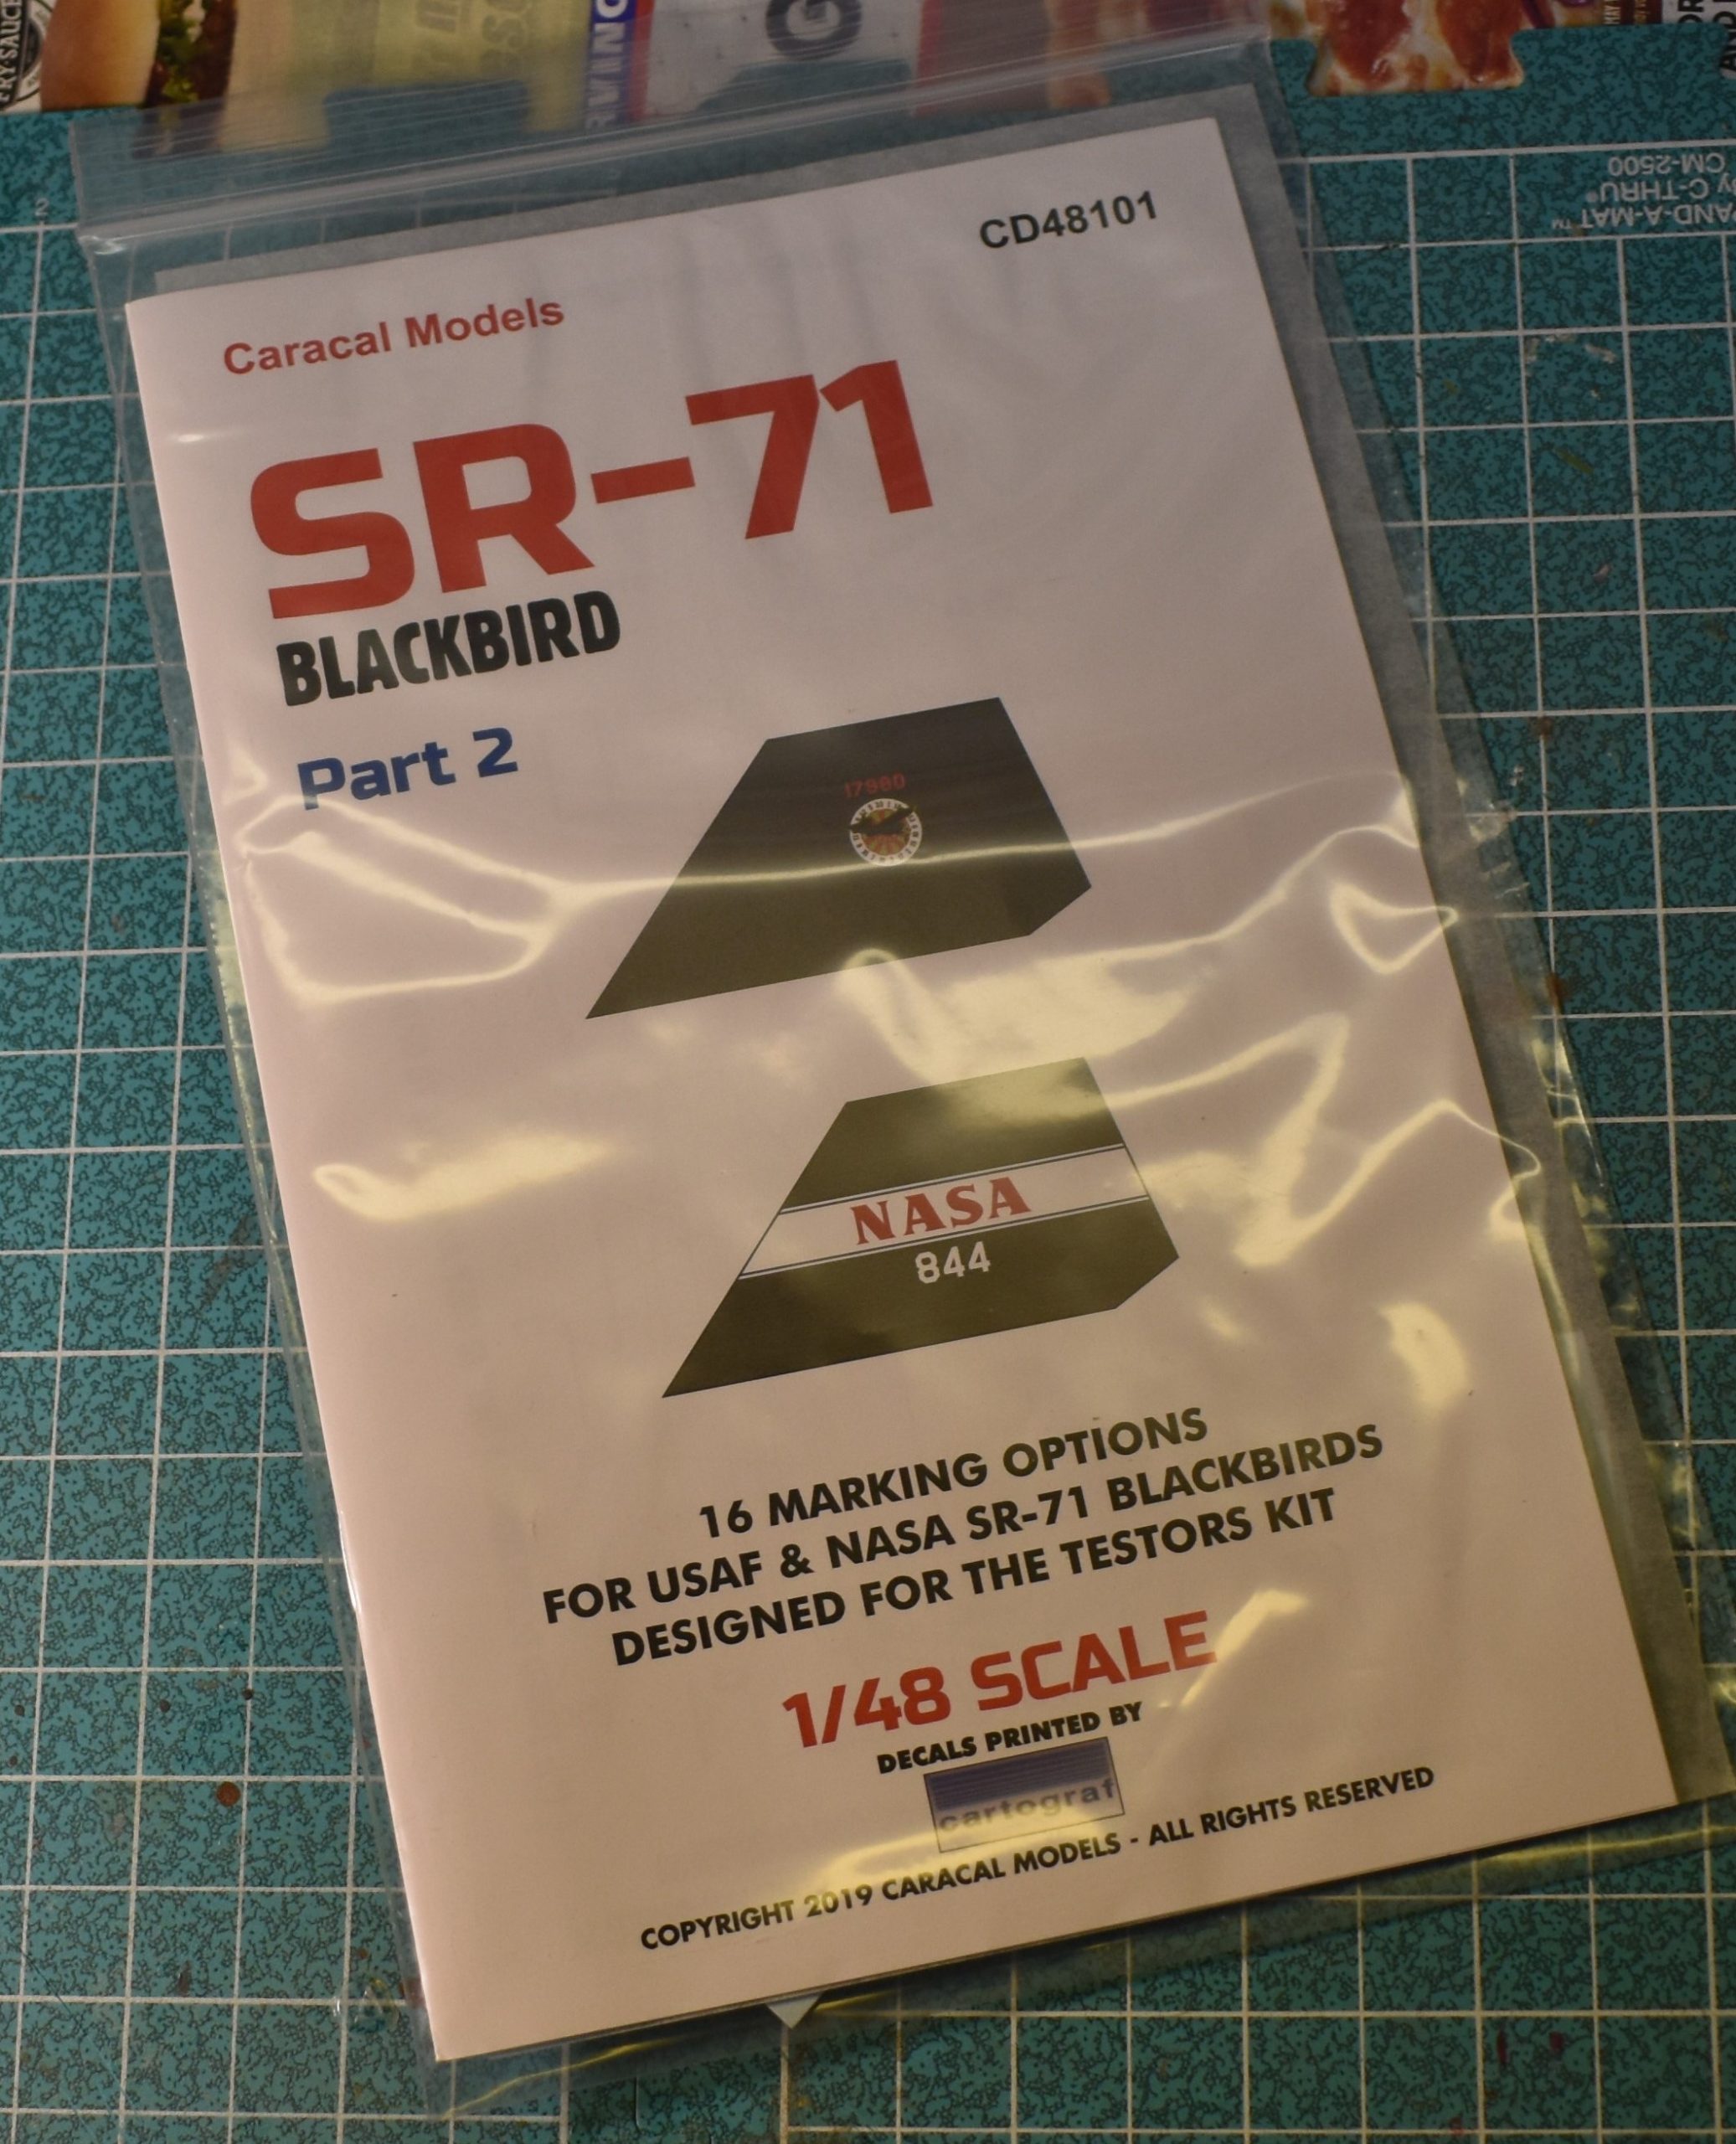
Unfortunately, the box and decals didn’t survive the test of time; the outer end opening box literally began disintegrating, and the decals were cracked beyond use (I tried, even with a coat of clear they shattered in the water), I ended up getting some Caracal-Cartograf decals.
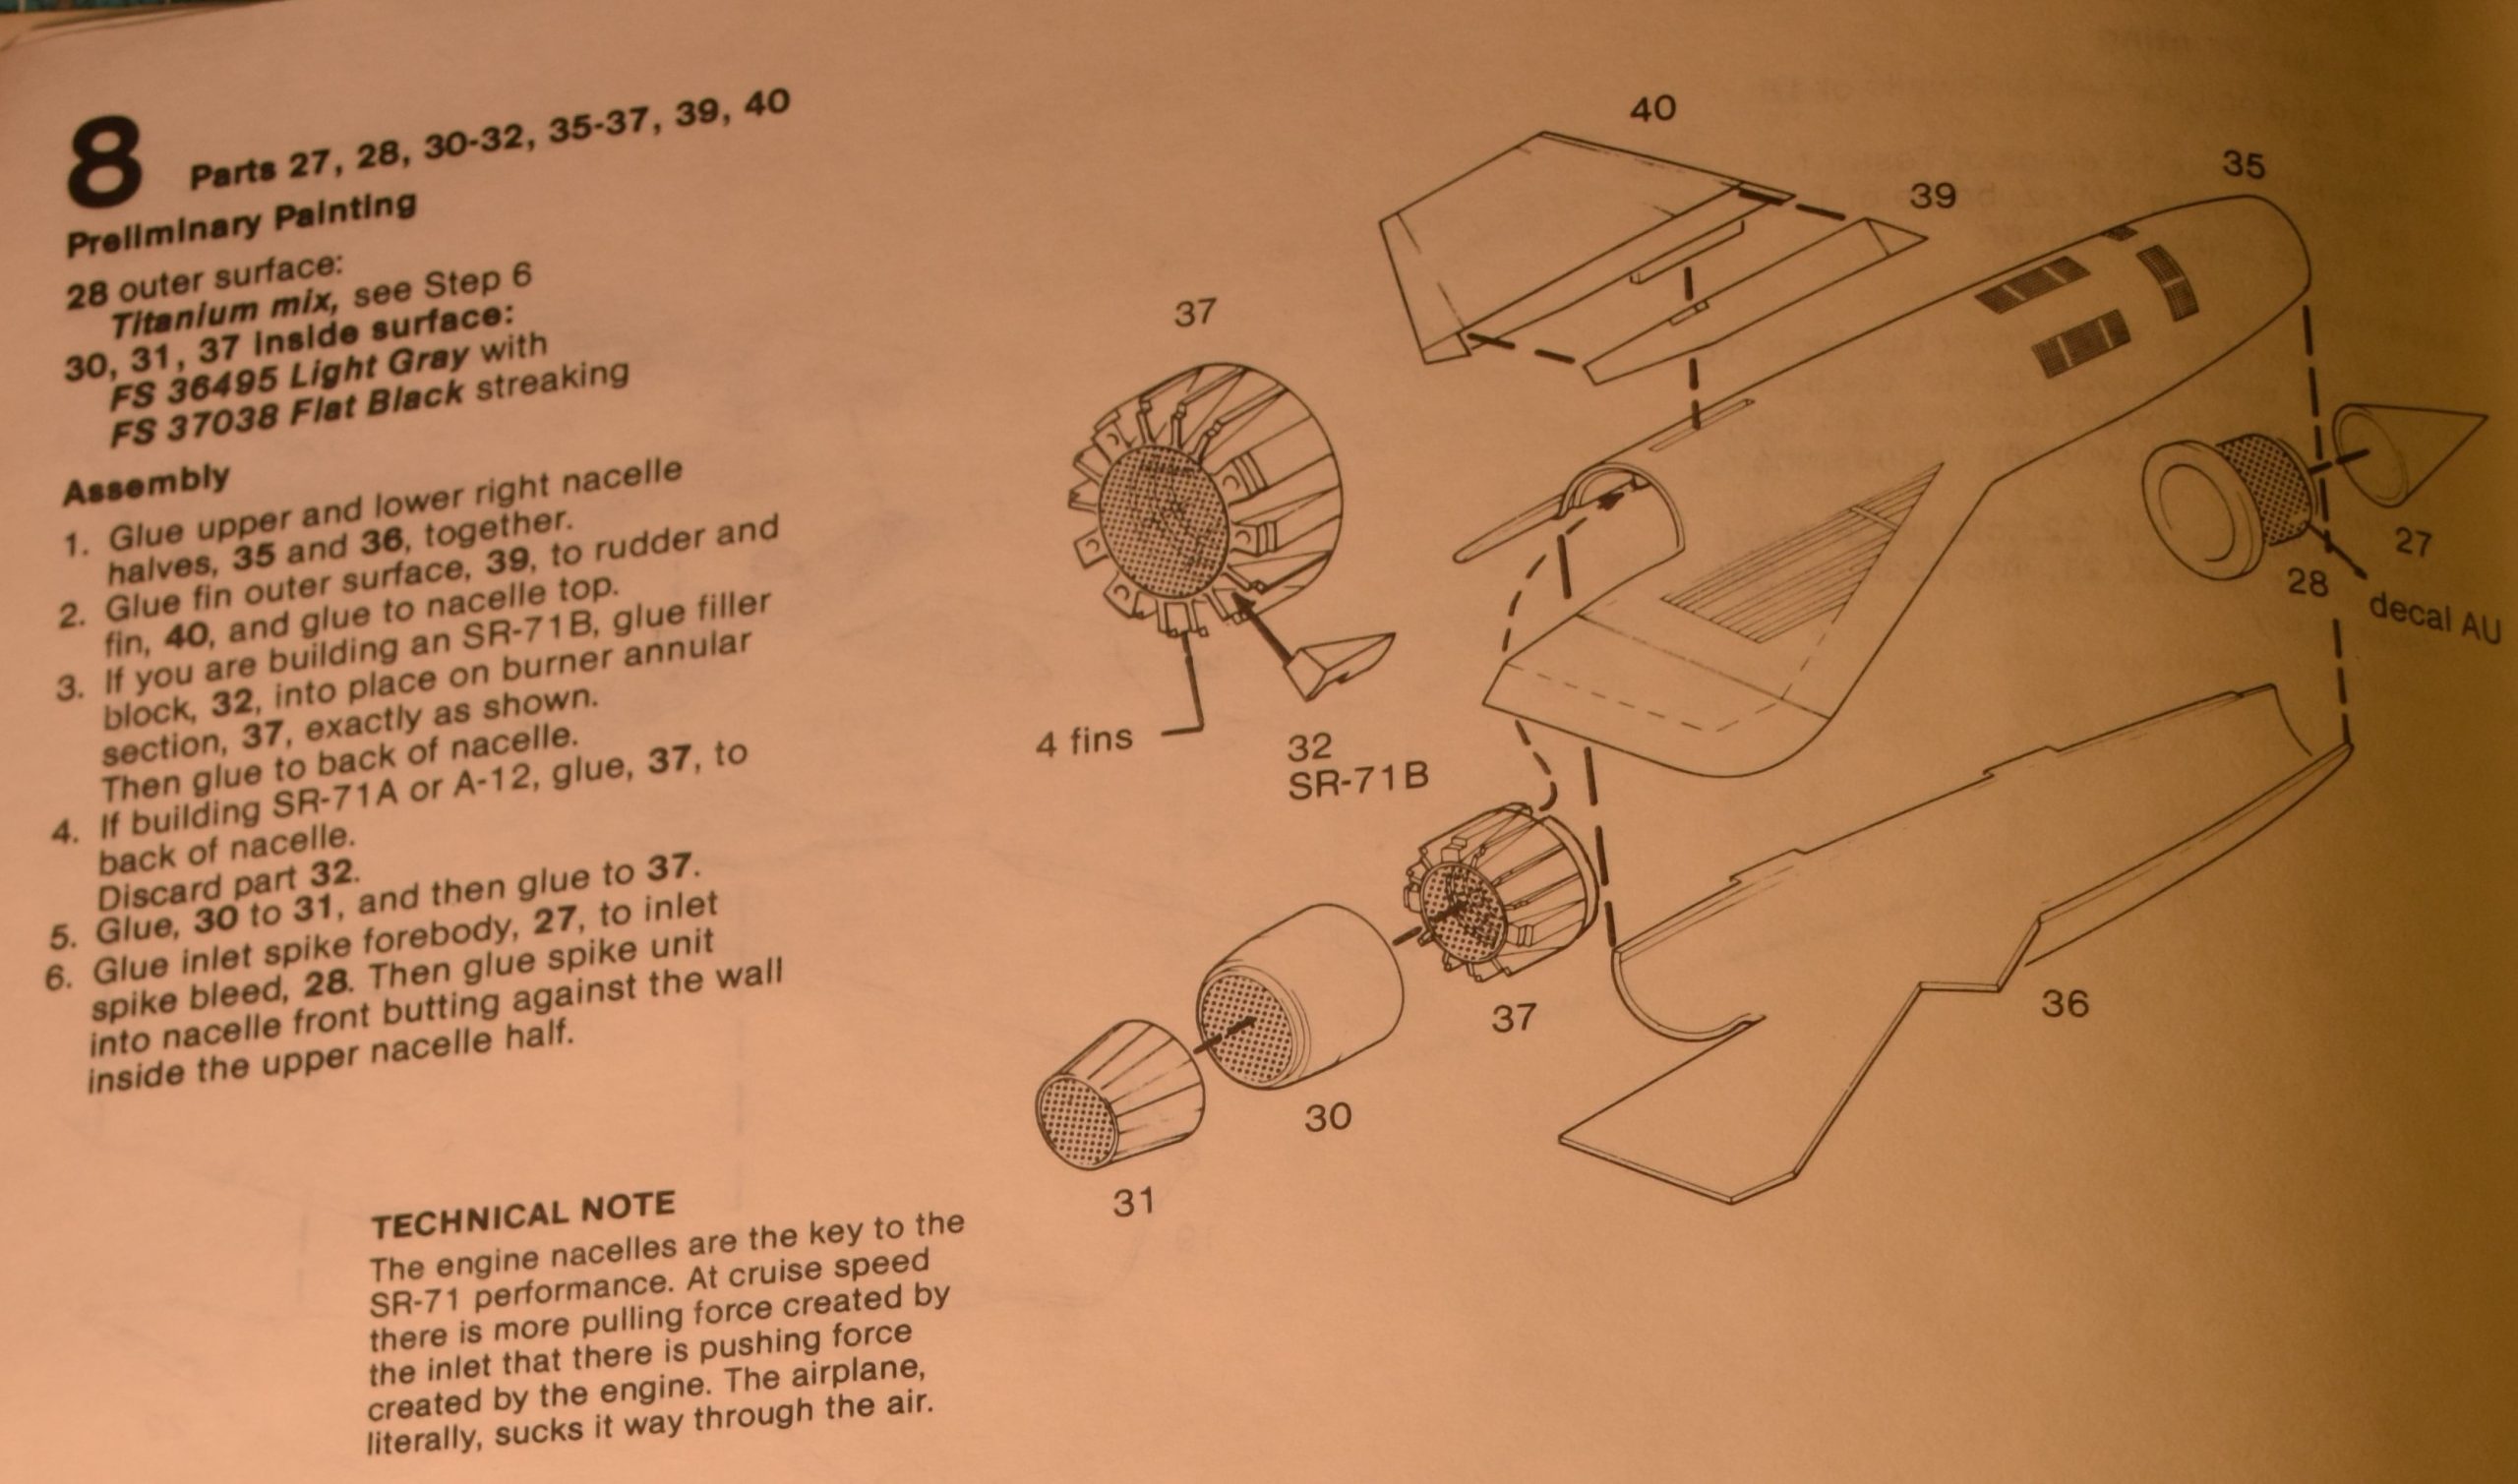
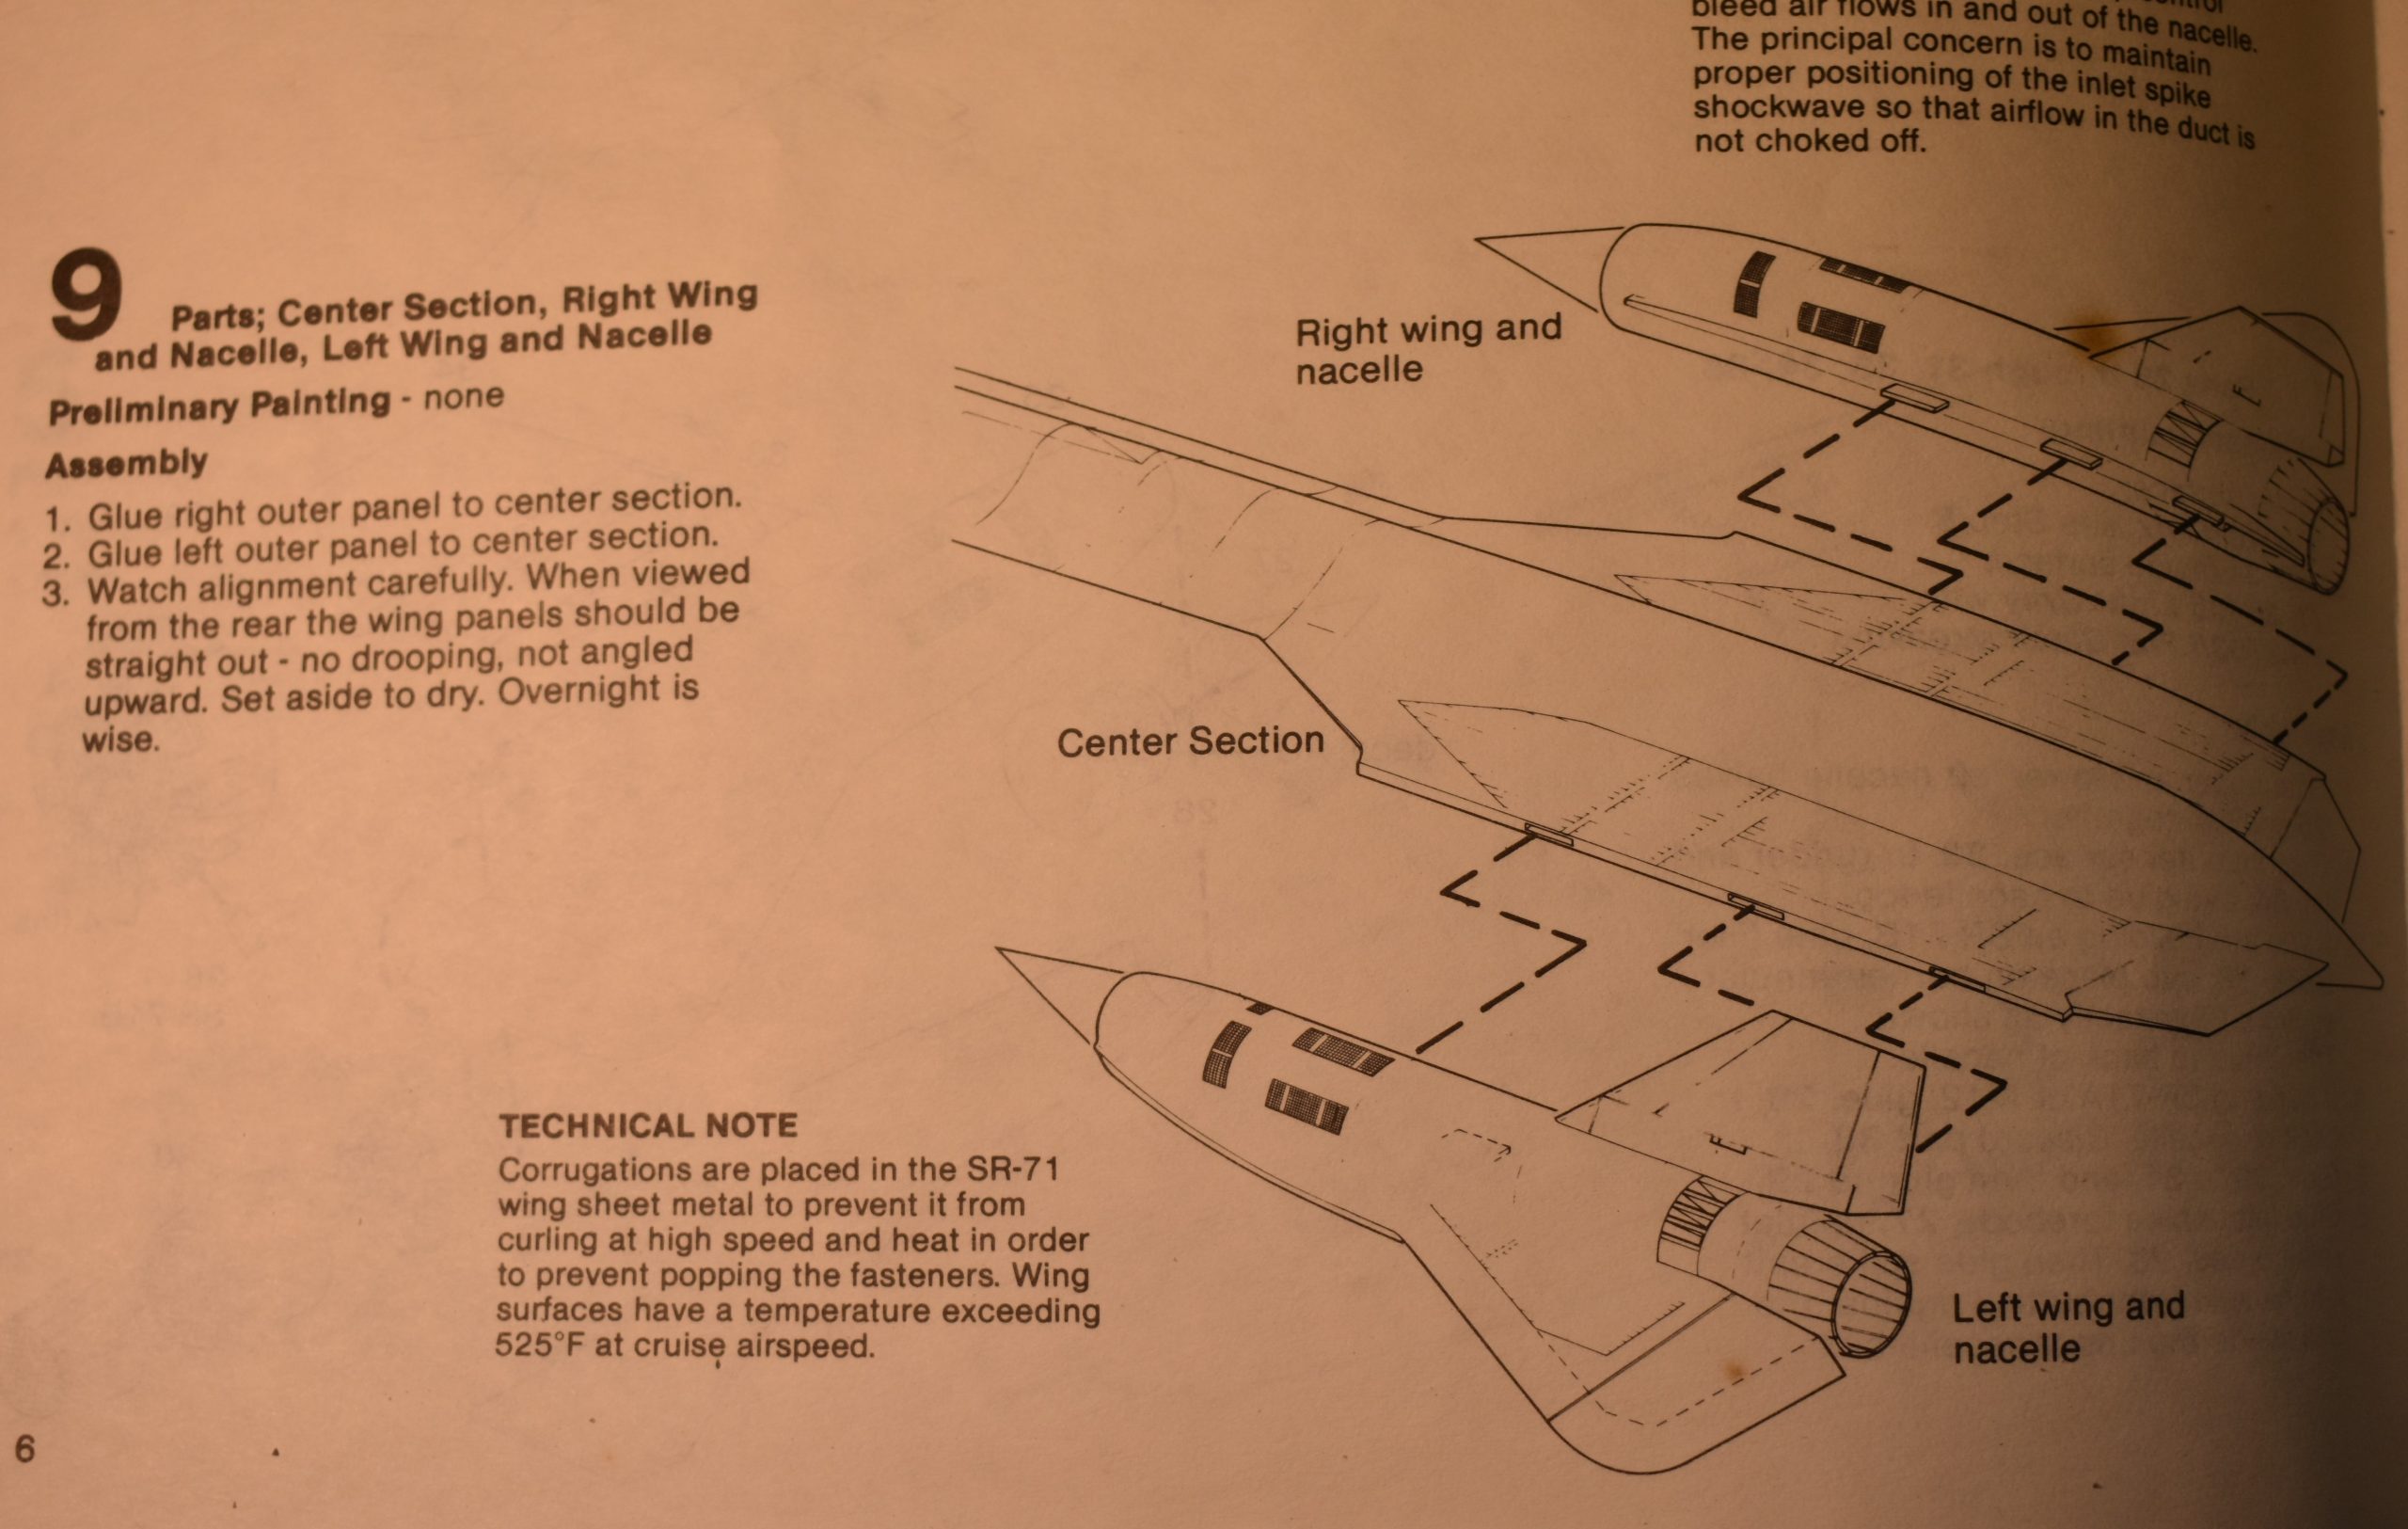
If you follow the order of assembly you will have problems.
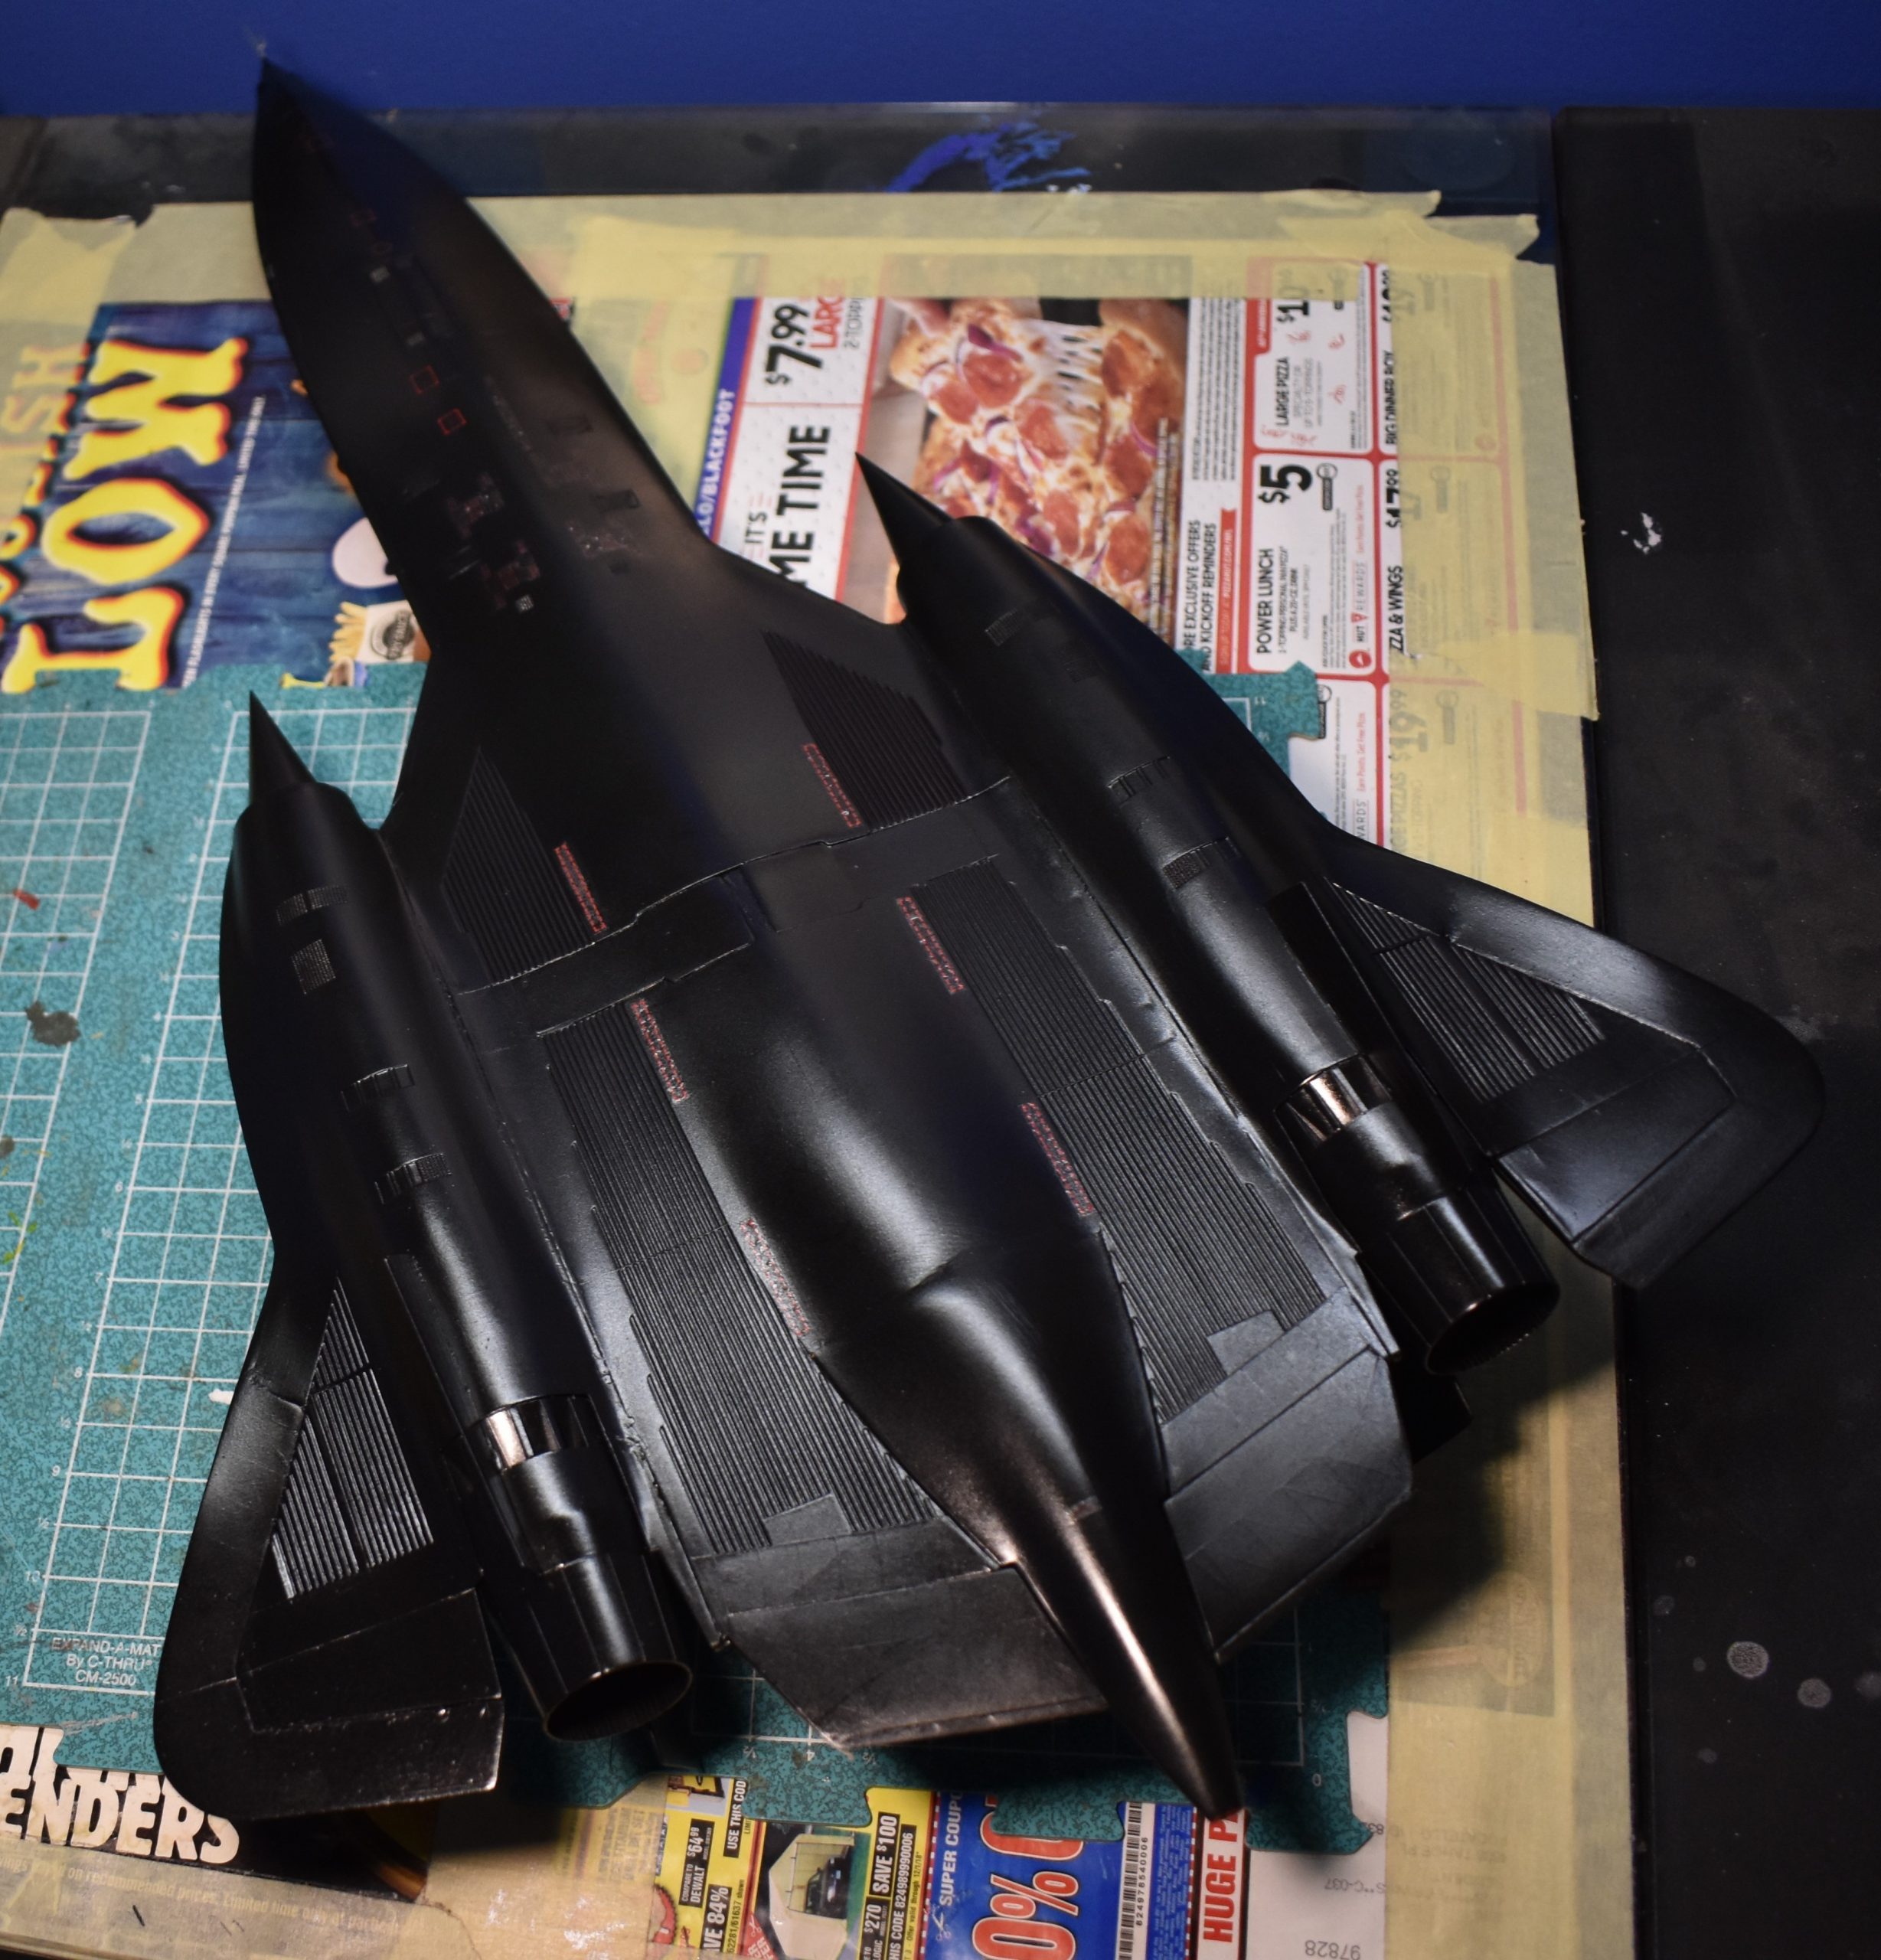
I learned that if you follow the instructions and attach the rudders to the nacelles first, you will have problems attaching the afterburners. Attach the afterburners before attaching the rudders. I glued the intake spike (shock cone) behind the mounting point as I was building it to represent being in-flight. The shock-cone retracts into the nacelle allowing the Blackbird to fly faster.
Dry fitting reveals a major problem.
Another problem is that the mounting holes in the center section are too small to allow the nacelles to fit. Even after hollowing them out, and thinning the posts on the nacelles, I still ended up with stress cracks on the center section.
Even after surgery to make the parts fit, stress cracks appeared.
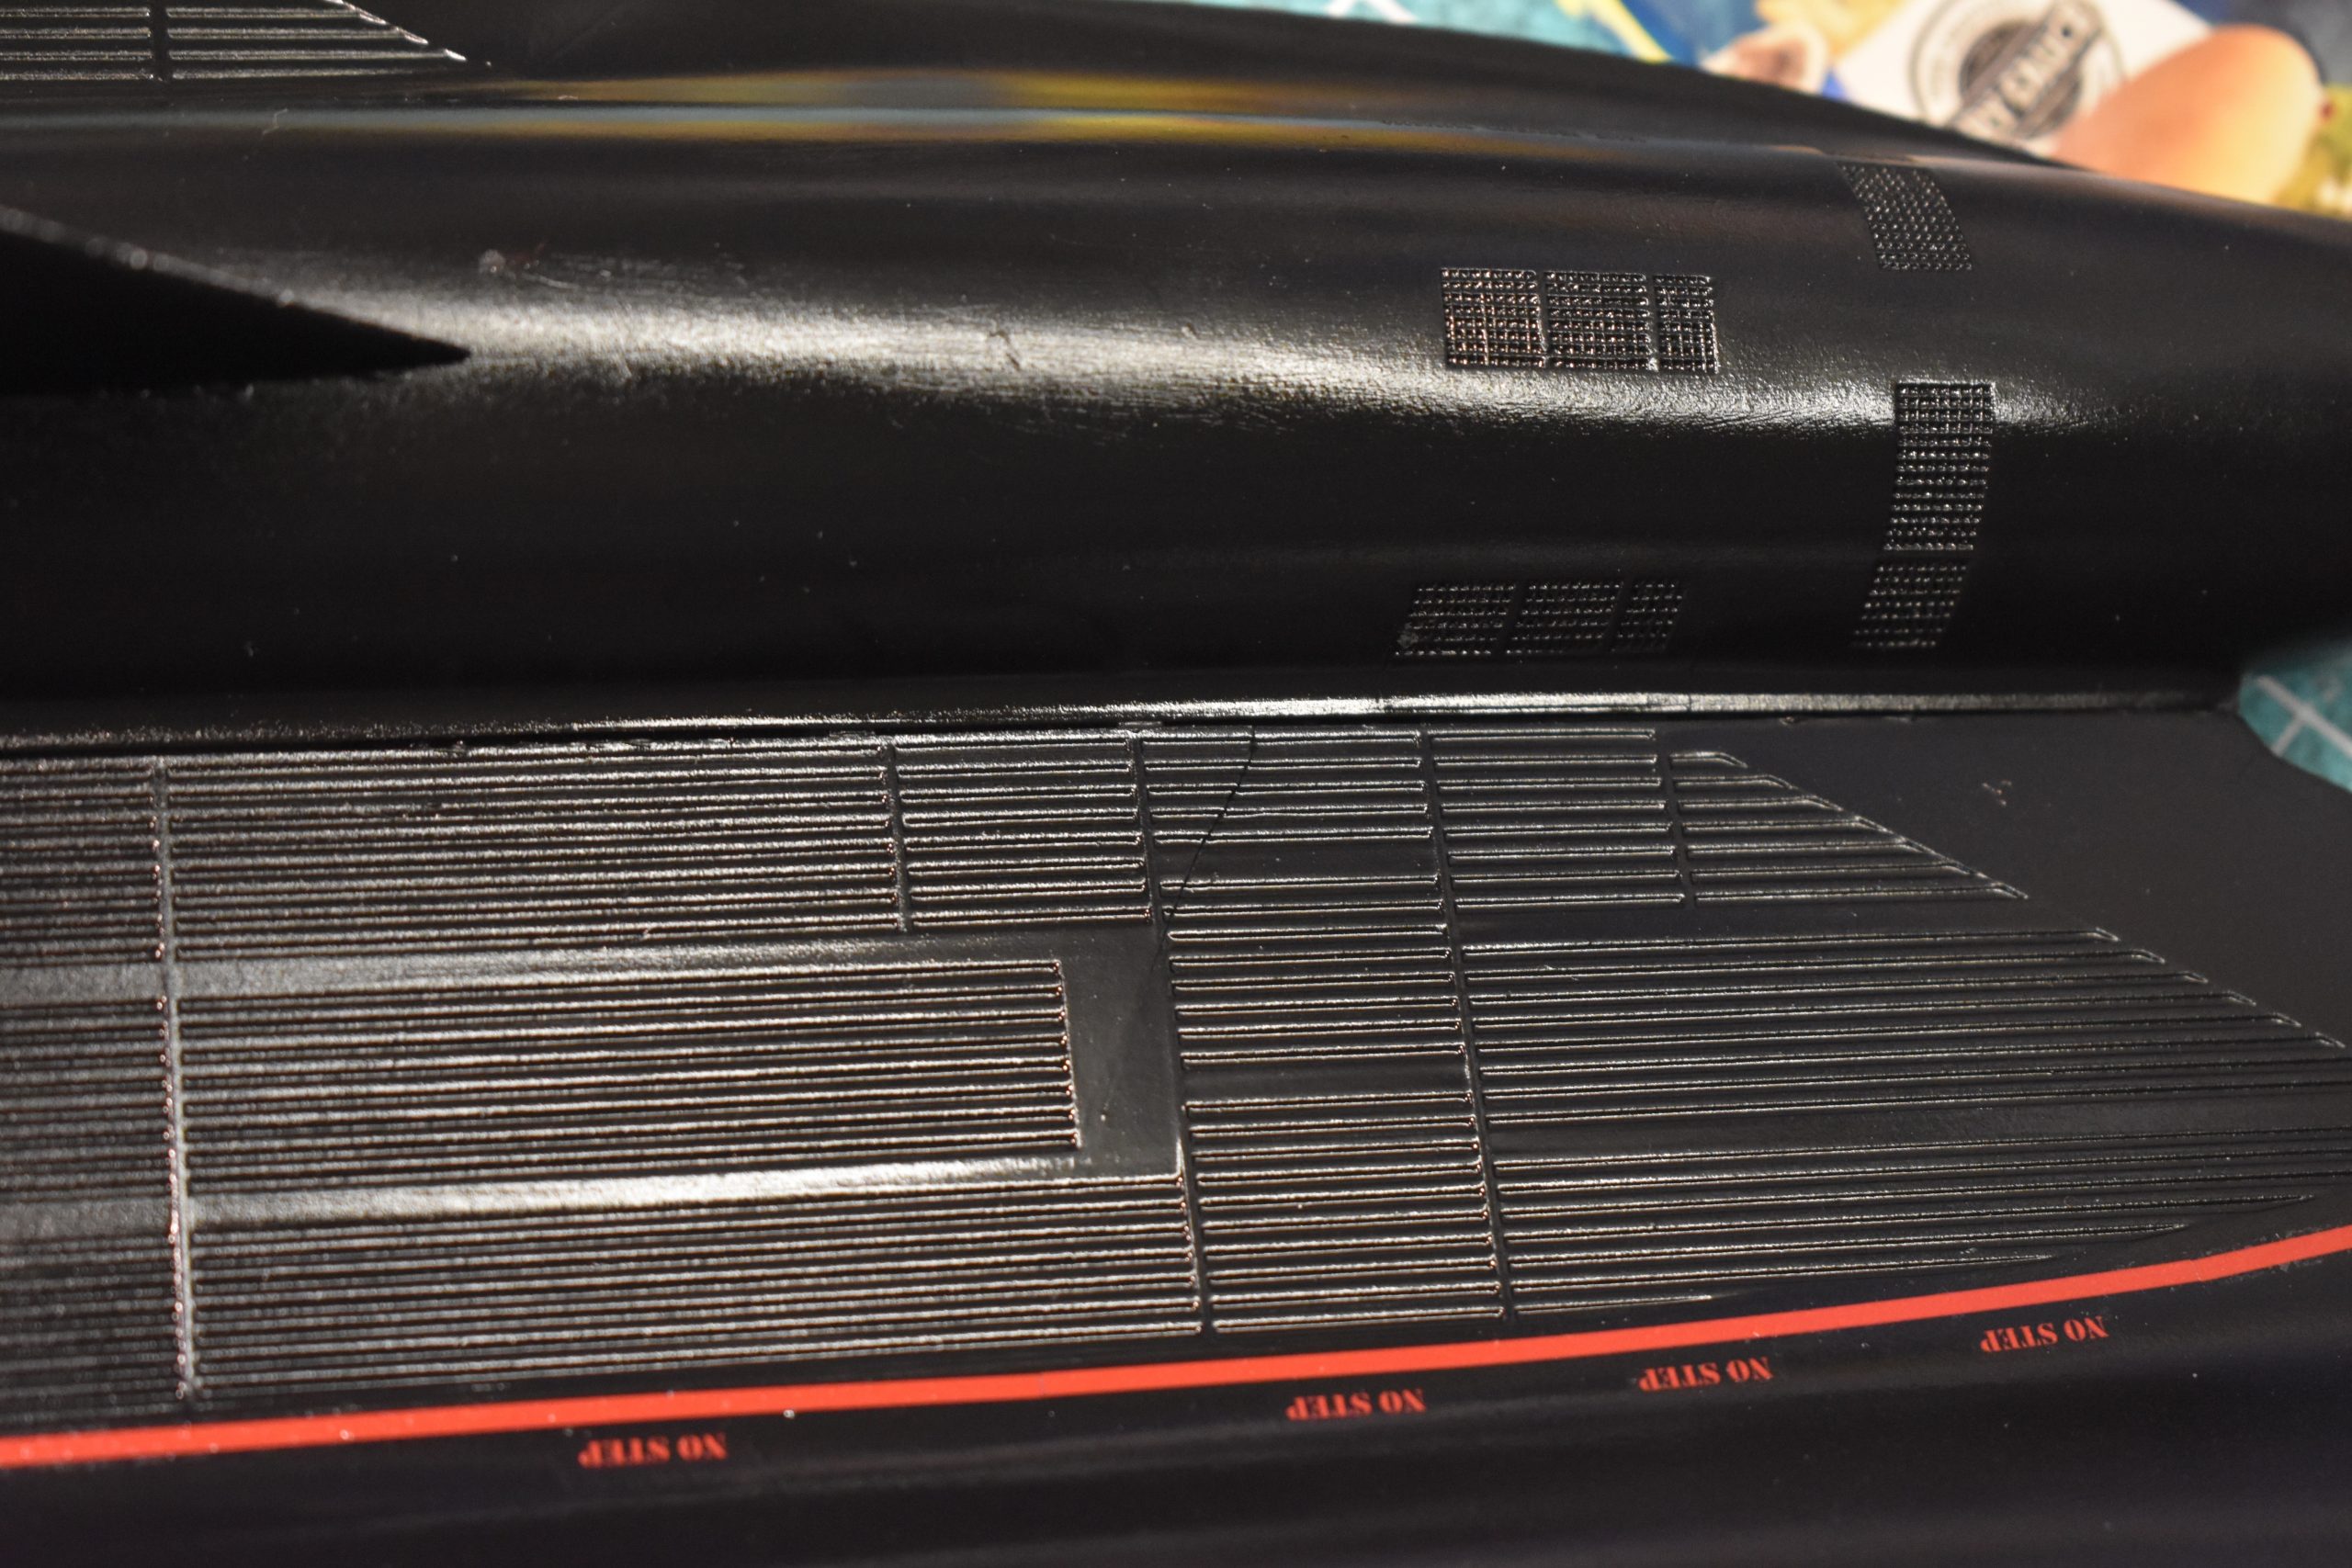
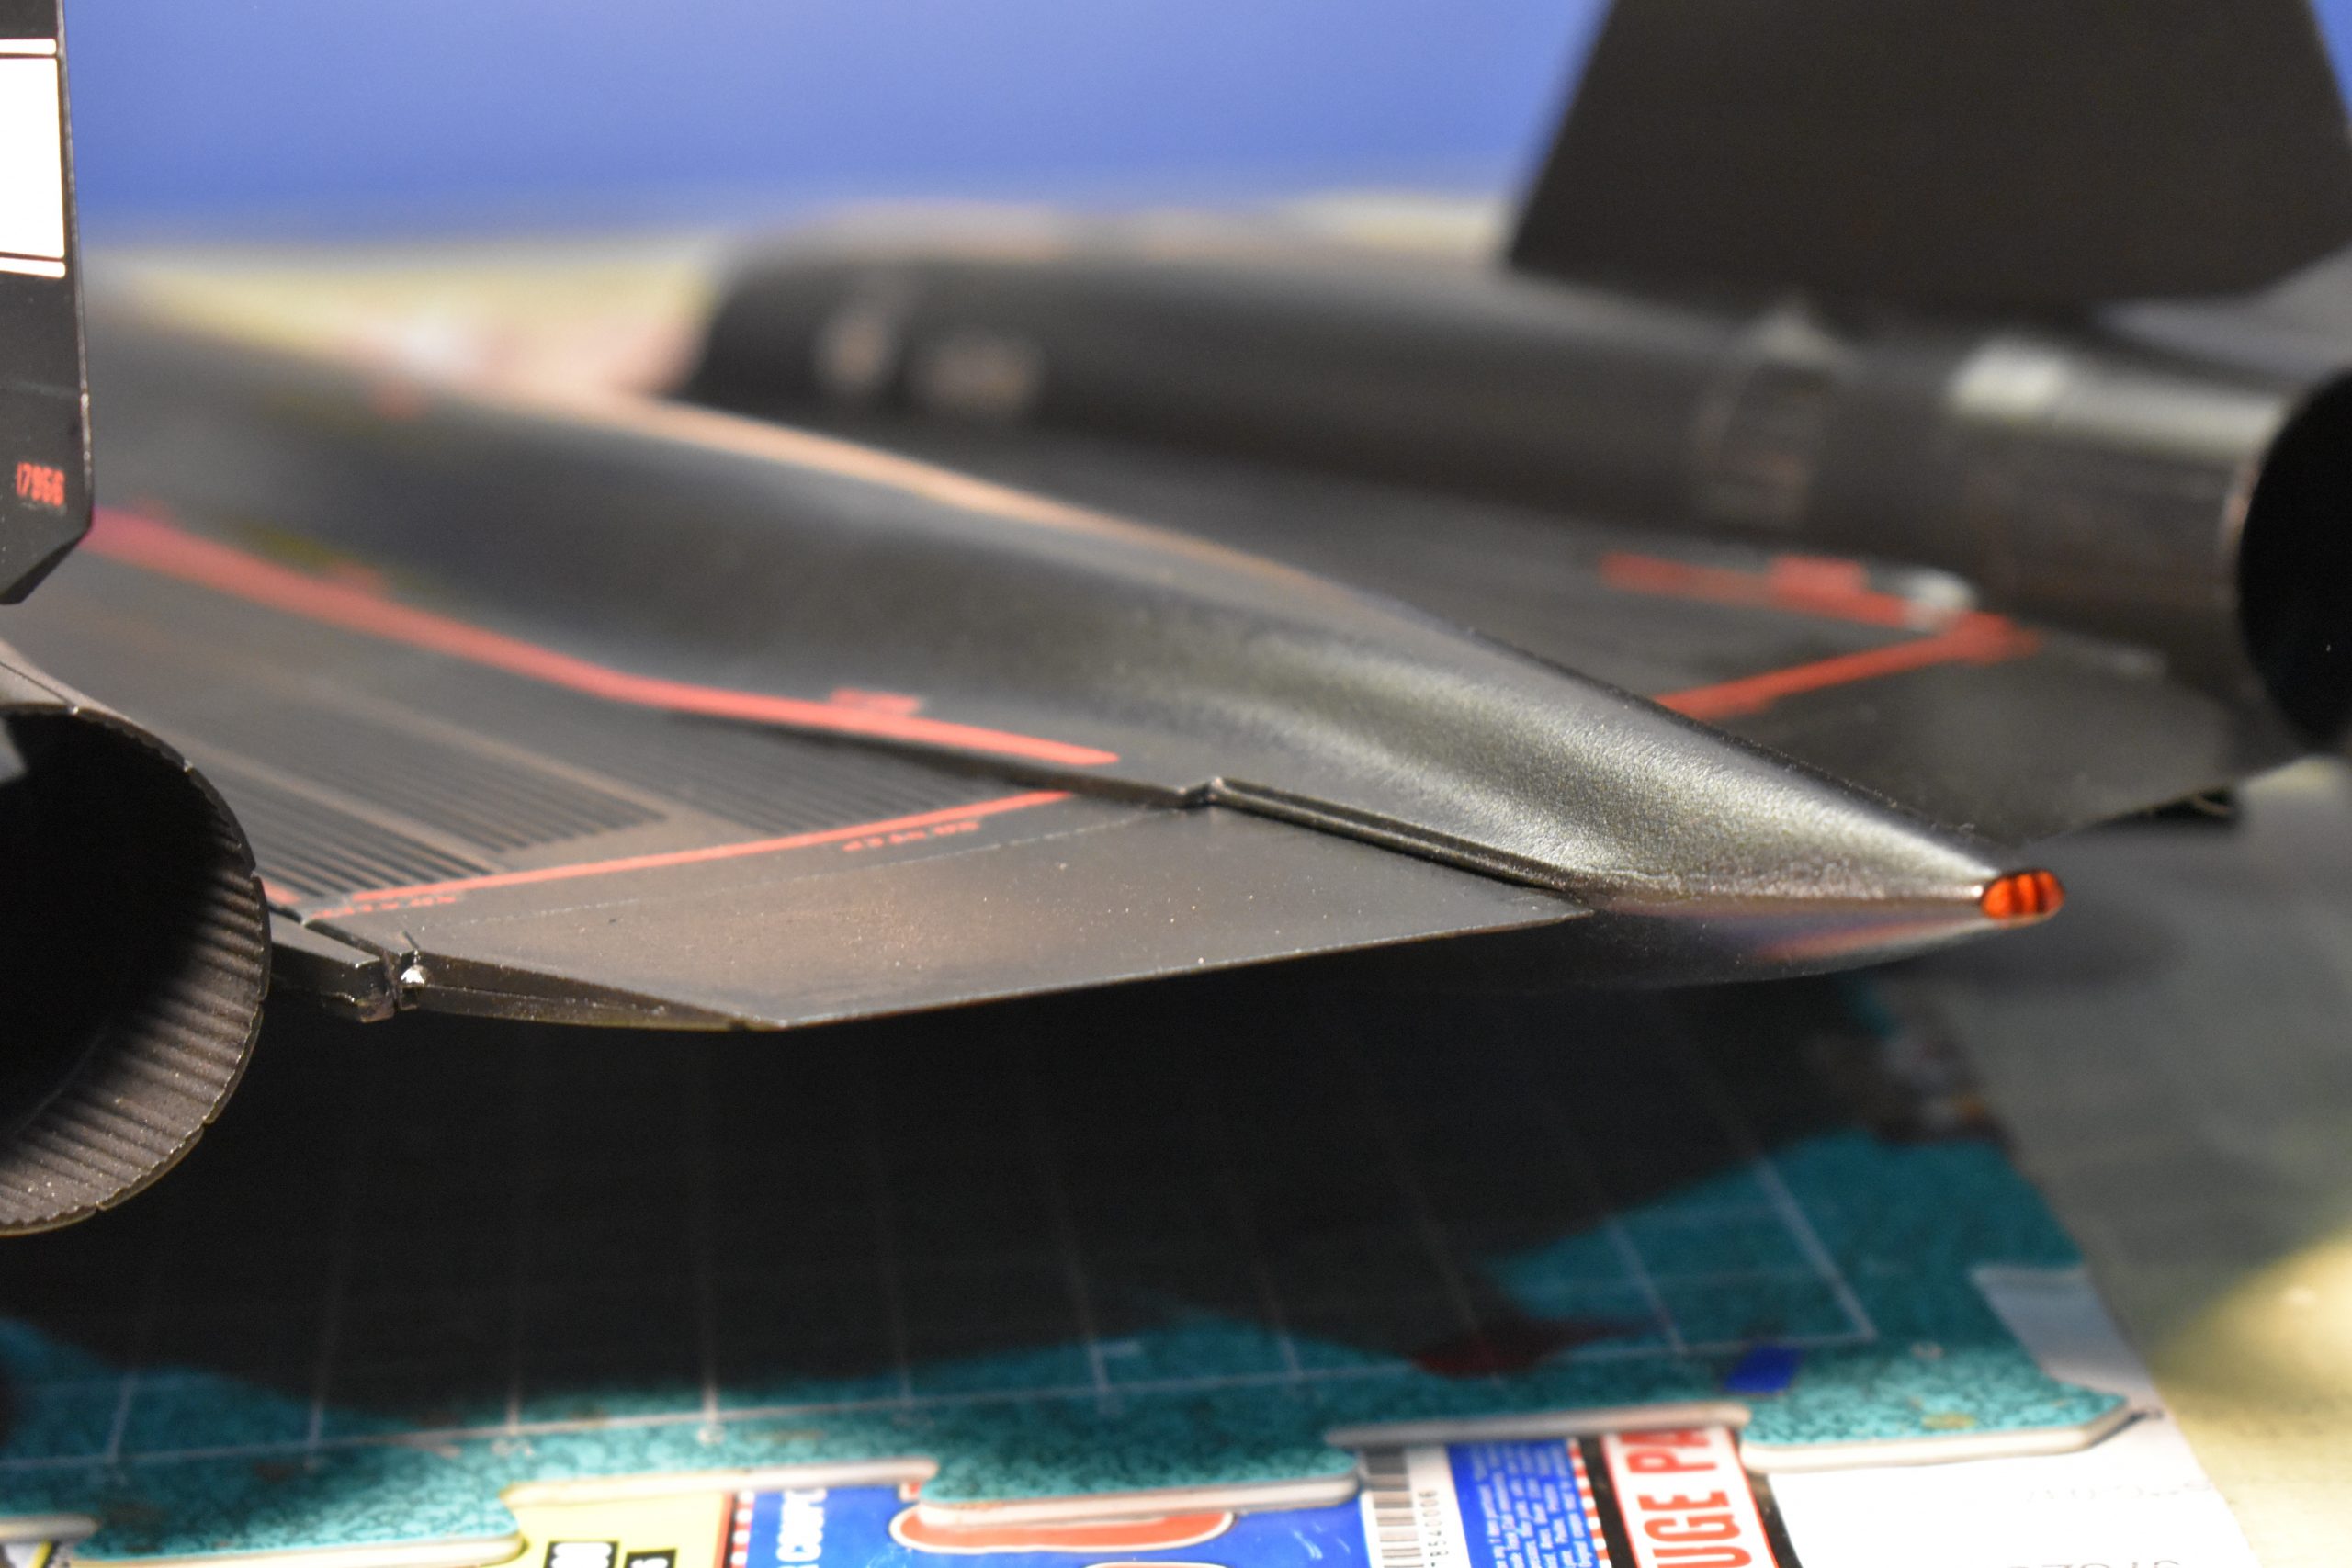
Lack of mounting stubs caused the rear part of the wing to droop. Testors does not replicate the fuel dump, I tried by filing the pointy end flat and using paint.
For some reason Testors did not model the prominent fuel dump at the back of the Blackbird. I decided to flatten the pointy end and then use red paint to represent the fuel dump. Most photos of the rear-end of SR-71s show the inside of the fuel dump was painted red.
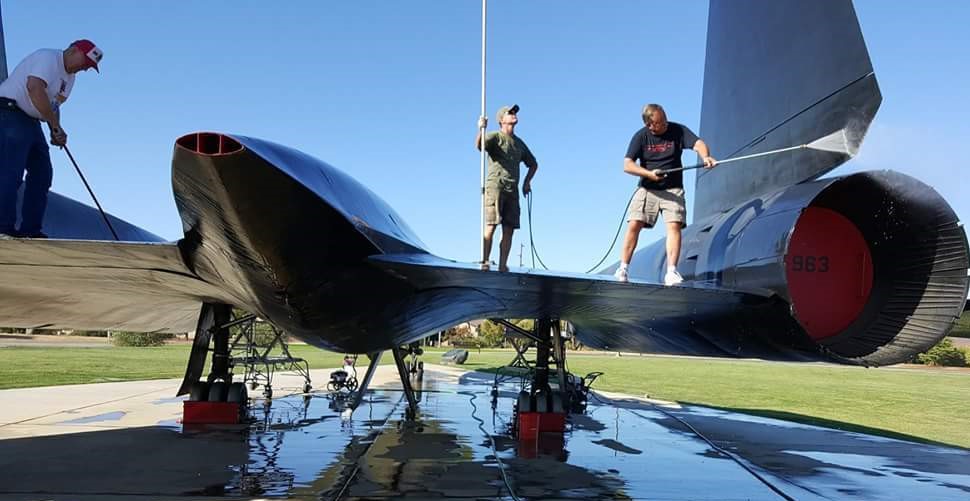
An SR-71 gate-guard on Beale AFB, California, showing the red painted fuel dump. USAF photo, 26JAN2016.
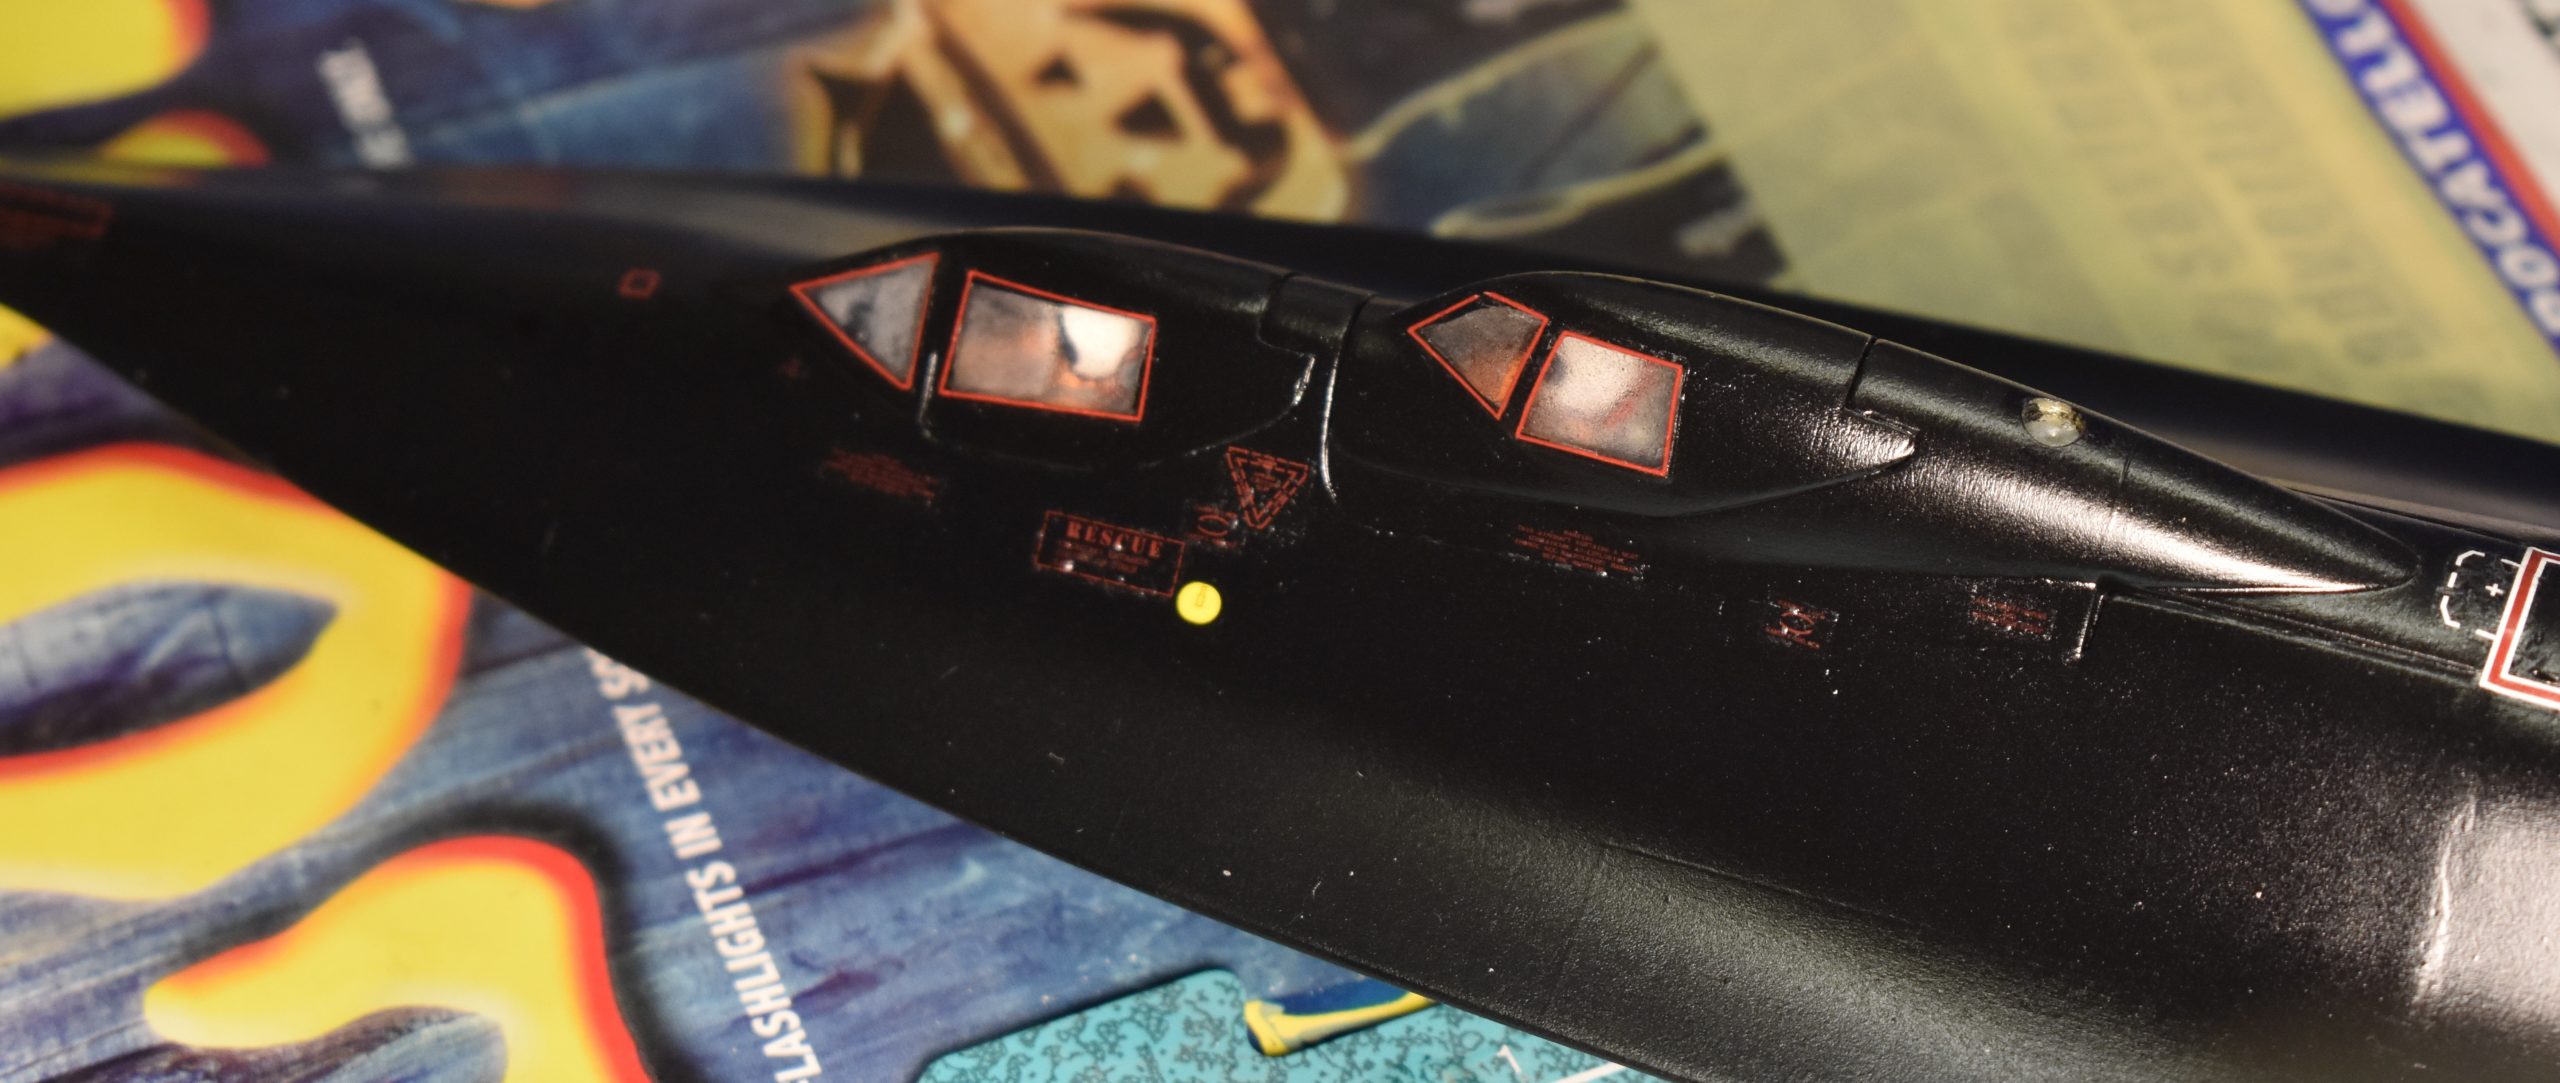
The kit does not come with pilots, using putty I modified some old Monogram pilots to look like astronauts, but then discovered the seats wouldn’t allow them to fit. I had to chop off the pilot’s feet, butts and part of their backs to get them to fit.
I modified some spare Monogram pilots. Turns out the red borders around the canopy glazing are incorrect, and the clear I used to get them to stay down fogged the canopies.
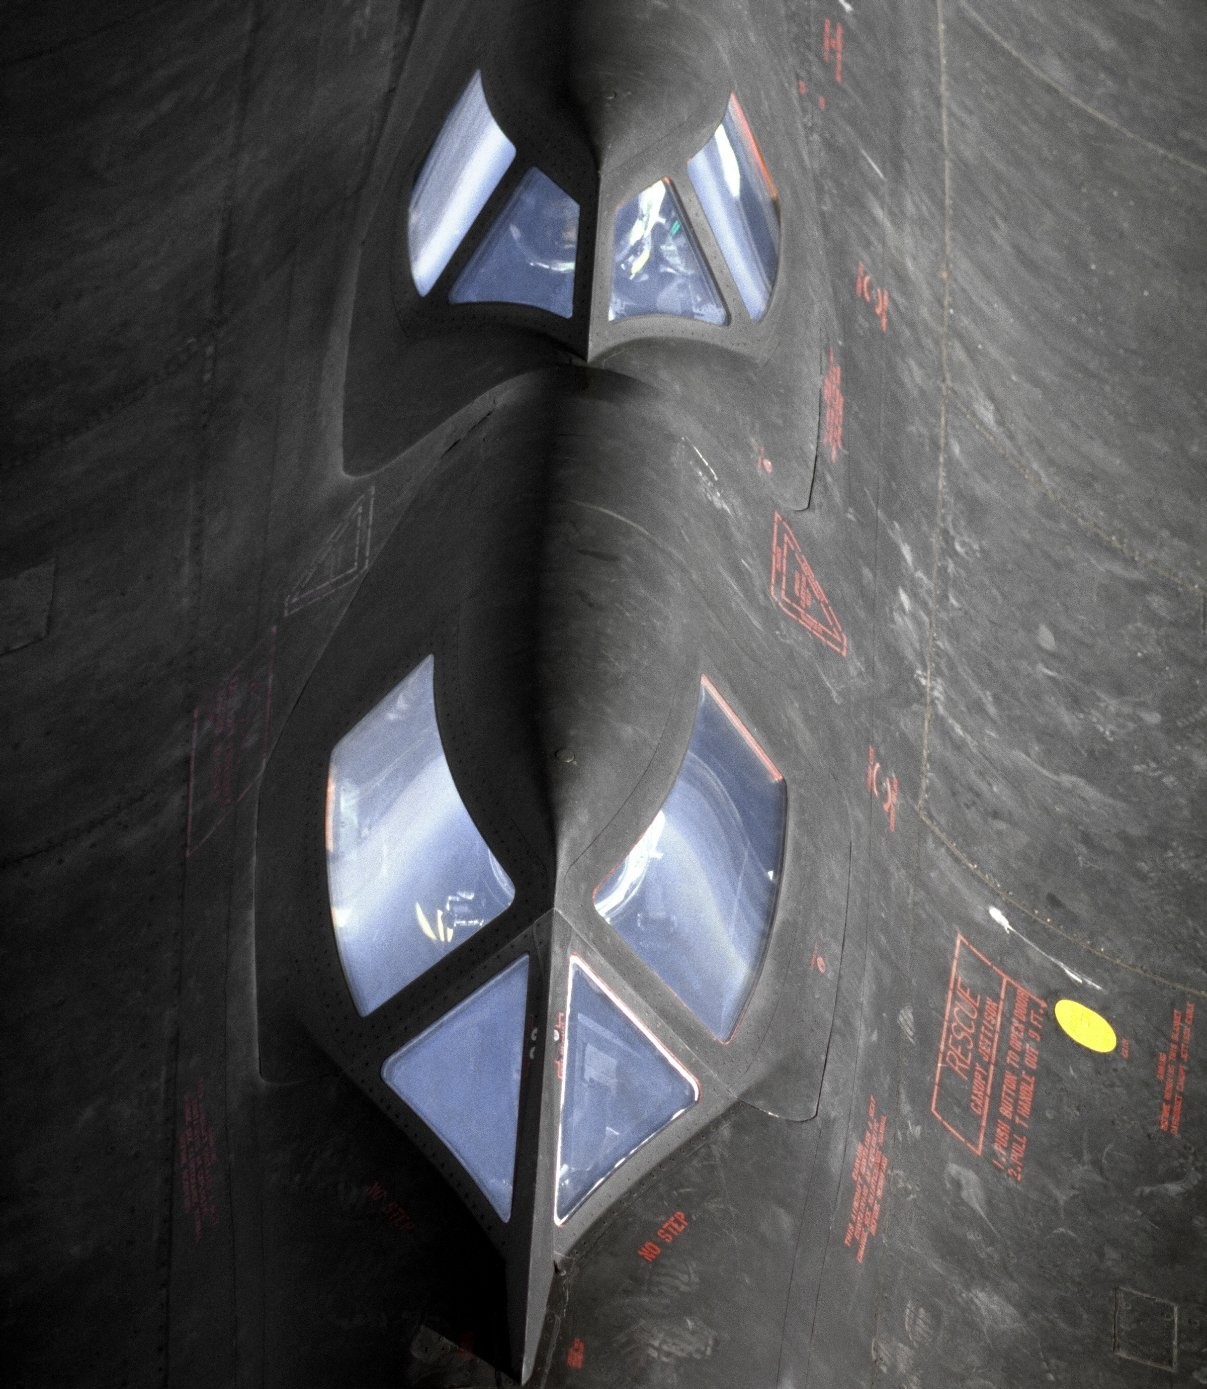
Forget those red canopy border decals, they are flat wrong. While reviewing photos (unfortunately after I applied the decals) I noticed there are no red borders. At certain angles it might look like there are, but the red that is sometimes seen around the glazing is actually the seals inside the canopy framing.
In this close-up of NASA SR-71B 831, you can see there are no red borders around the canopies. What is red are the seals inside the canopy framing. NASA photo, December 1994.
It was in the Caracal-Cartograf Blackbird Part-2 decal set that I discovered the markings for NASA 831.
You might not can see, but even a coat of clear paint failed to force the aftermarket decals to lay flat on the underside of the Blackbird.
Even expensive (almost as much as what I paid for the Testors kit back in 1997) aftermarket decals can be wrong (like the red canopy borders), and not cooperate. For some reason not known to me, the decals would not settle down on the underside of the kit. Decal solution failed to keep the decals from wrinkling. I applied clear paint and the result was no more wrinkles, instead I got blisters which hardened when the paint dried.
NASA photo of 831, sometime in 1995.
831 cruises over the Mojave Desert with a NASA F/A-18 Hornet flying safety chase. NASA photo sometime in 1996.
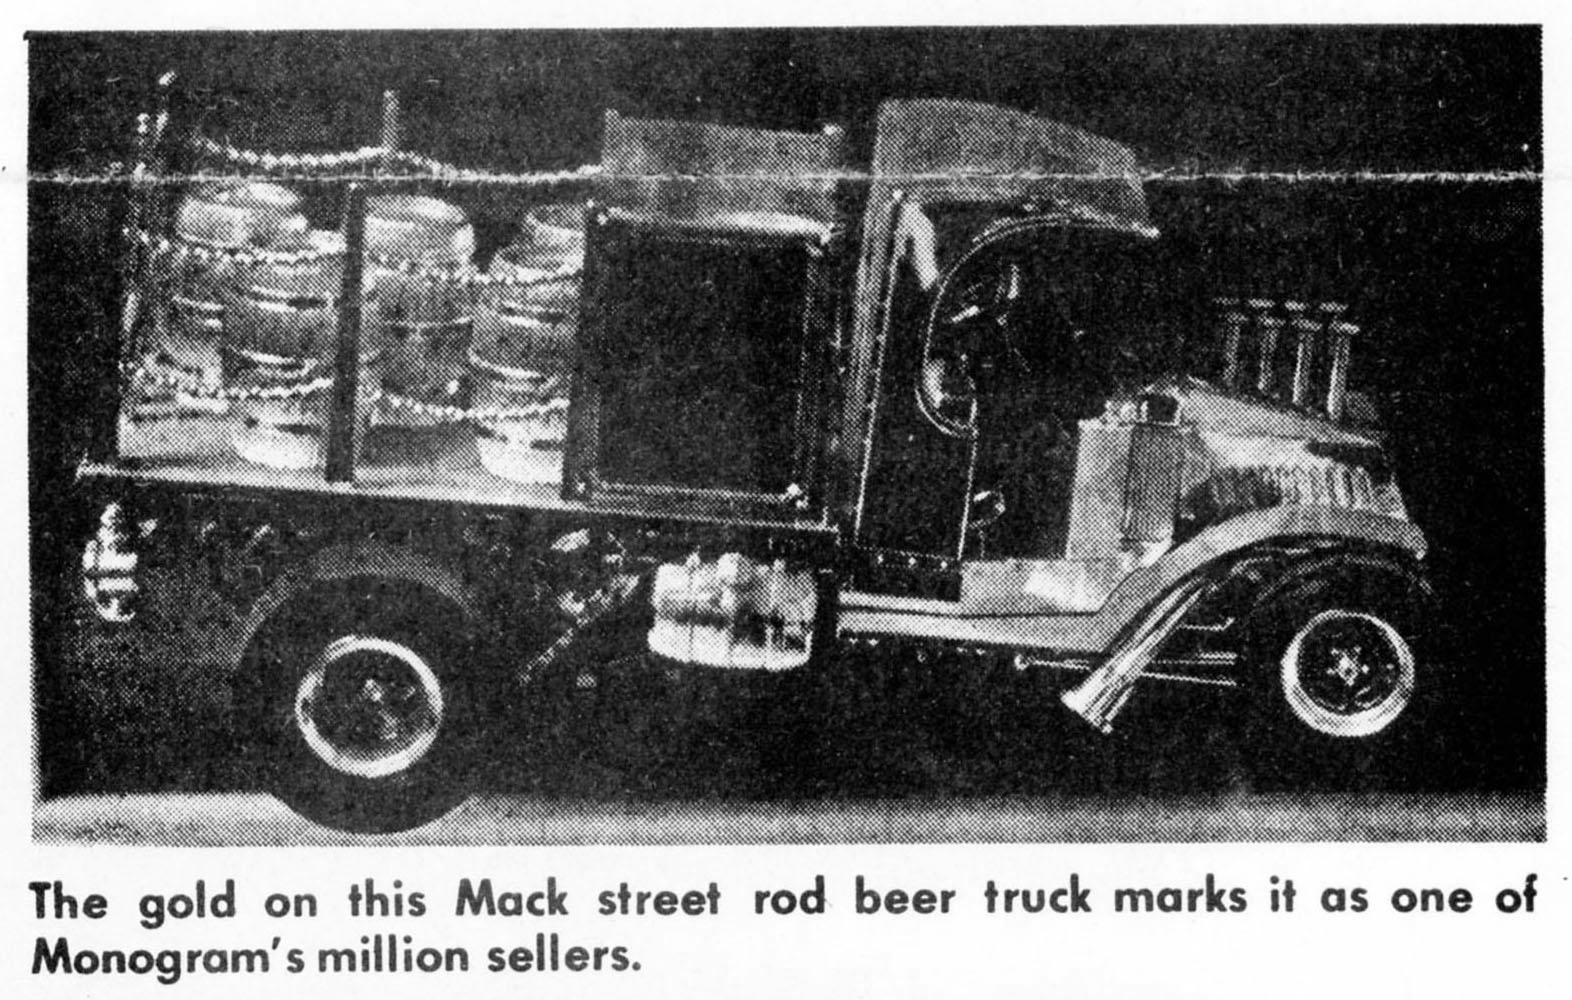
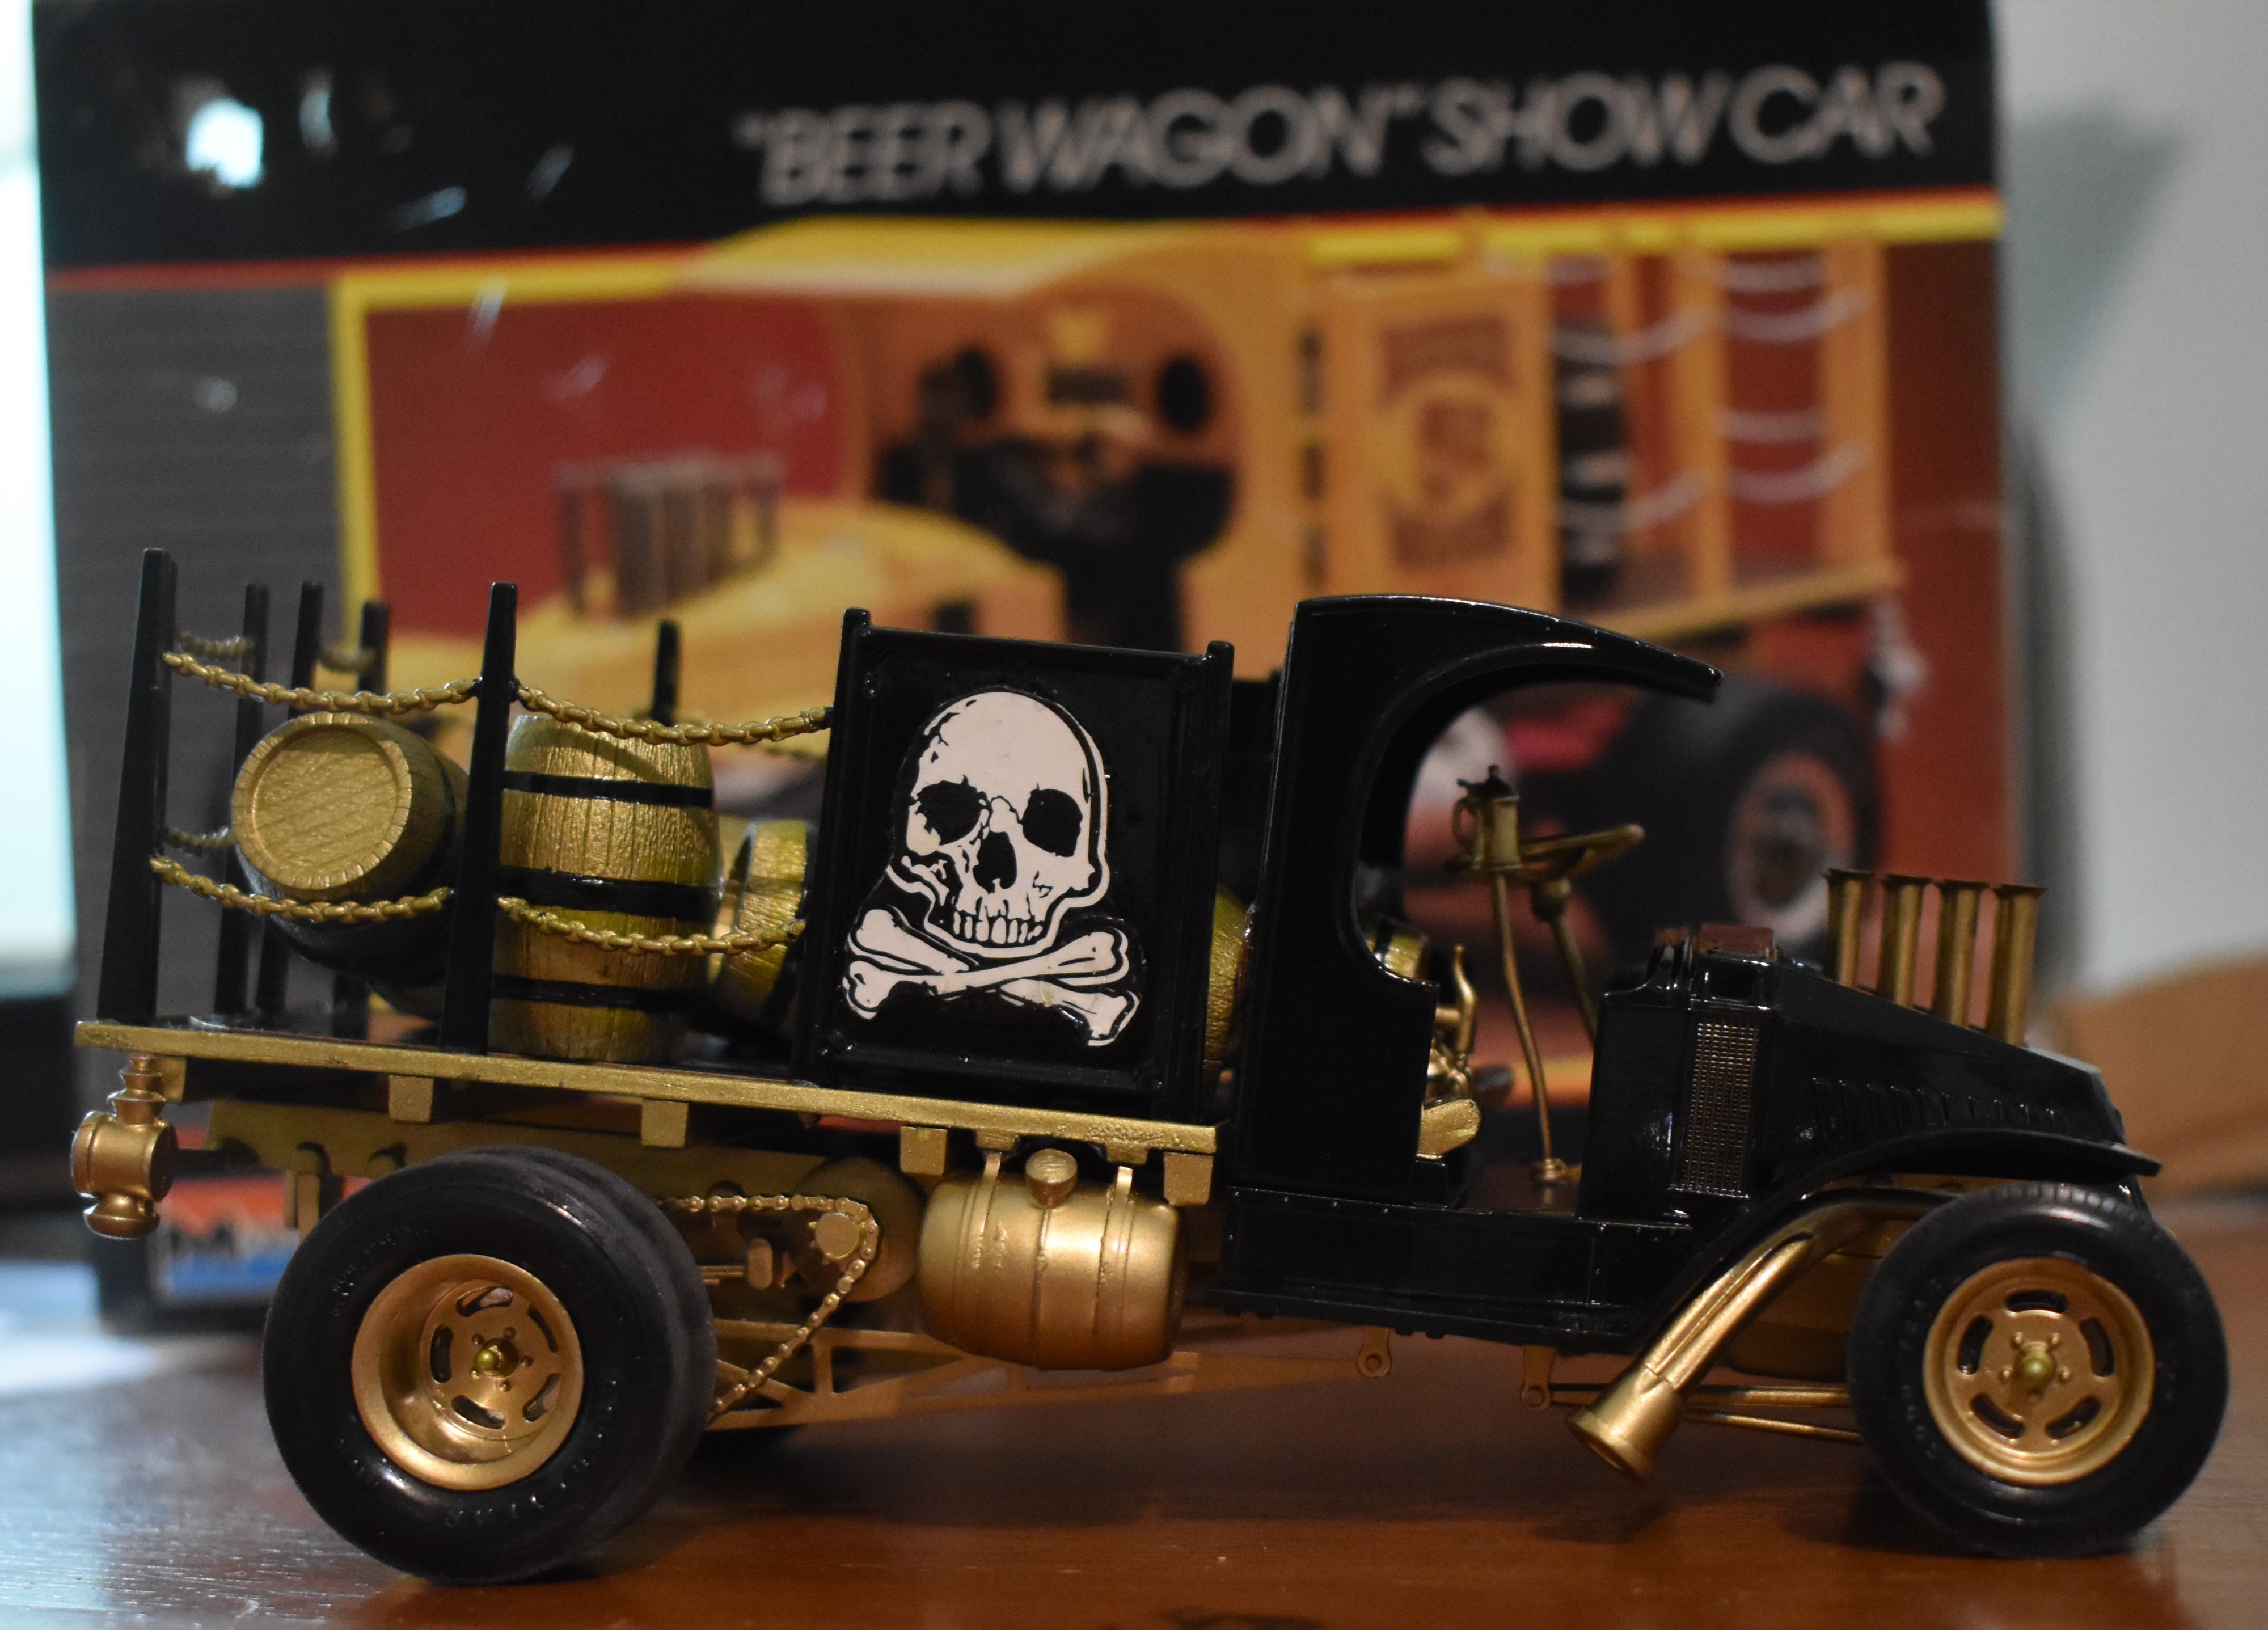
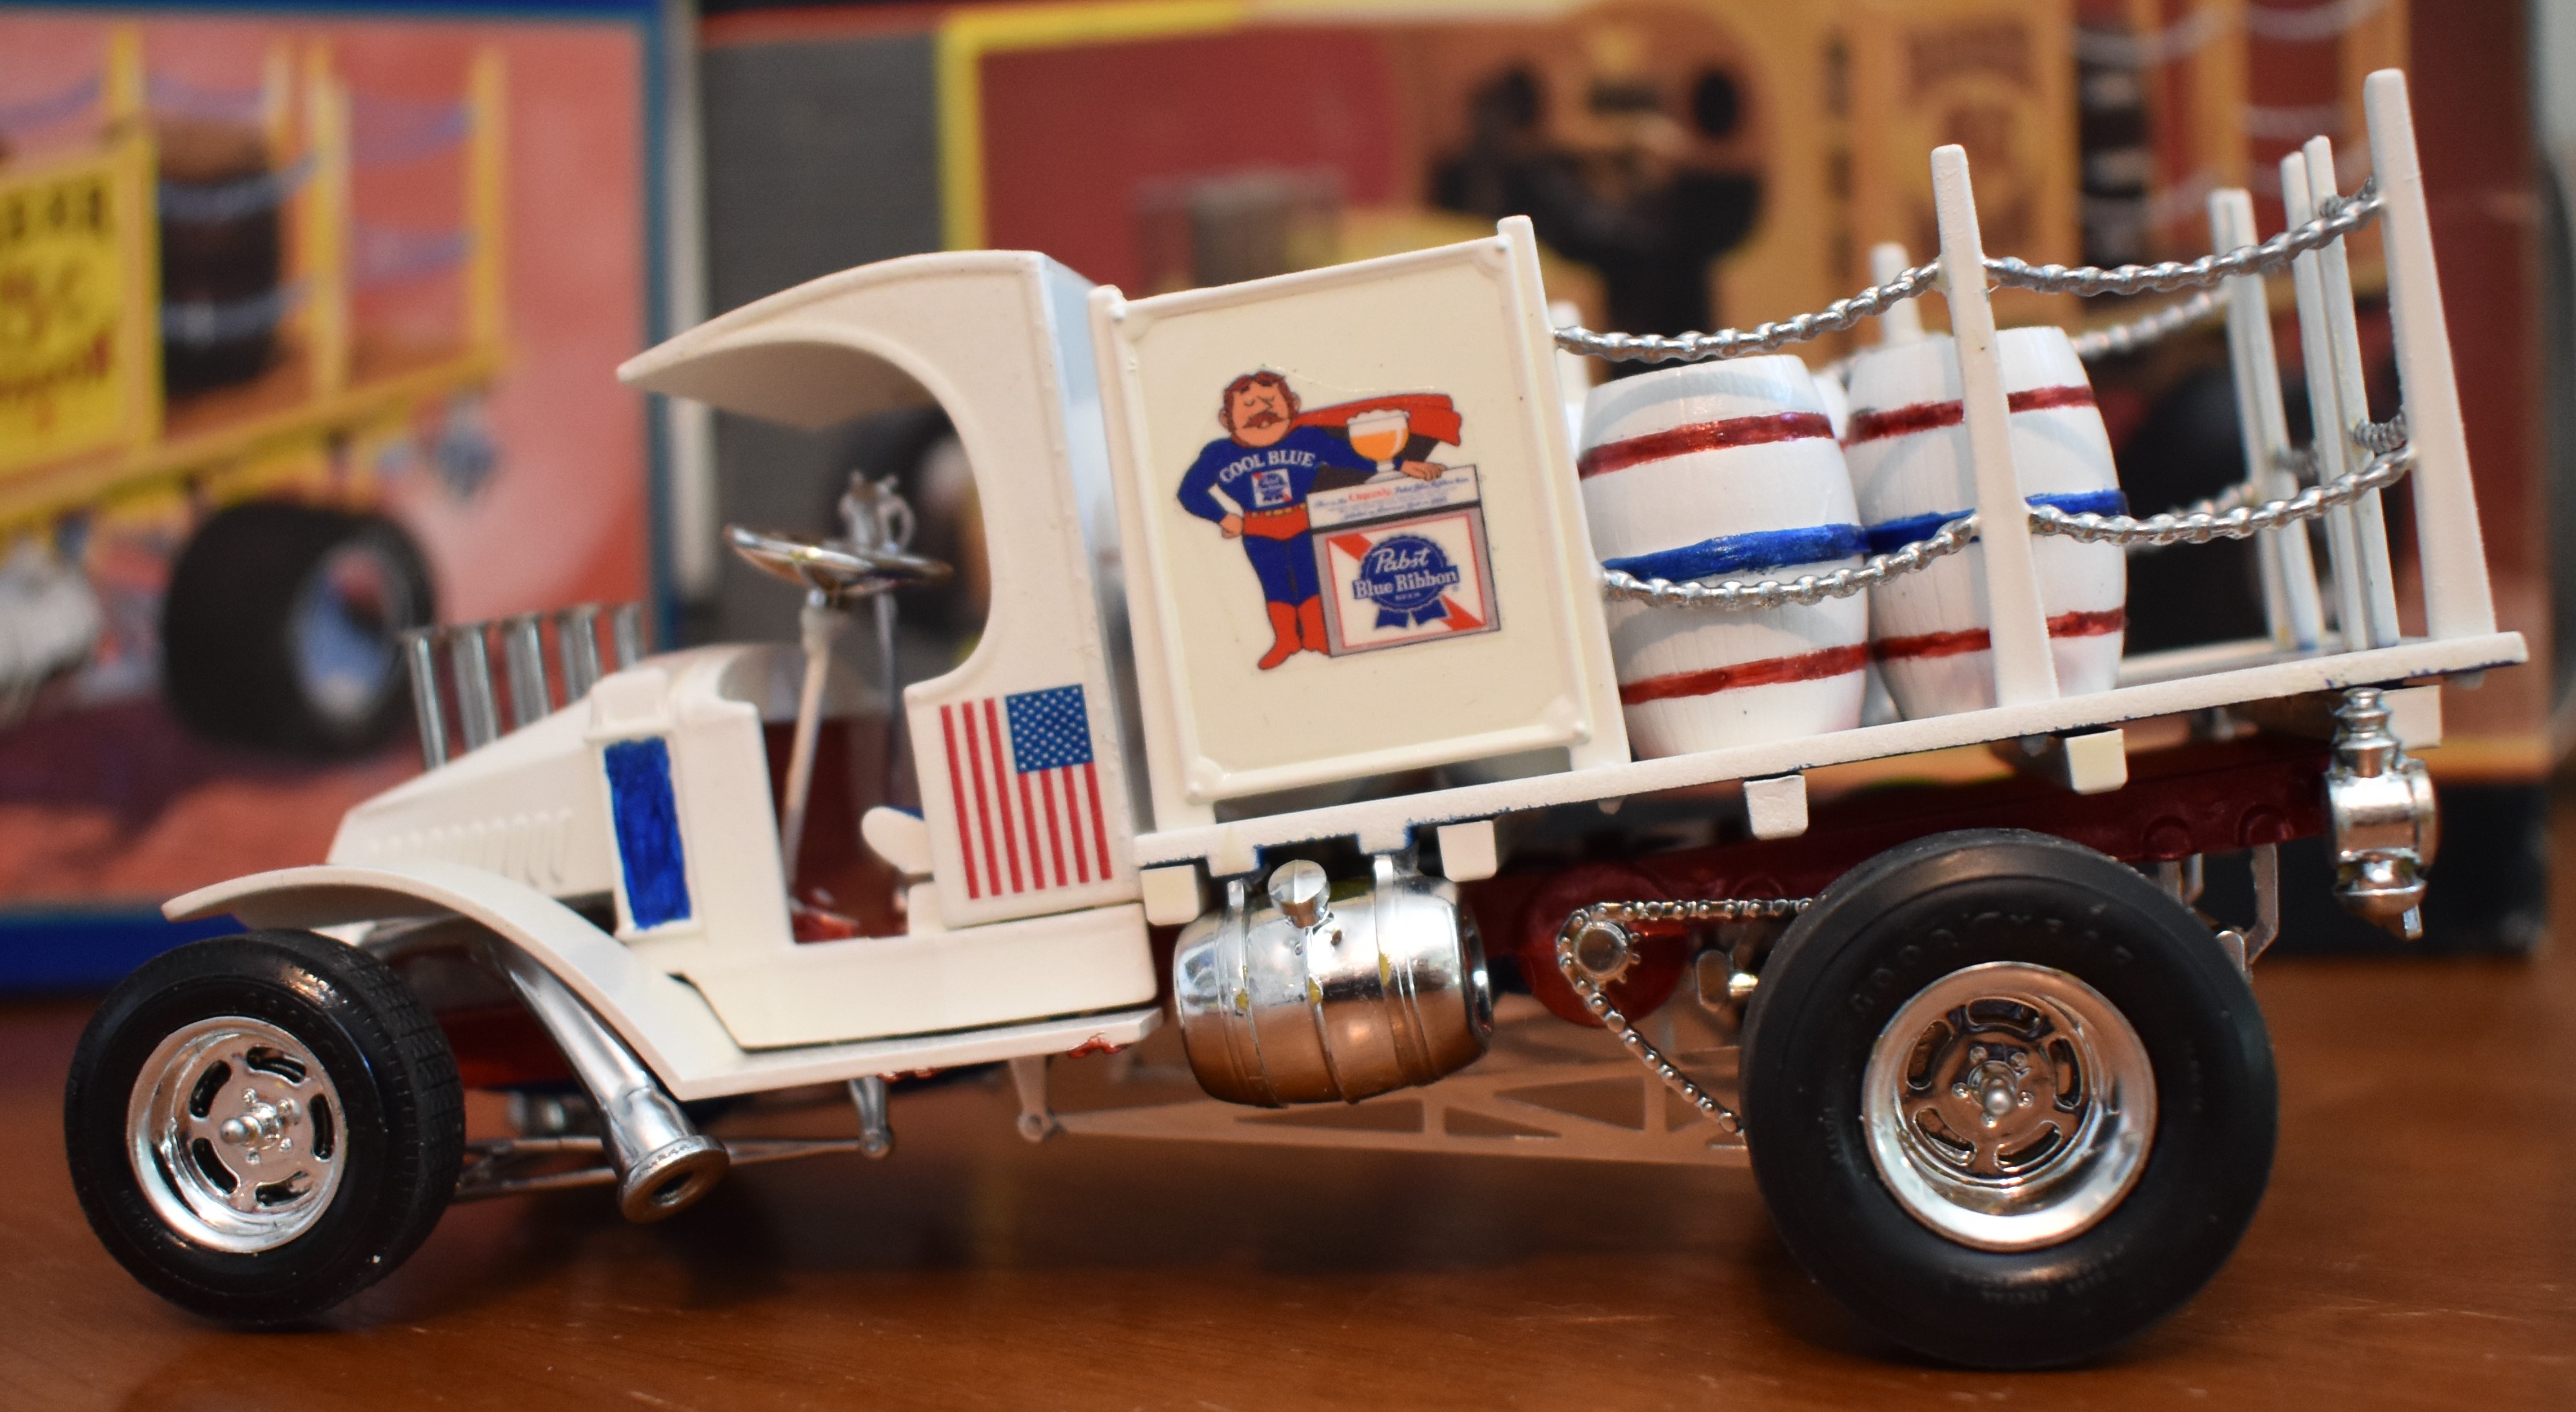
The classic Tom Daniel’s Monogram Beer Wagon (also issued as a Cola Wagon under the Revell-Monogram brand) was first issued in 1967. Apparently, it was last issued in 2016.
Photo by me.
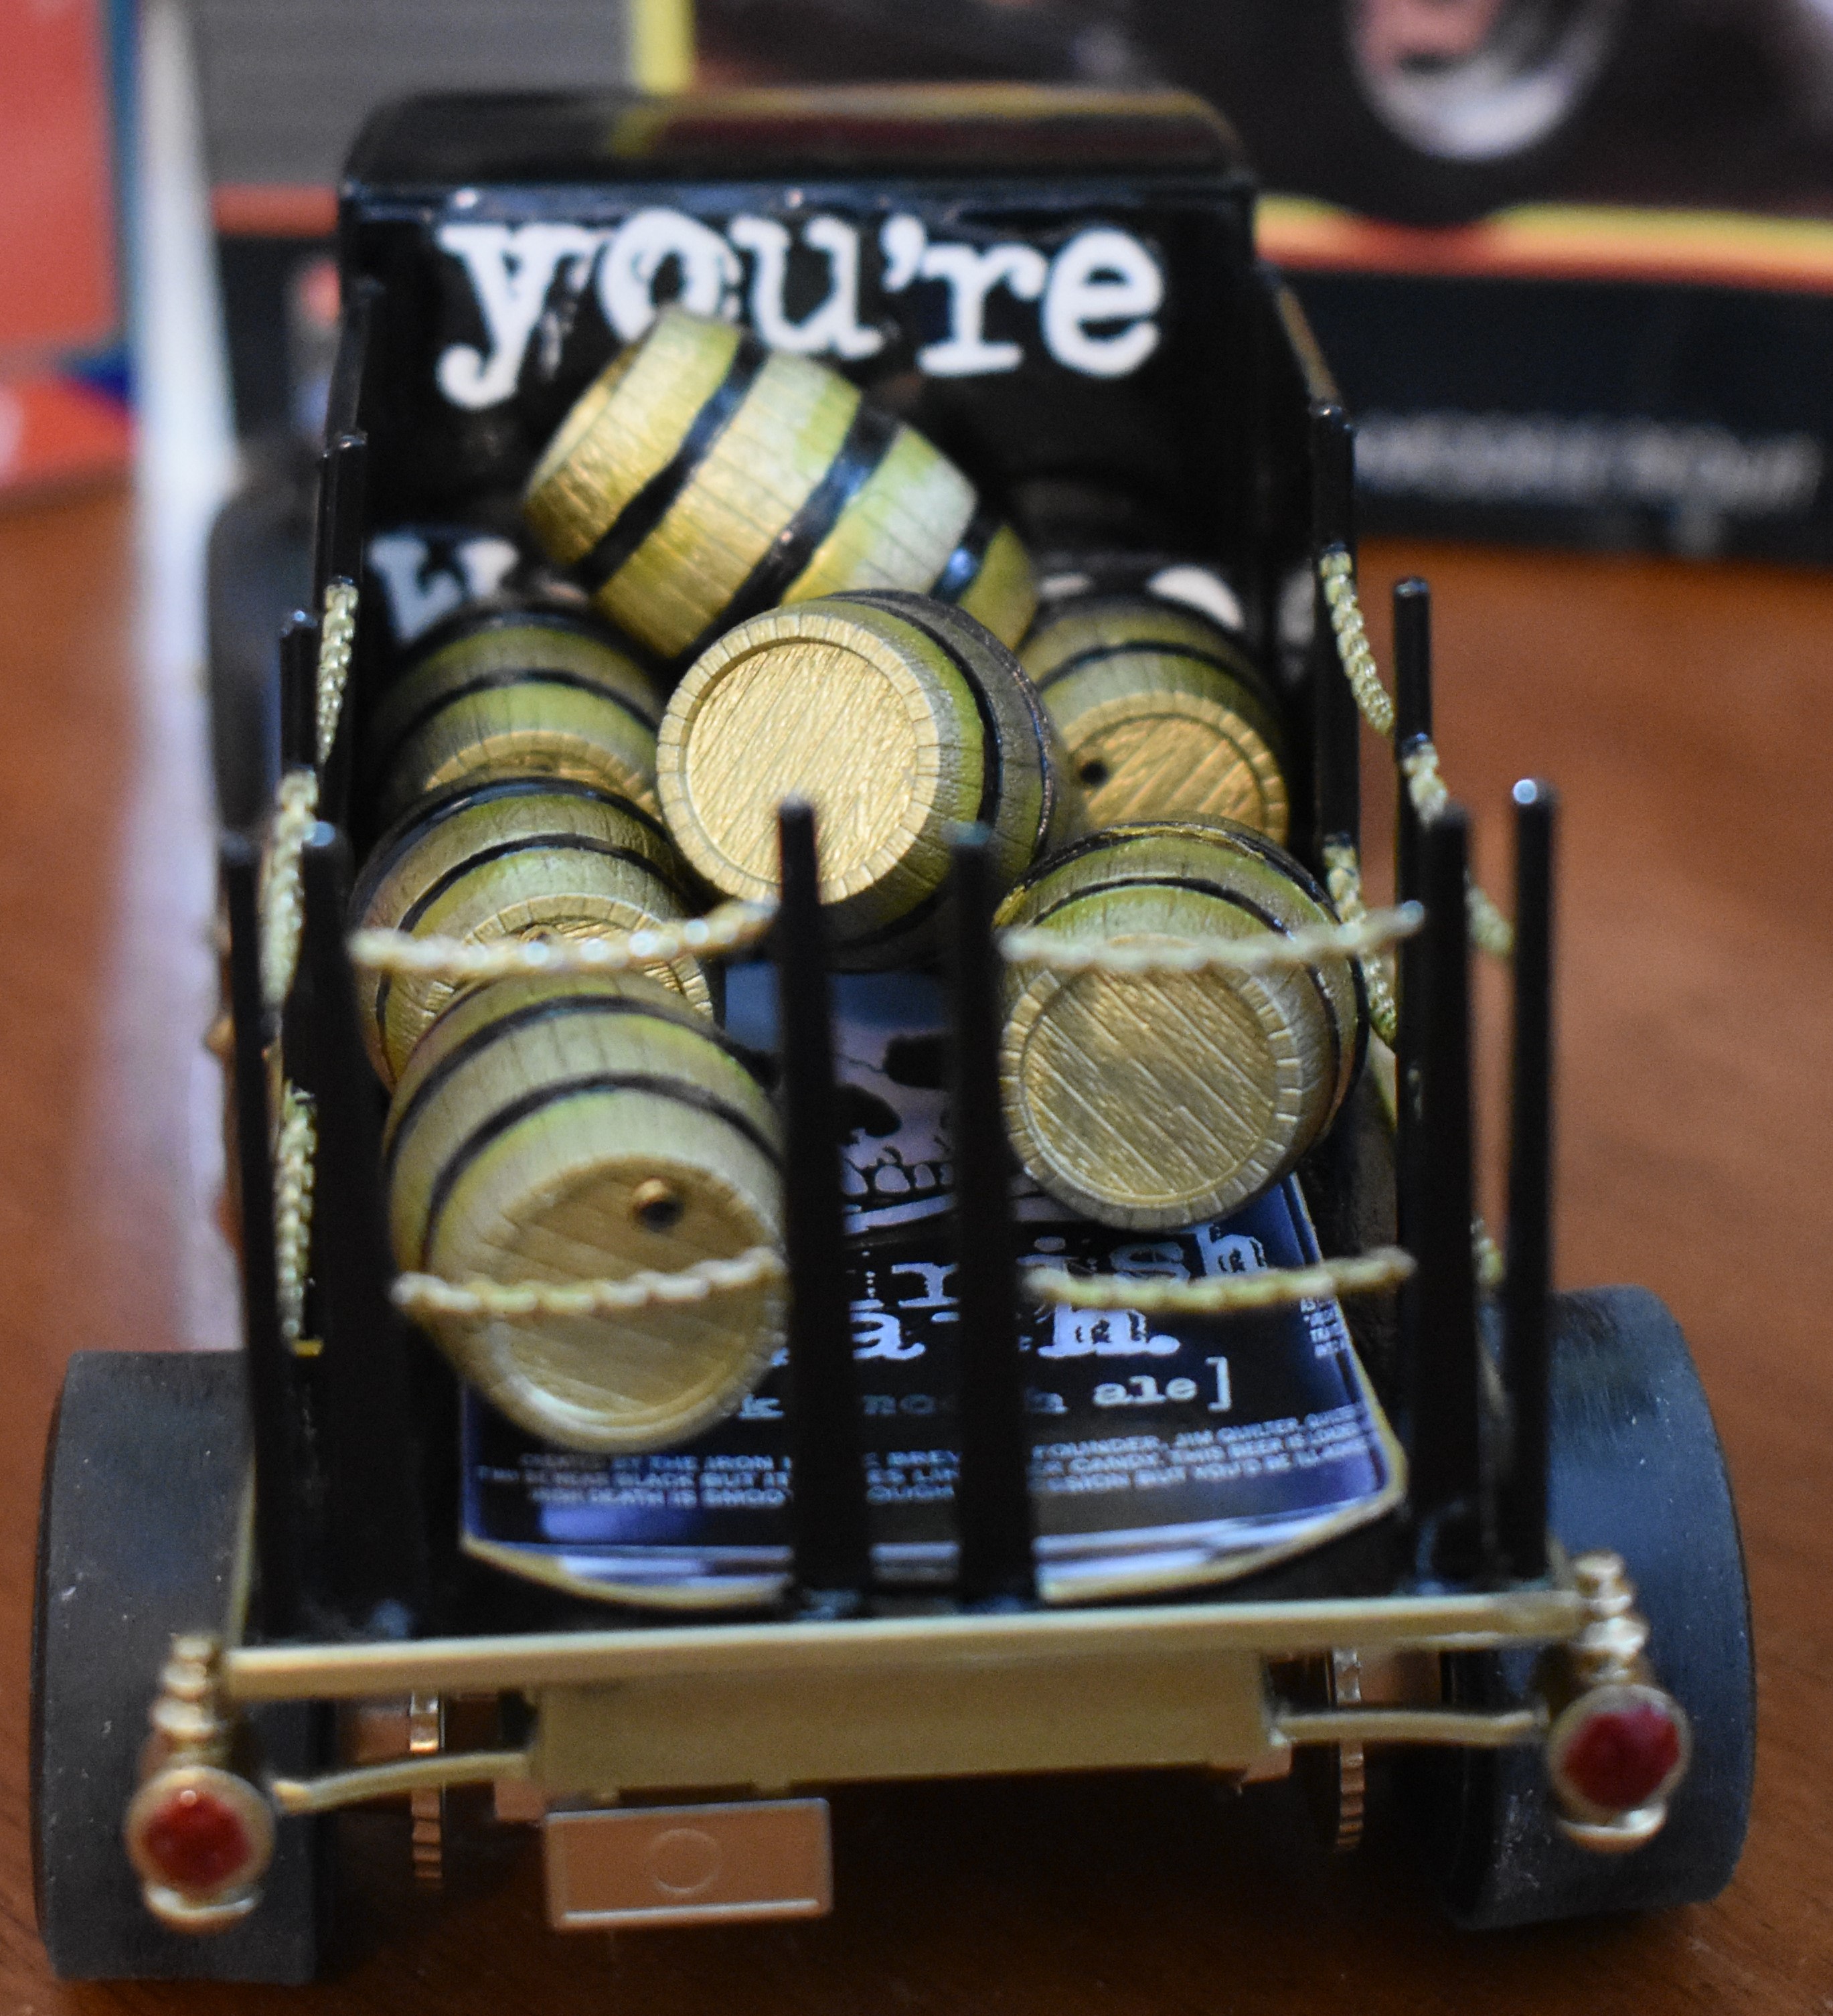
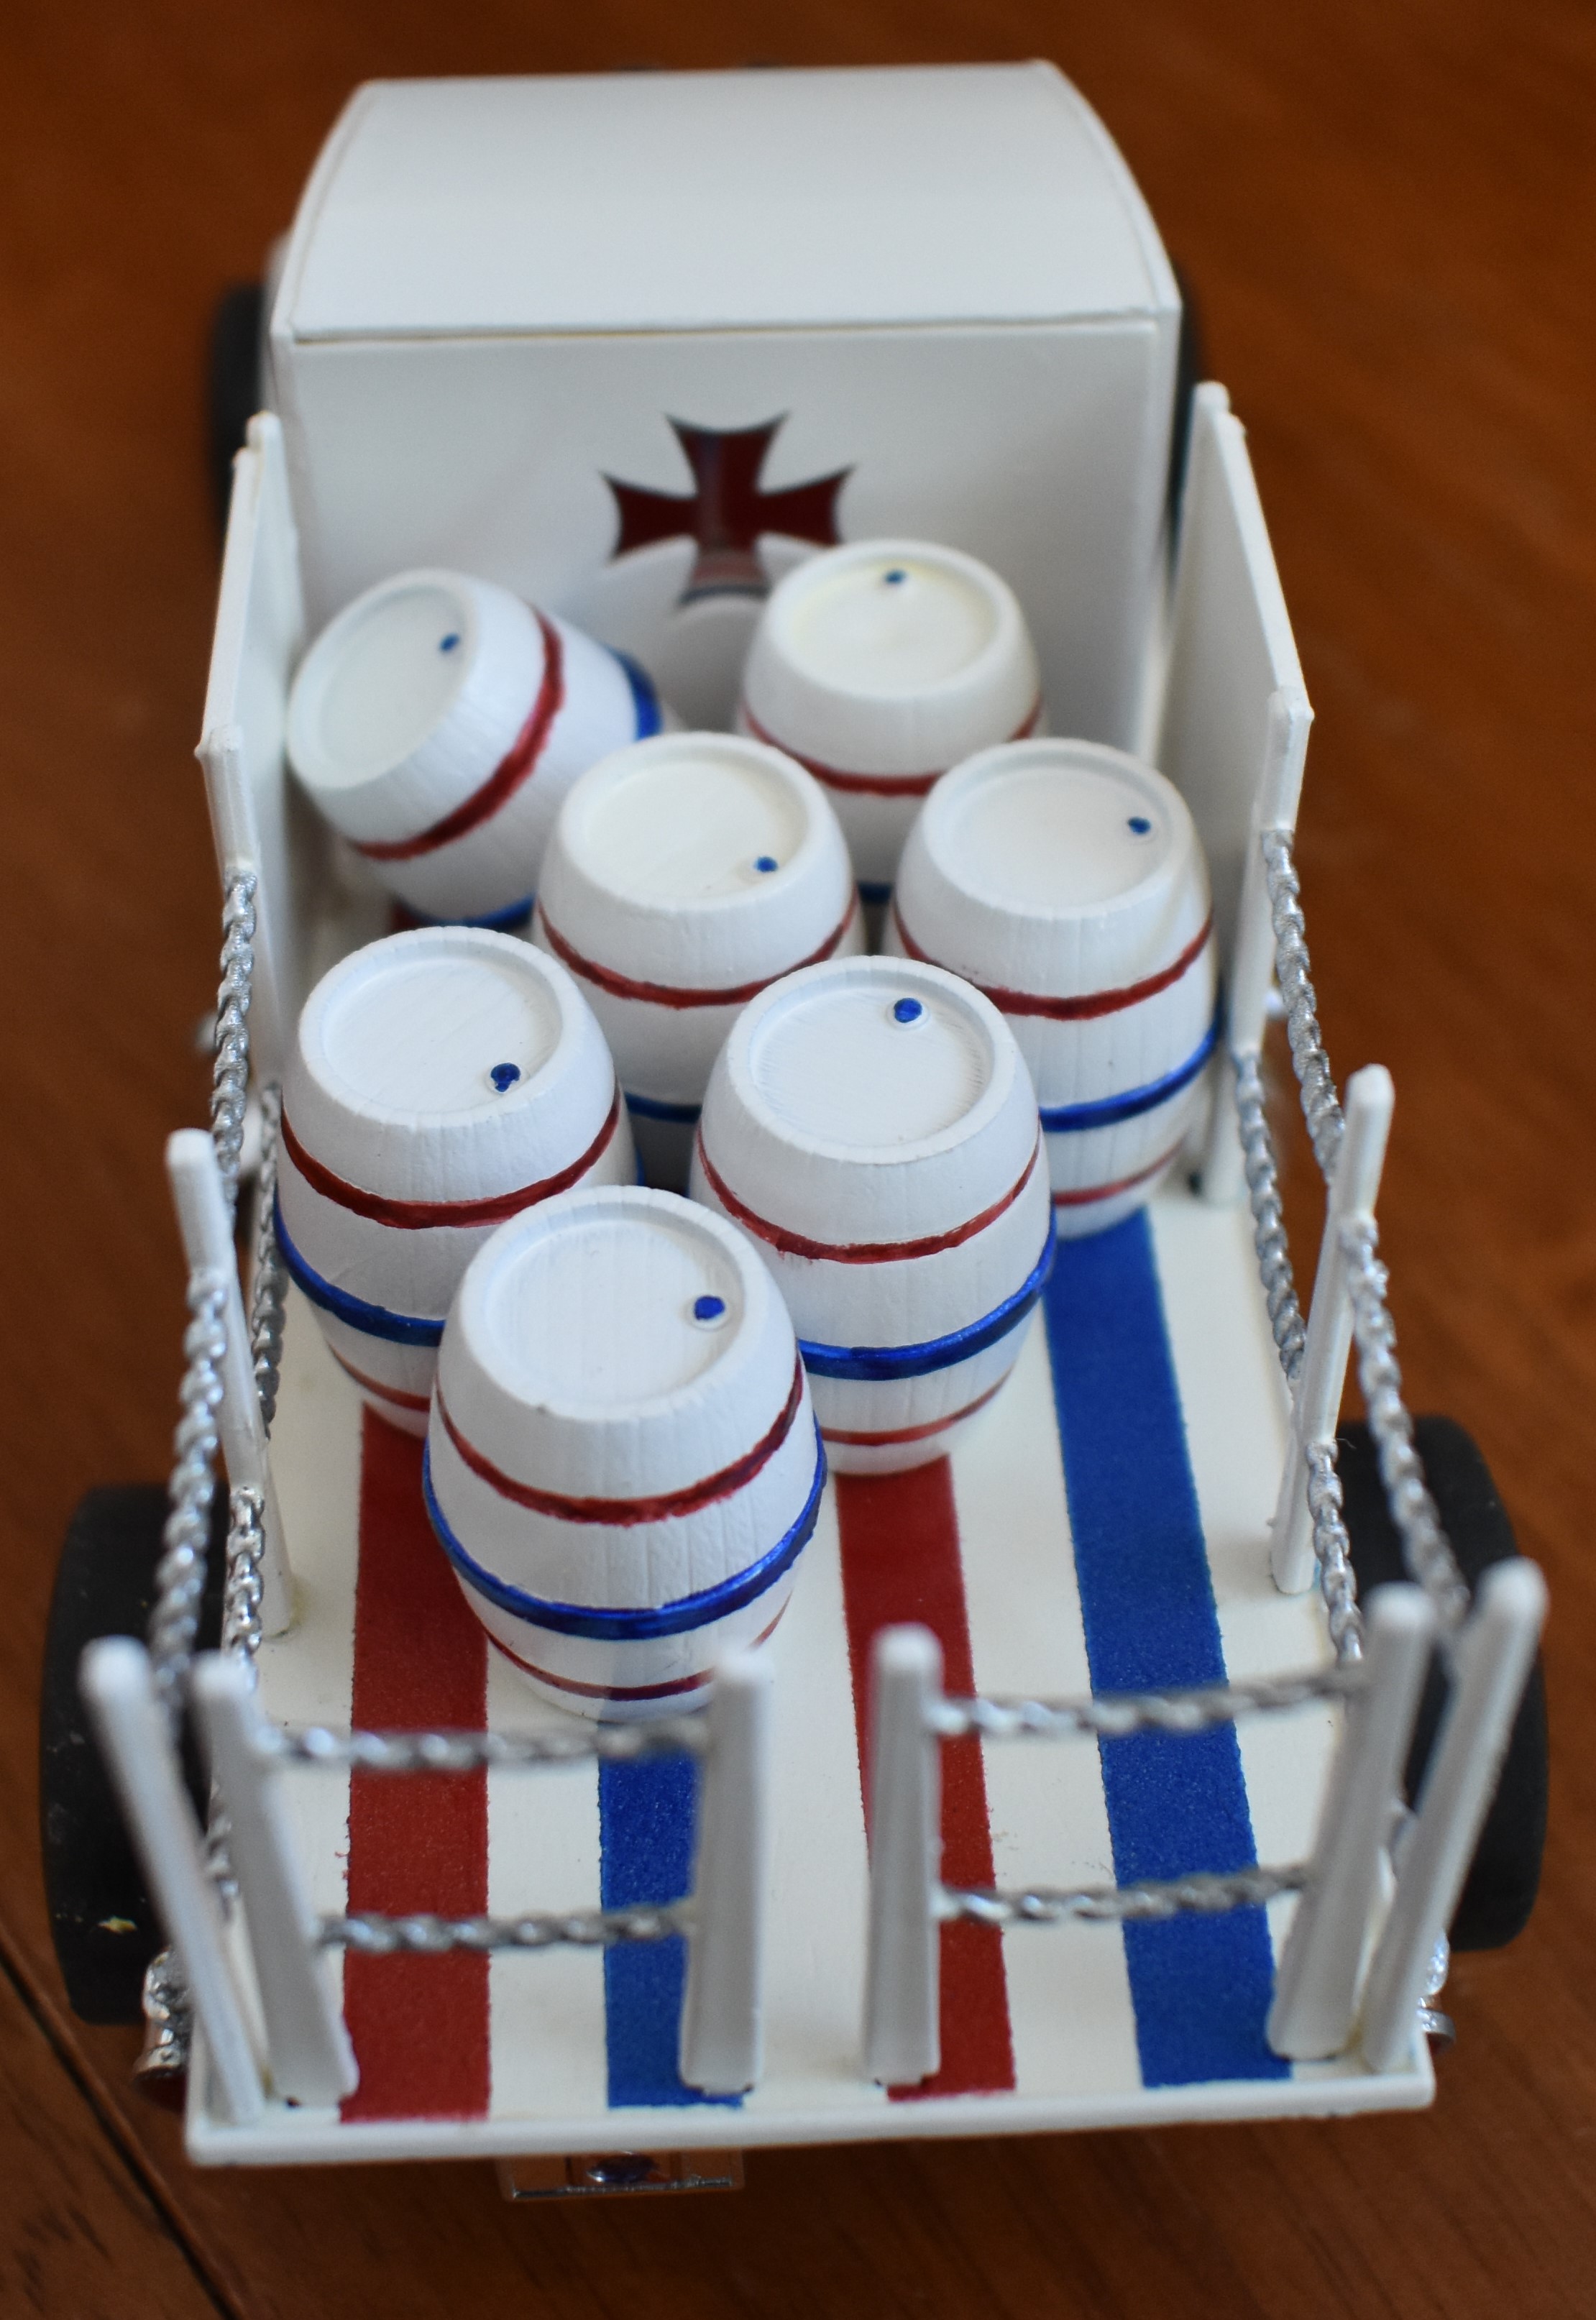
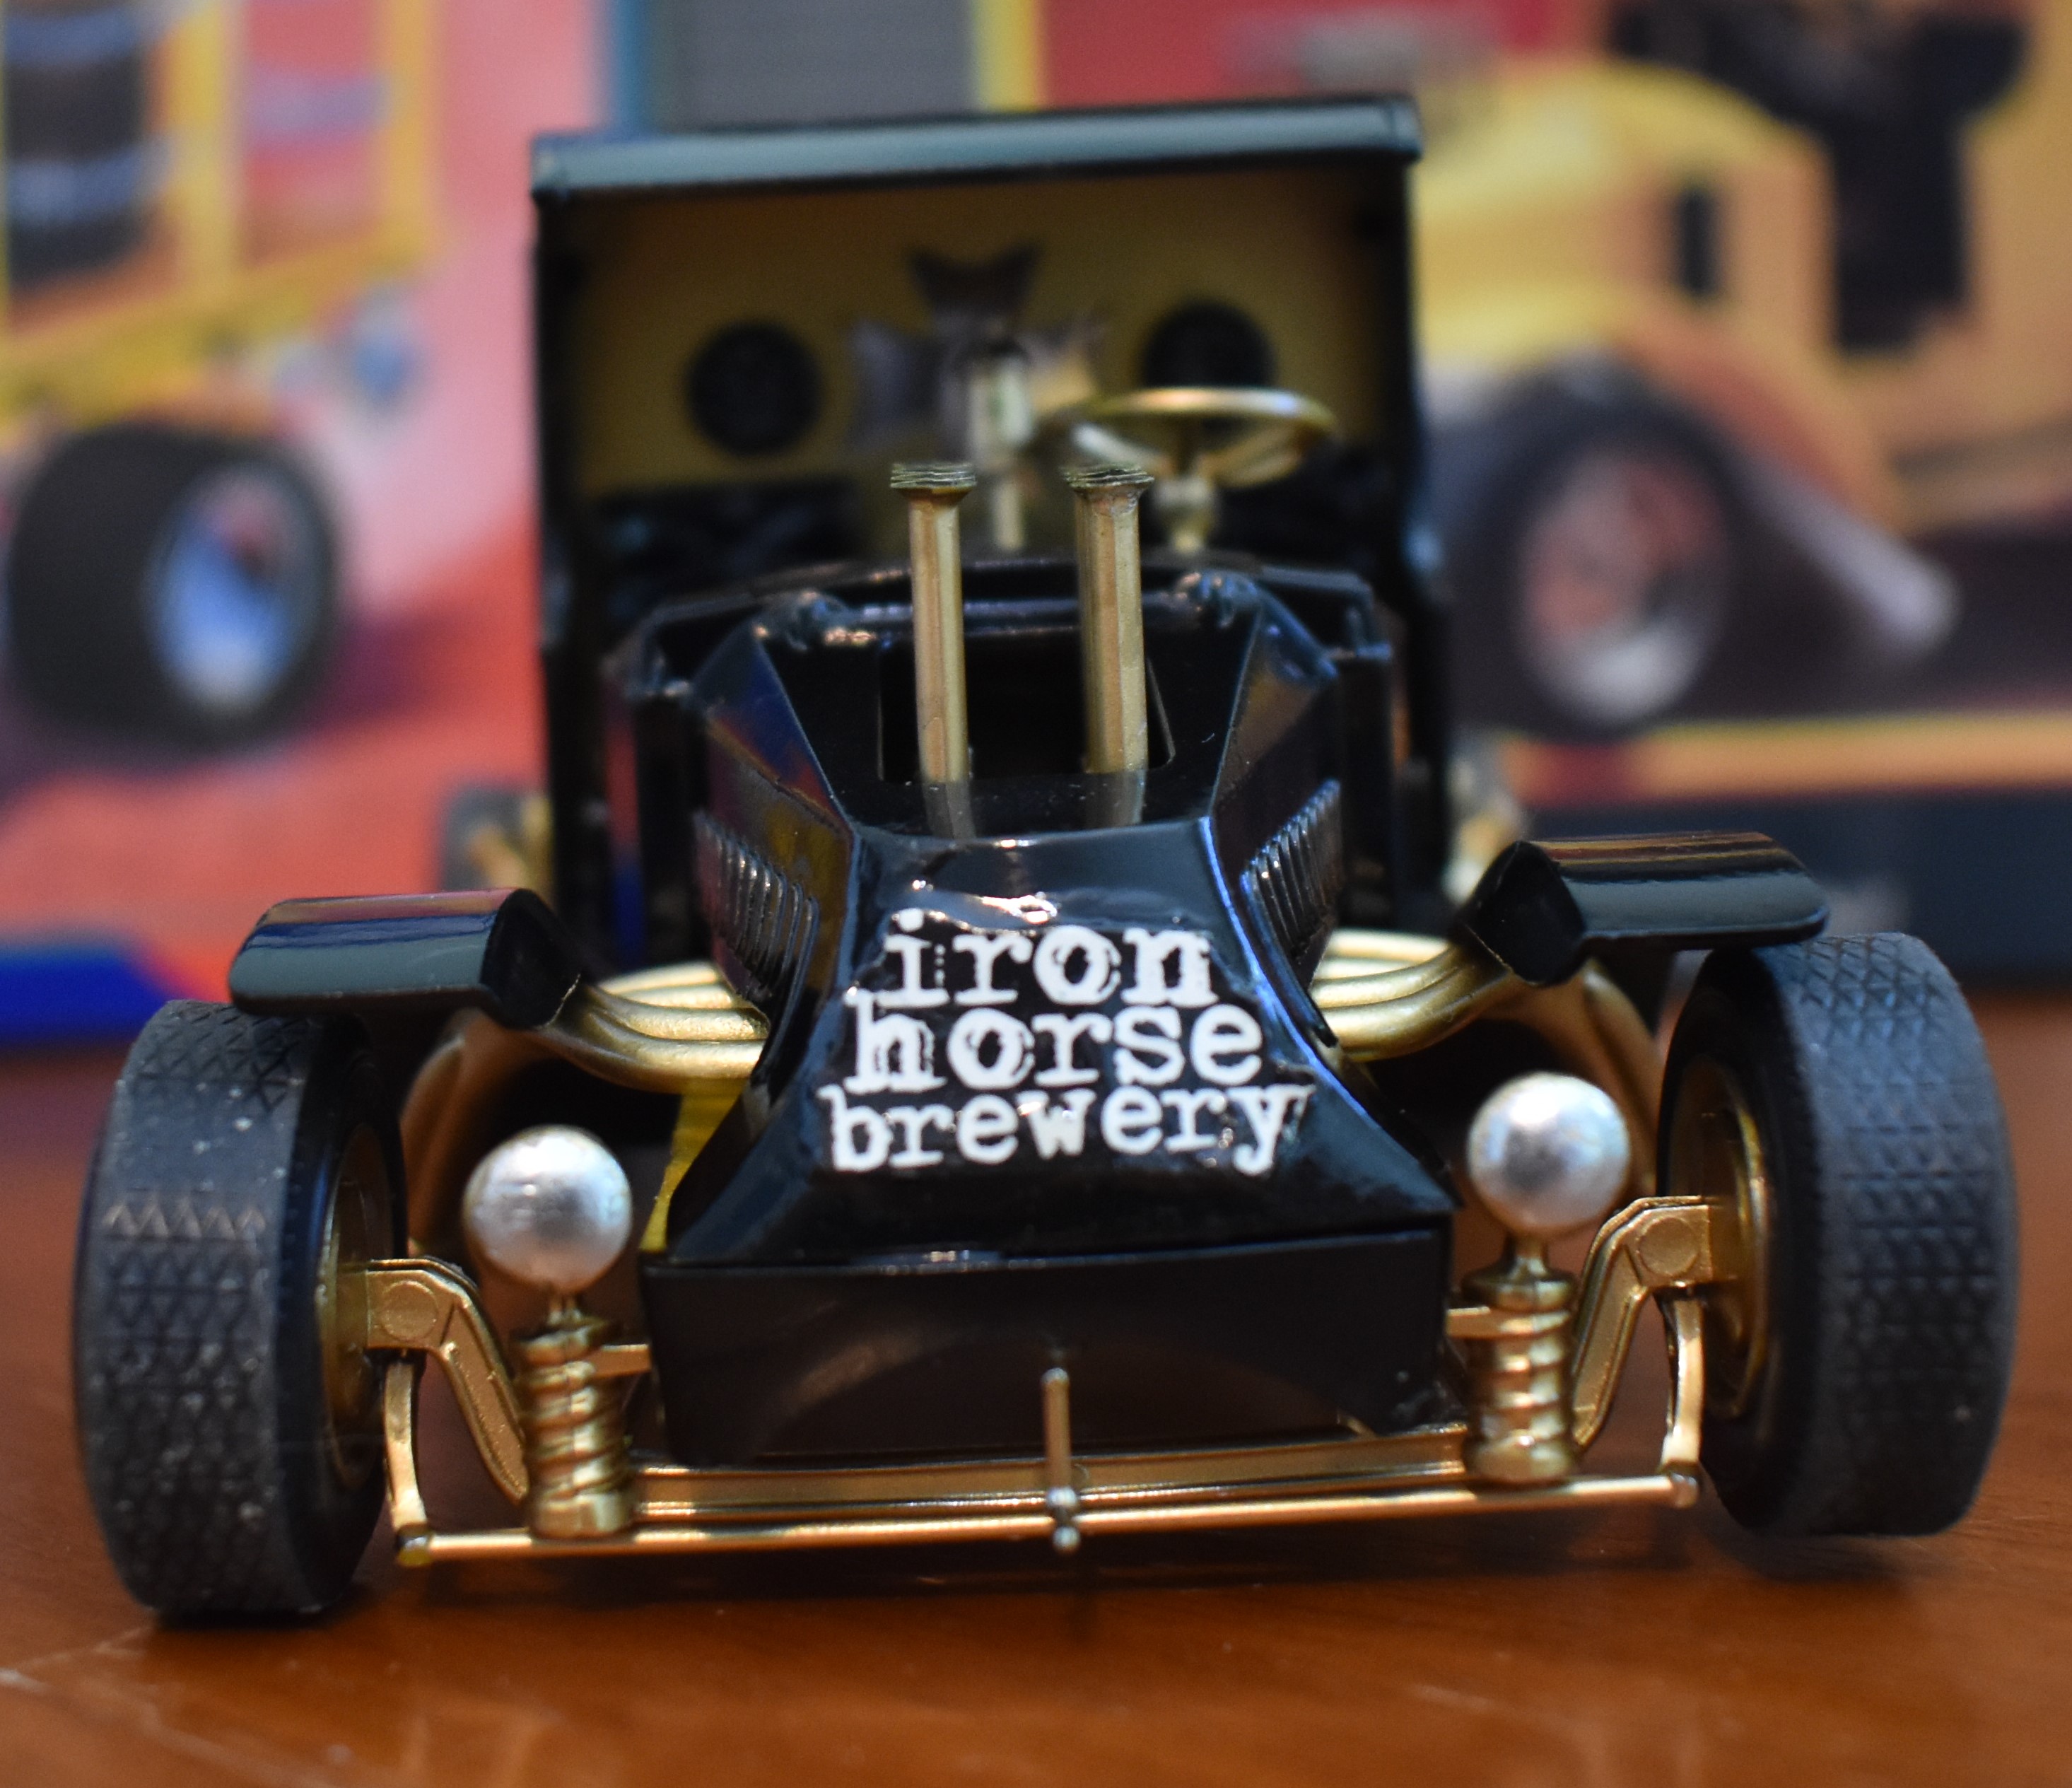
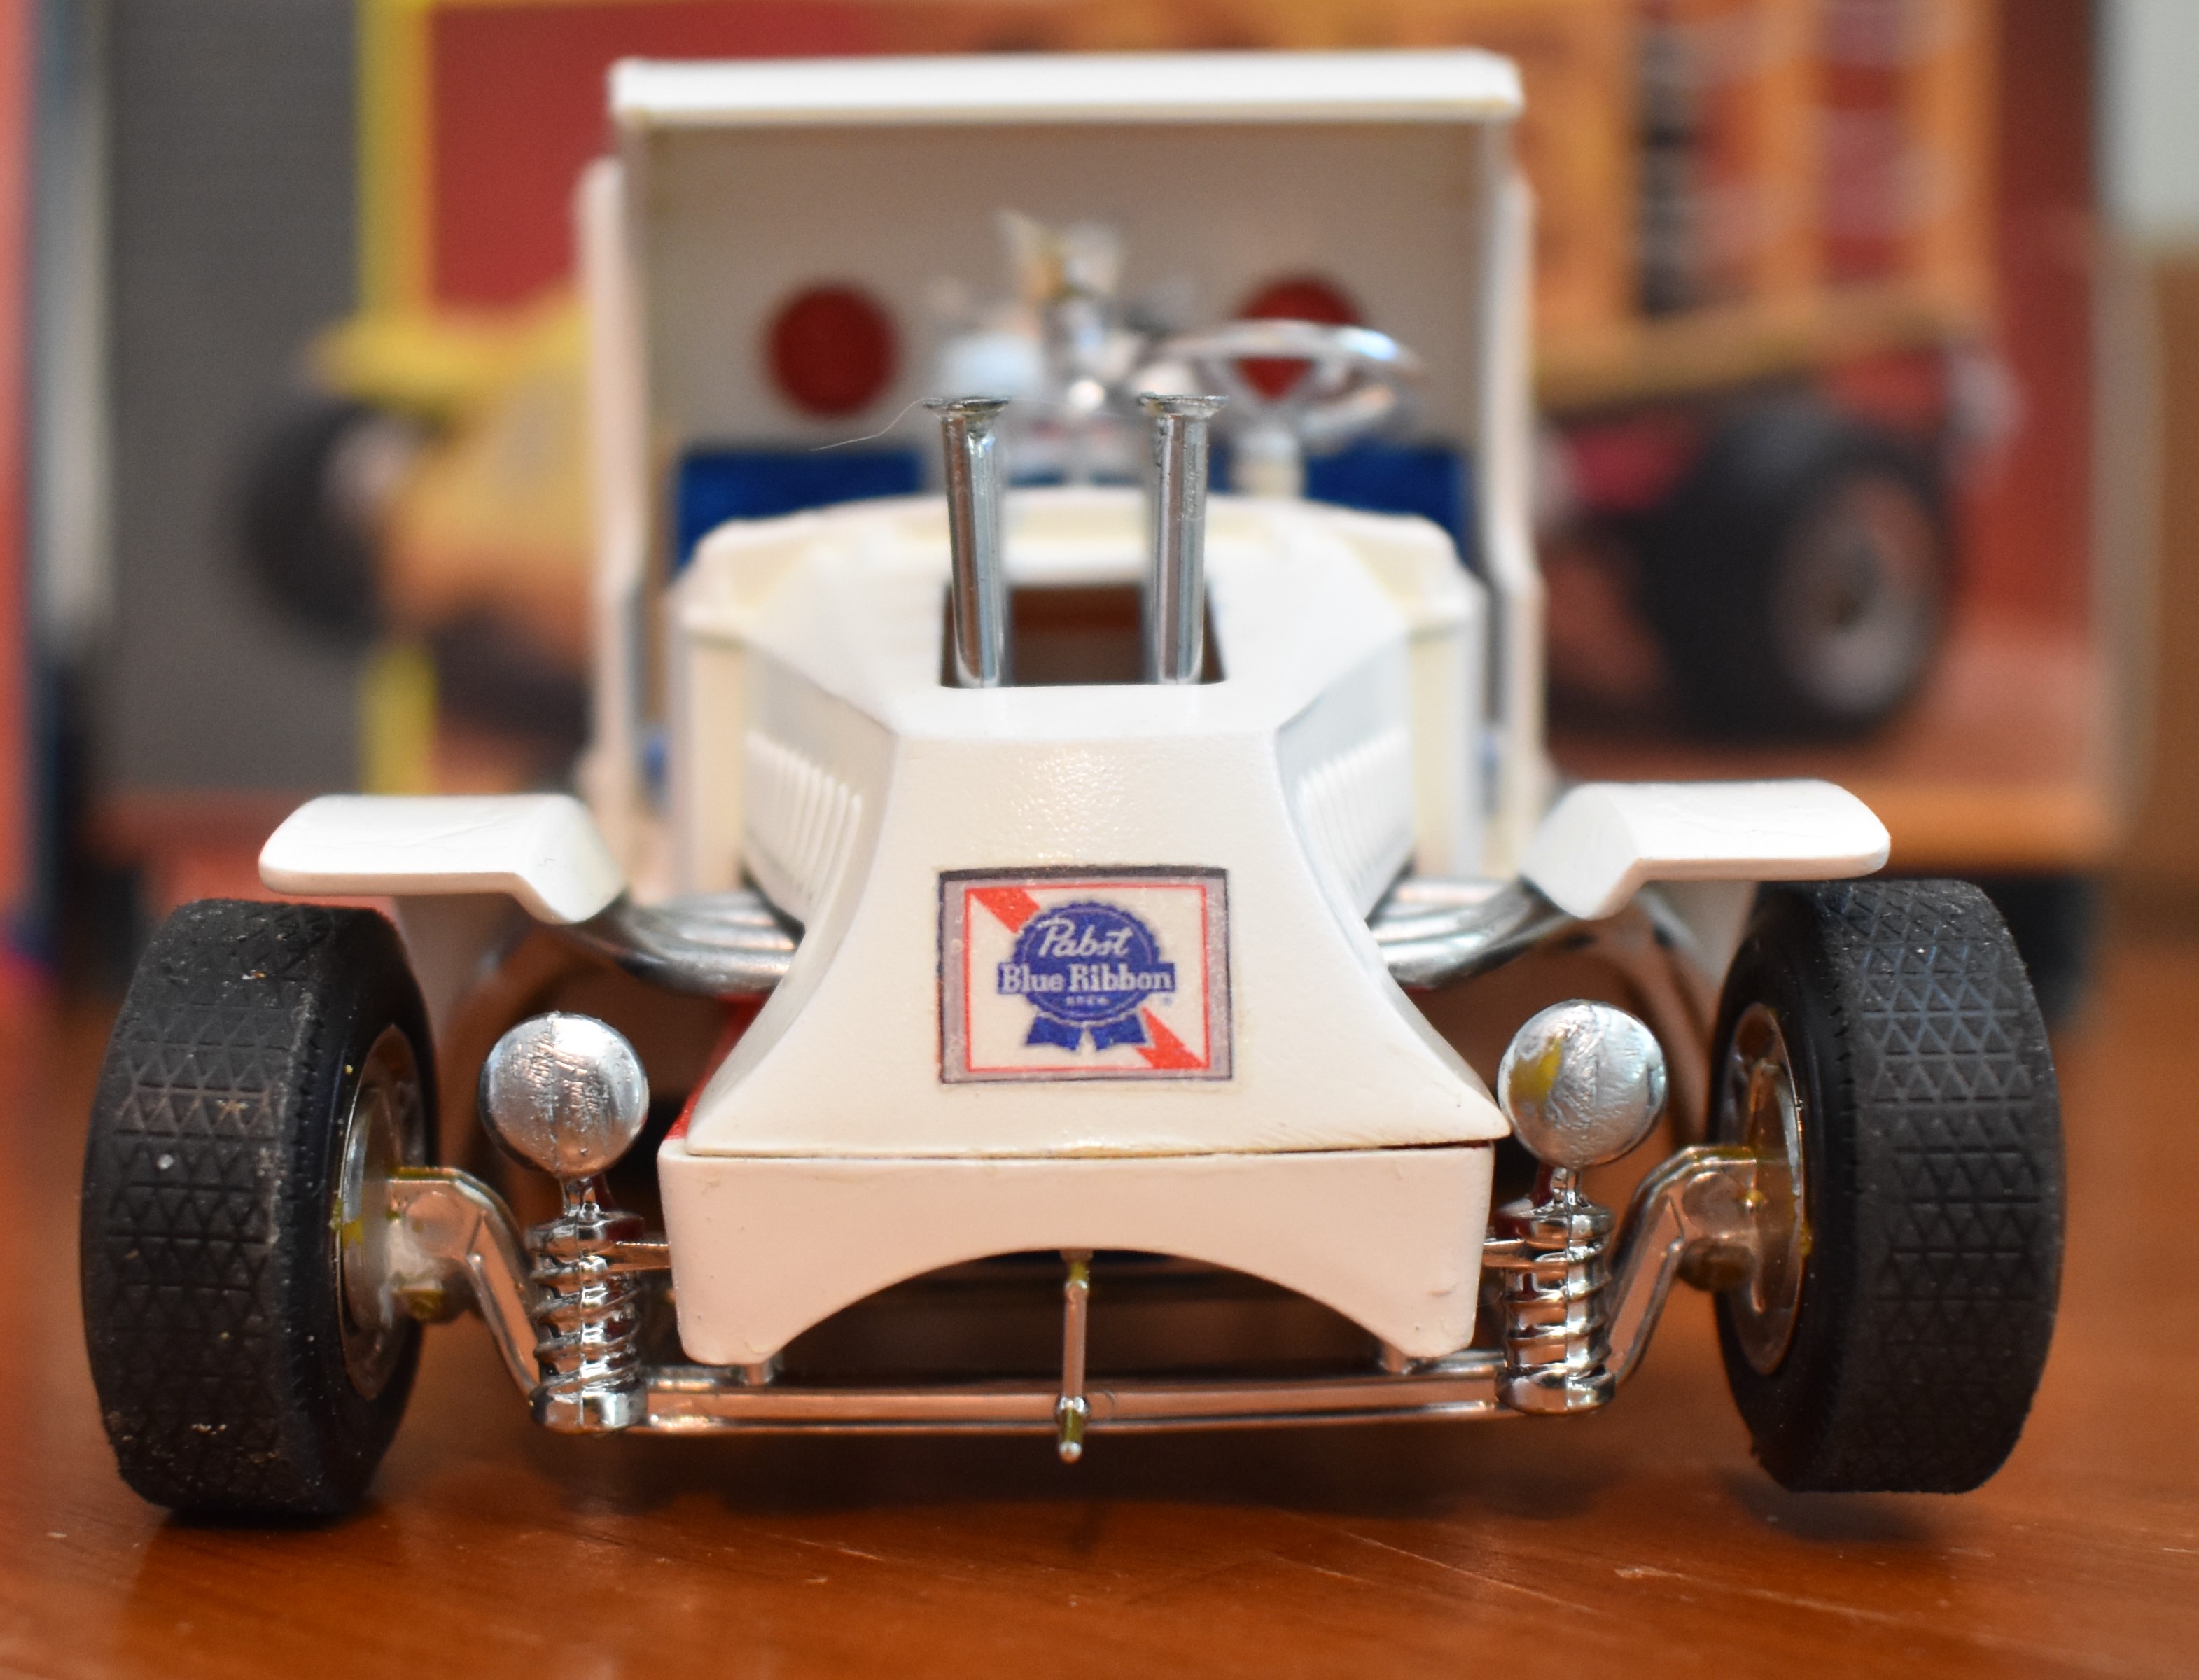
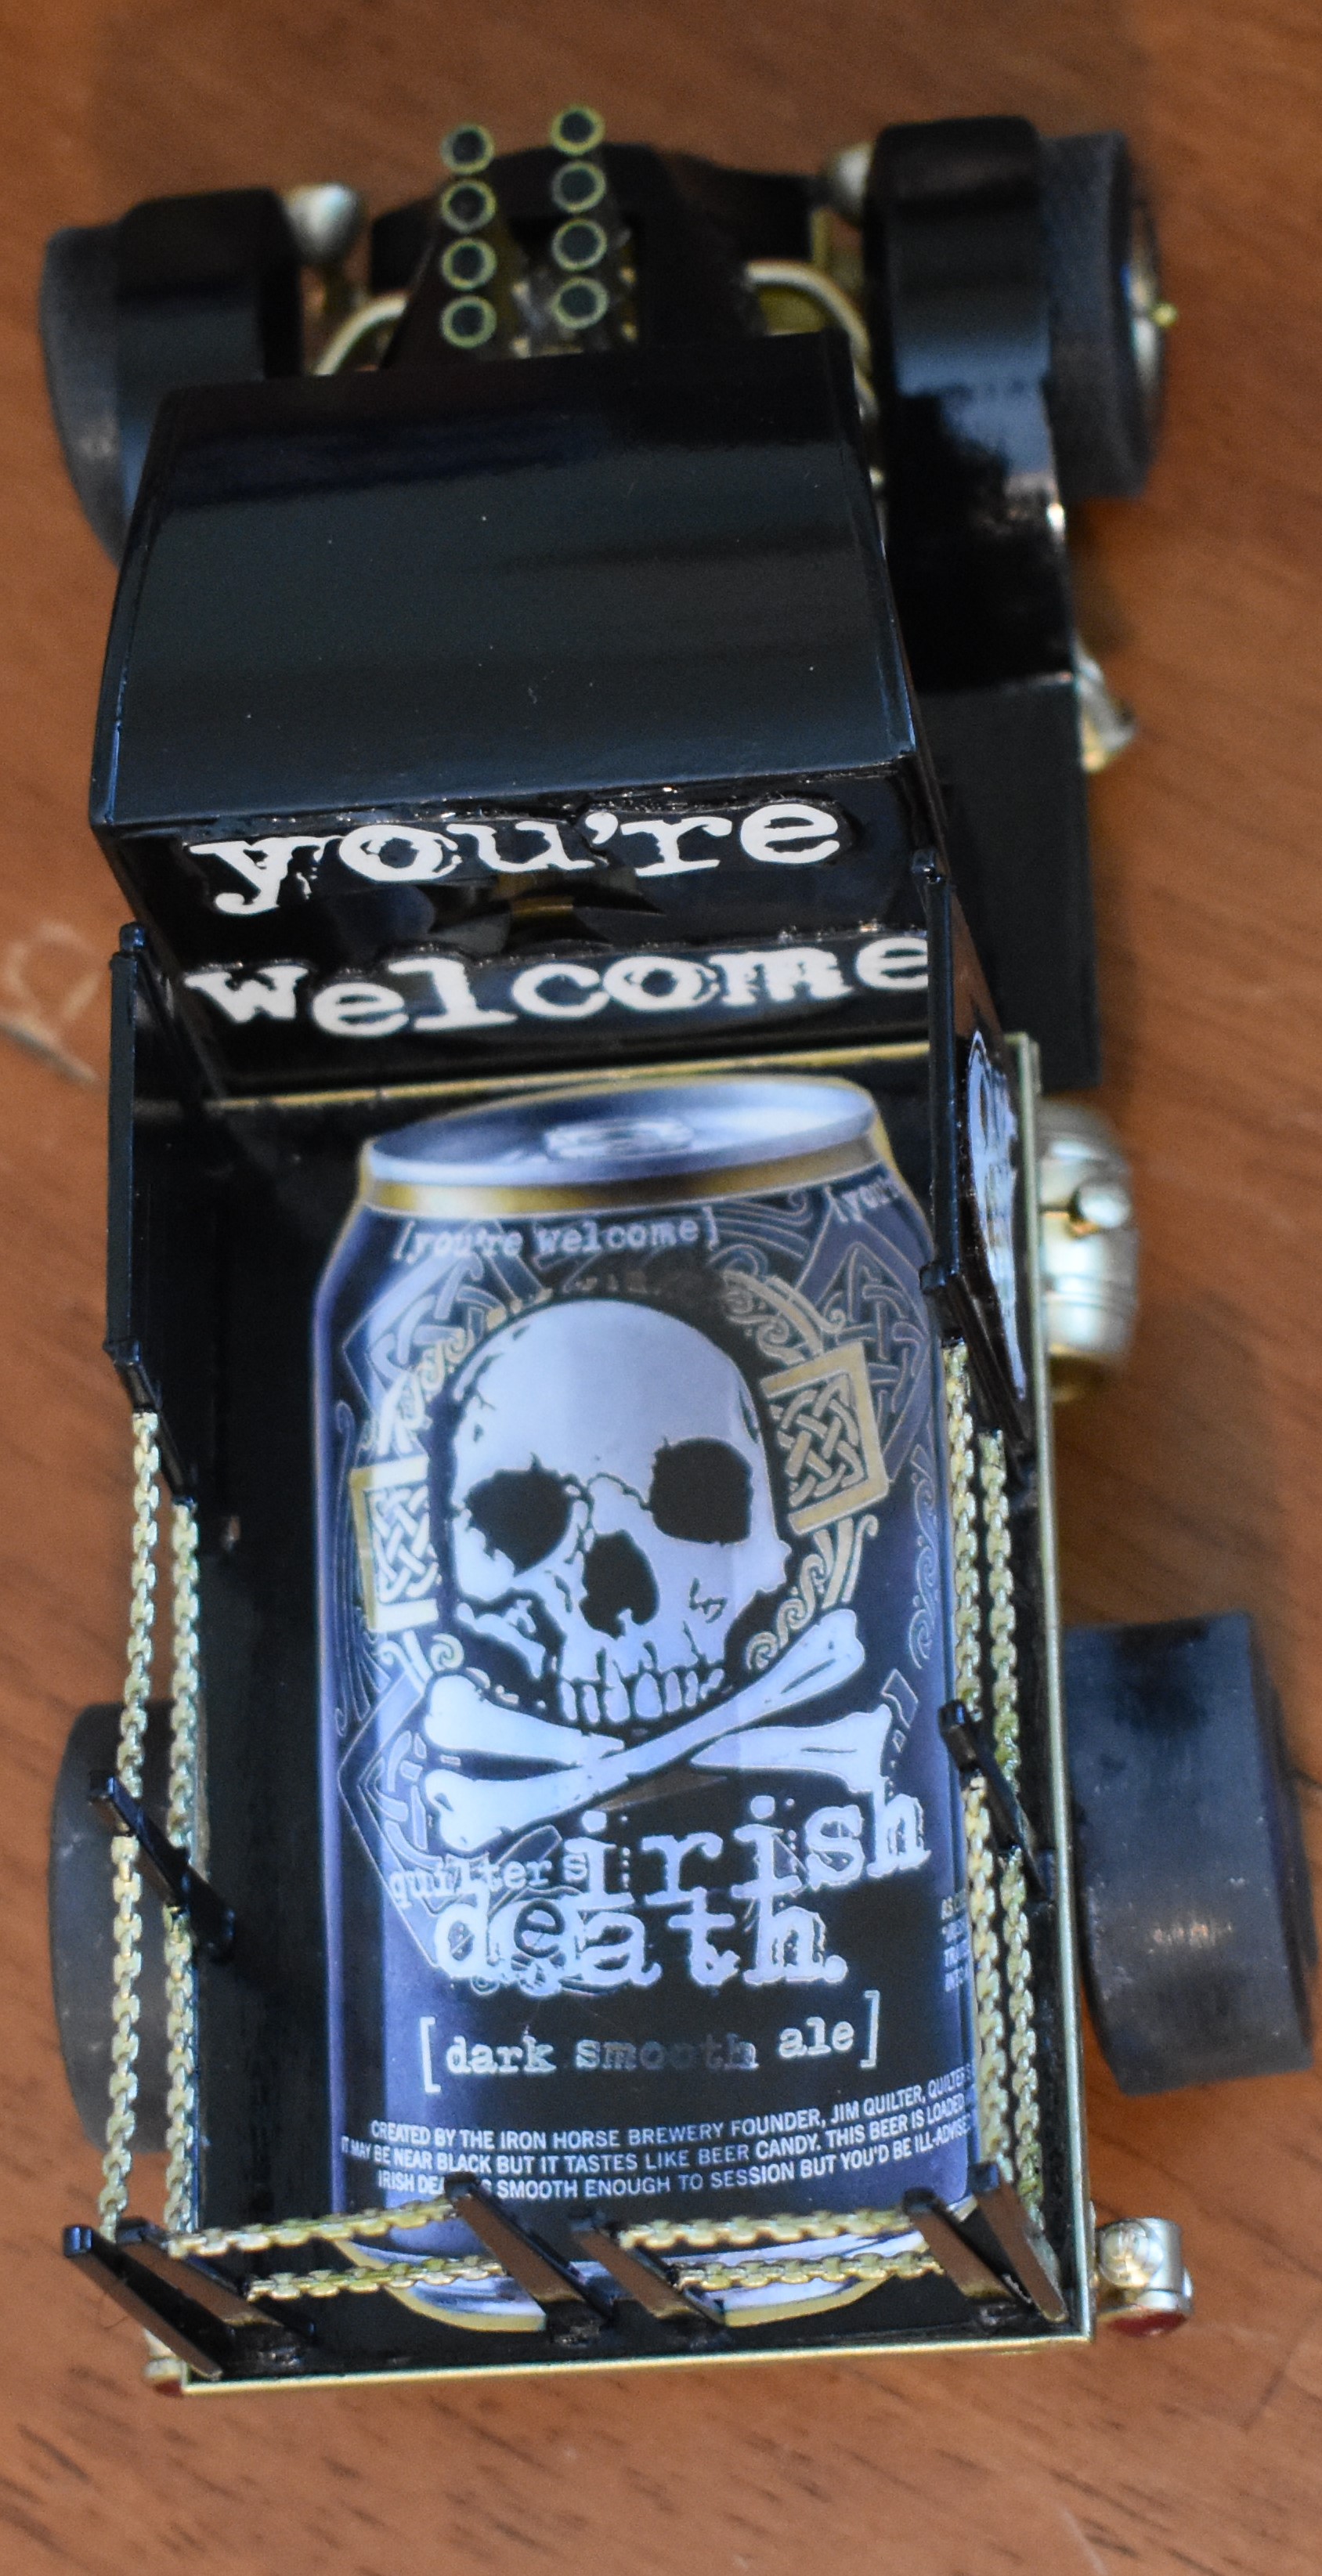
I built two Monogram Beer Wagons as xmas gifts for two guys who love their specific brands of beer; Pabst and Iron Horse Brewery’s Irish Death.
Photo by me.
I used aftermarket Pabst decals meant for a 1970s gasser/drag racer. Alcohol based chrome paint was used on the headers, works good but is expensive.
Photo by me.
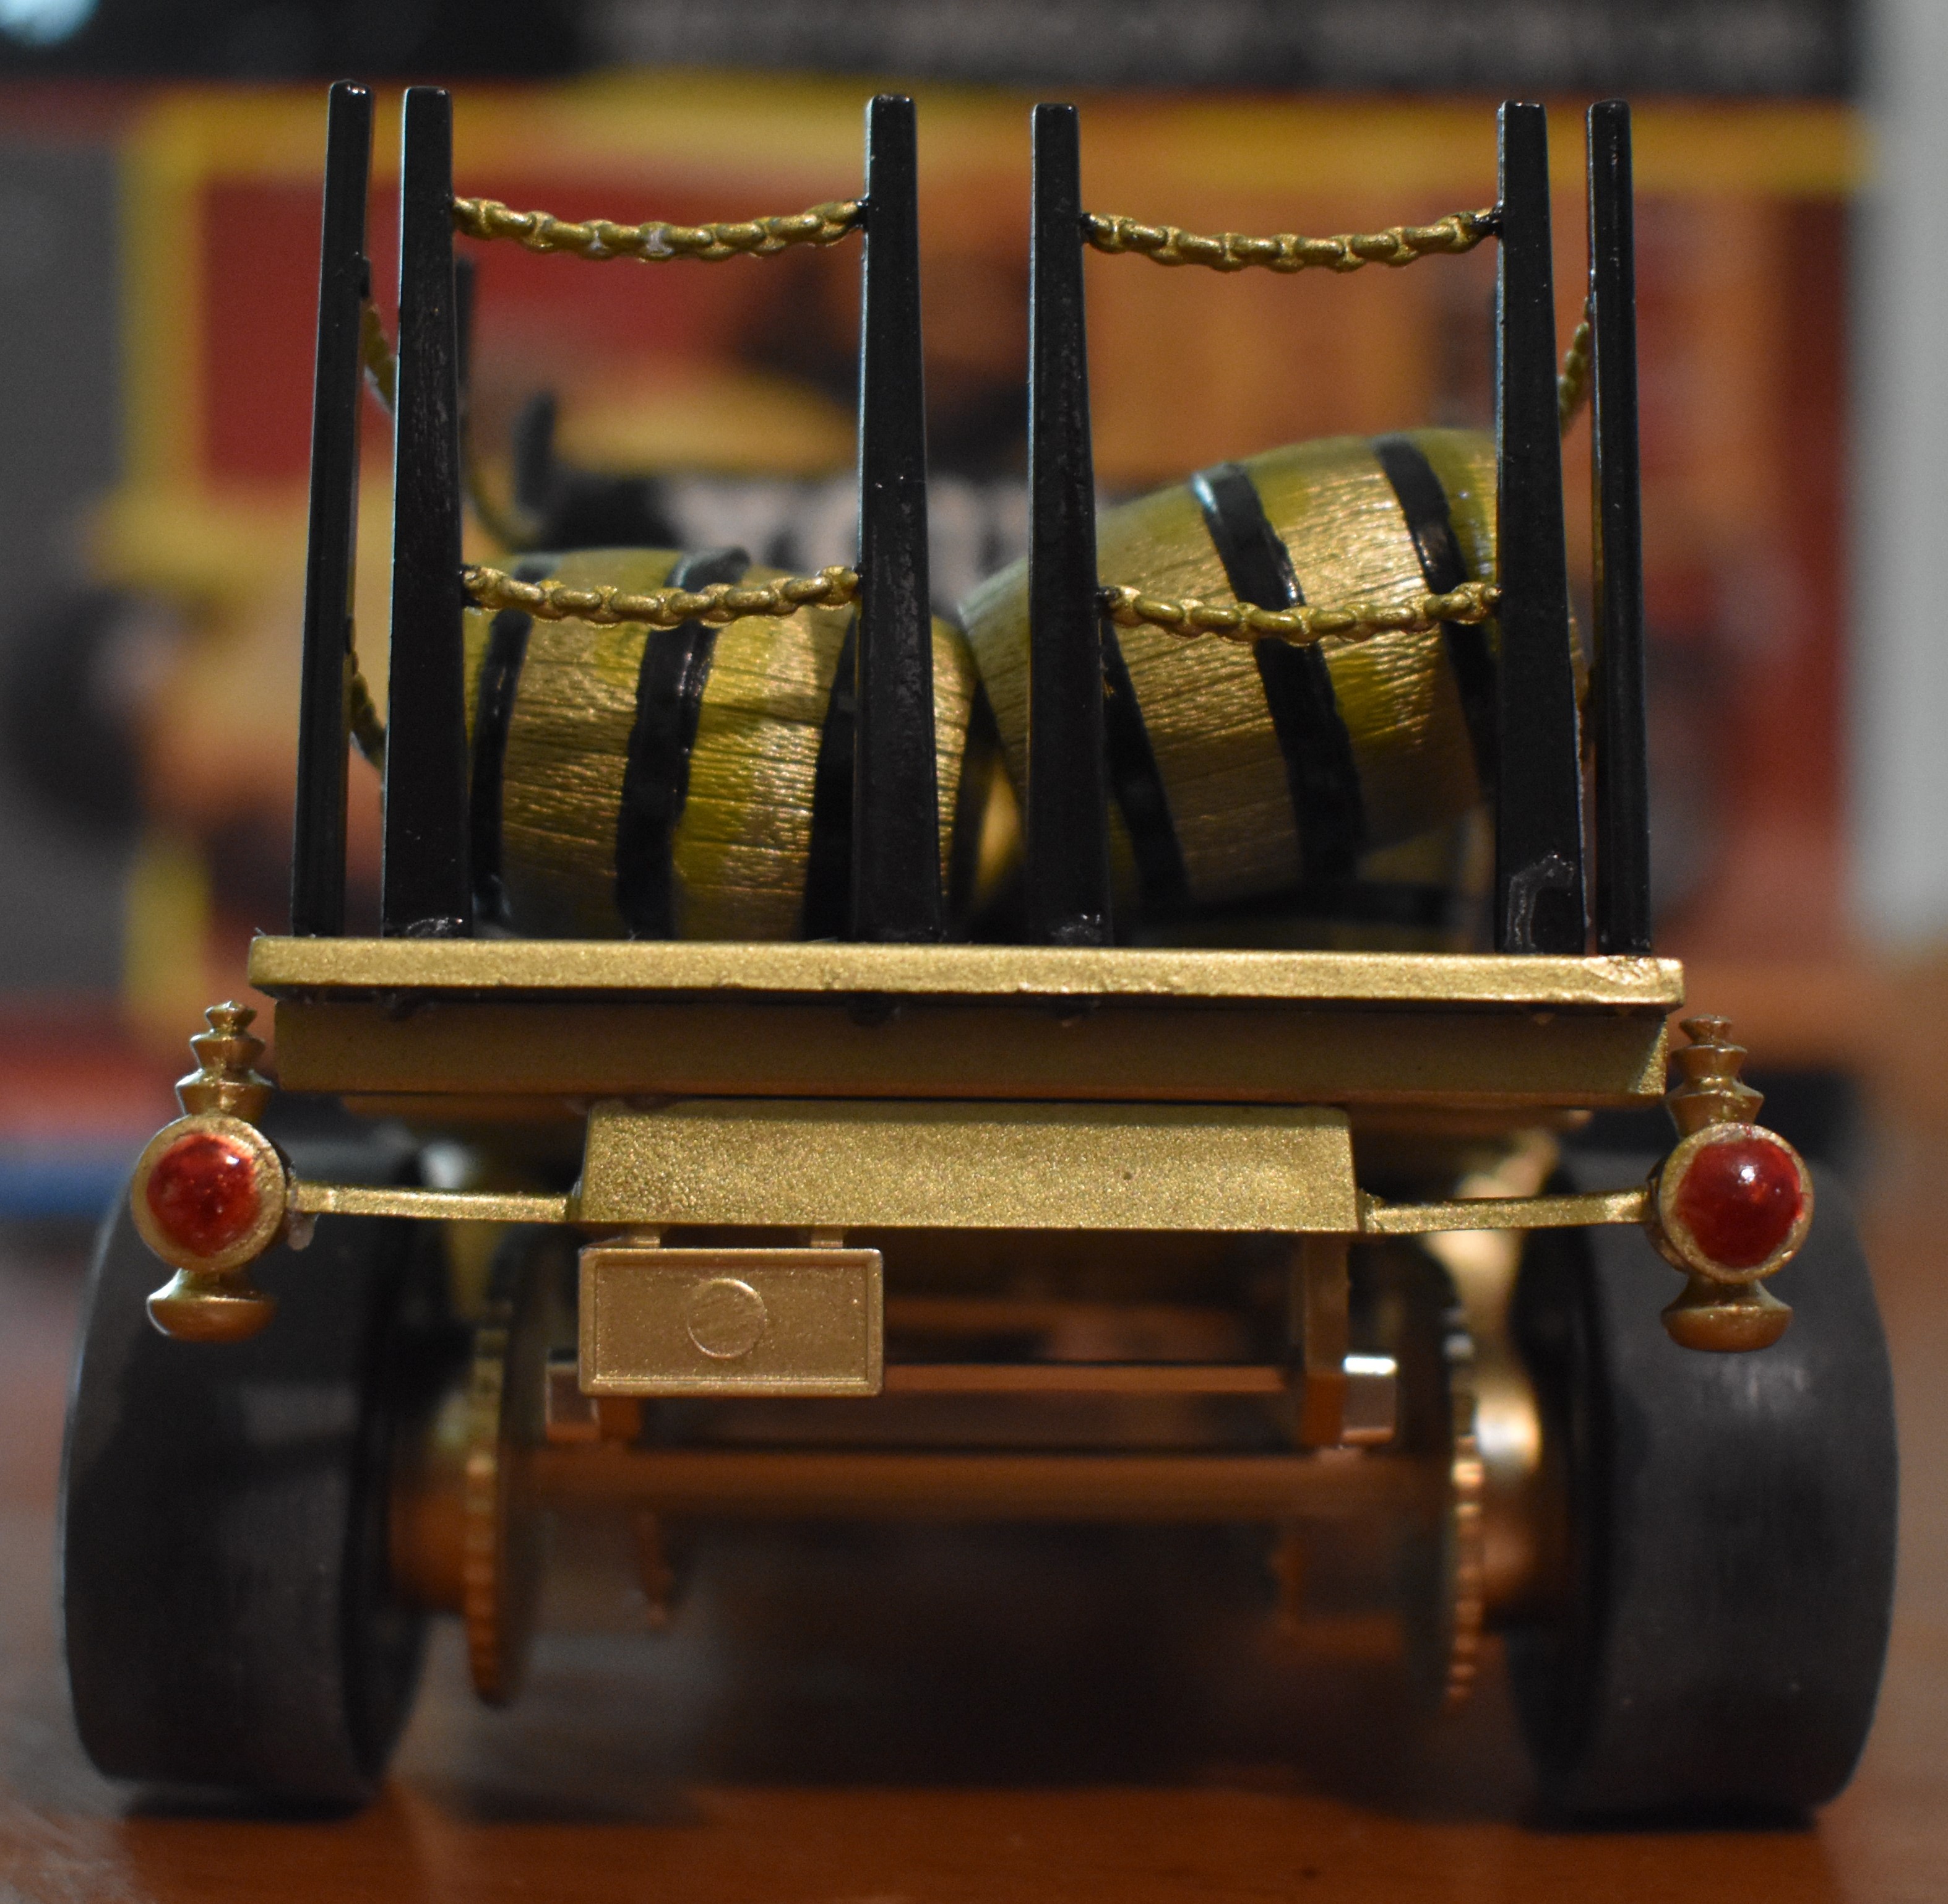
The markings for the Irish Death were cut from Iron Horse Brewery’s 36 square-root package, thinned down and pasted with clear setting glue. Then I covered with lots of clear paint.
Photo by me.
Photo by me.
I tried using different brands of gold spray paints, all claiming to look like gold chrome. None of them lived up to their promise.
Photo by me.
Video, the real 1:1 scale Beer Wagon:
Photo by me.
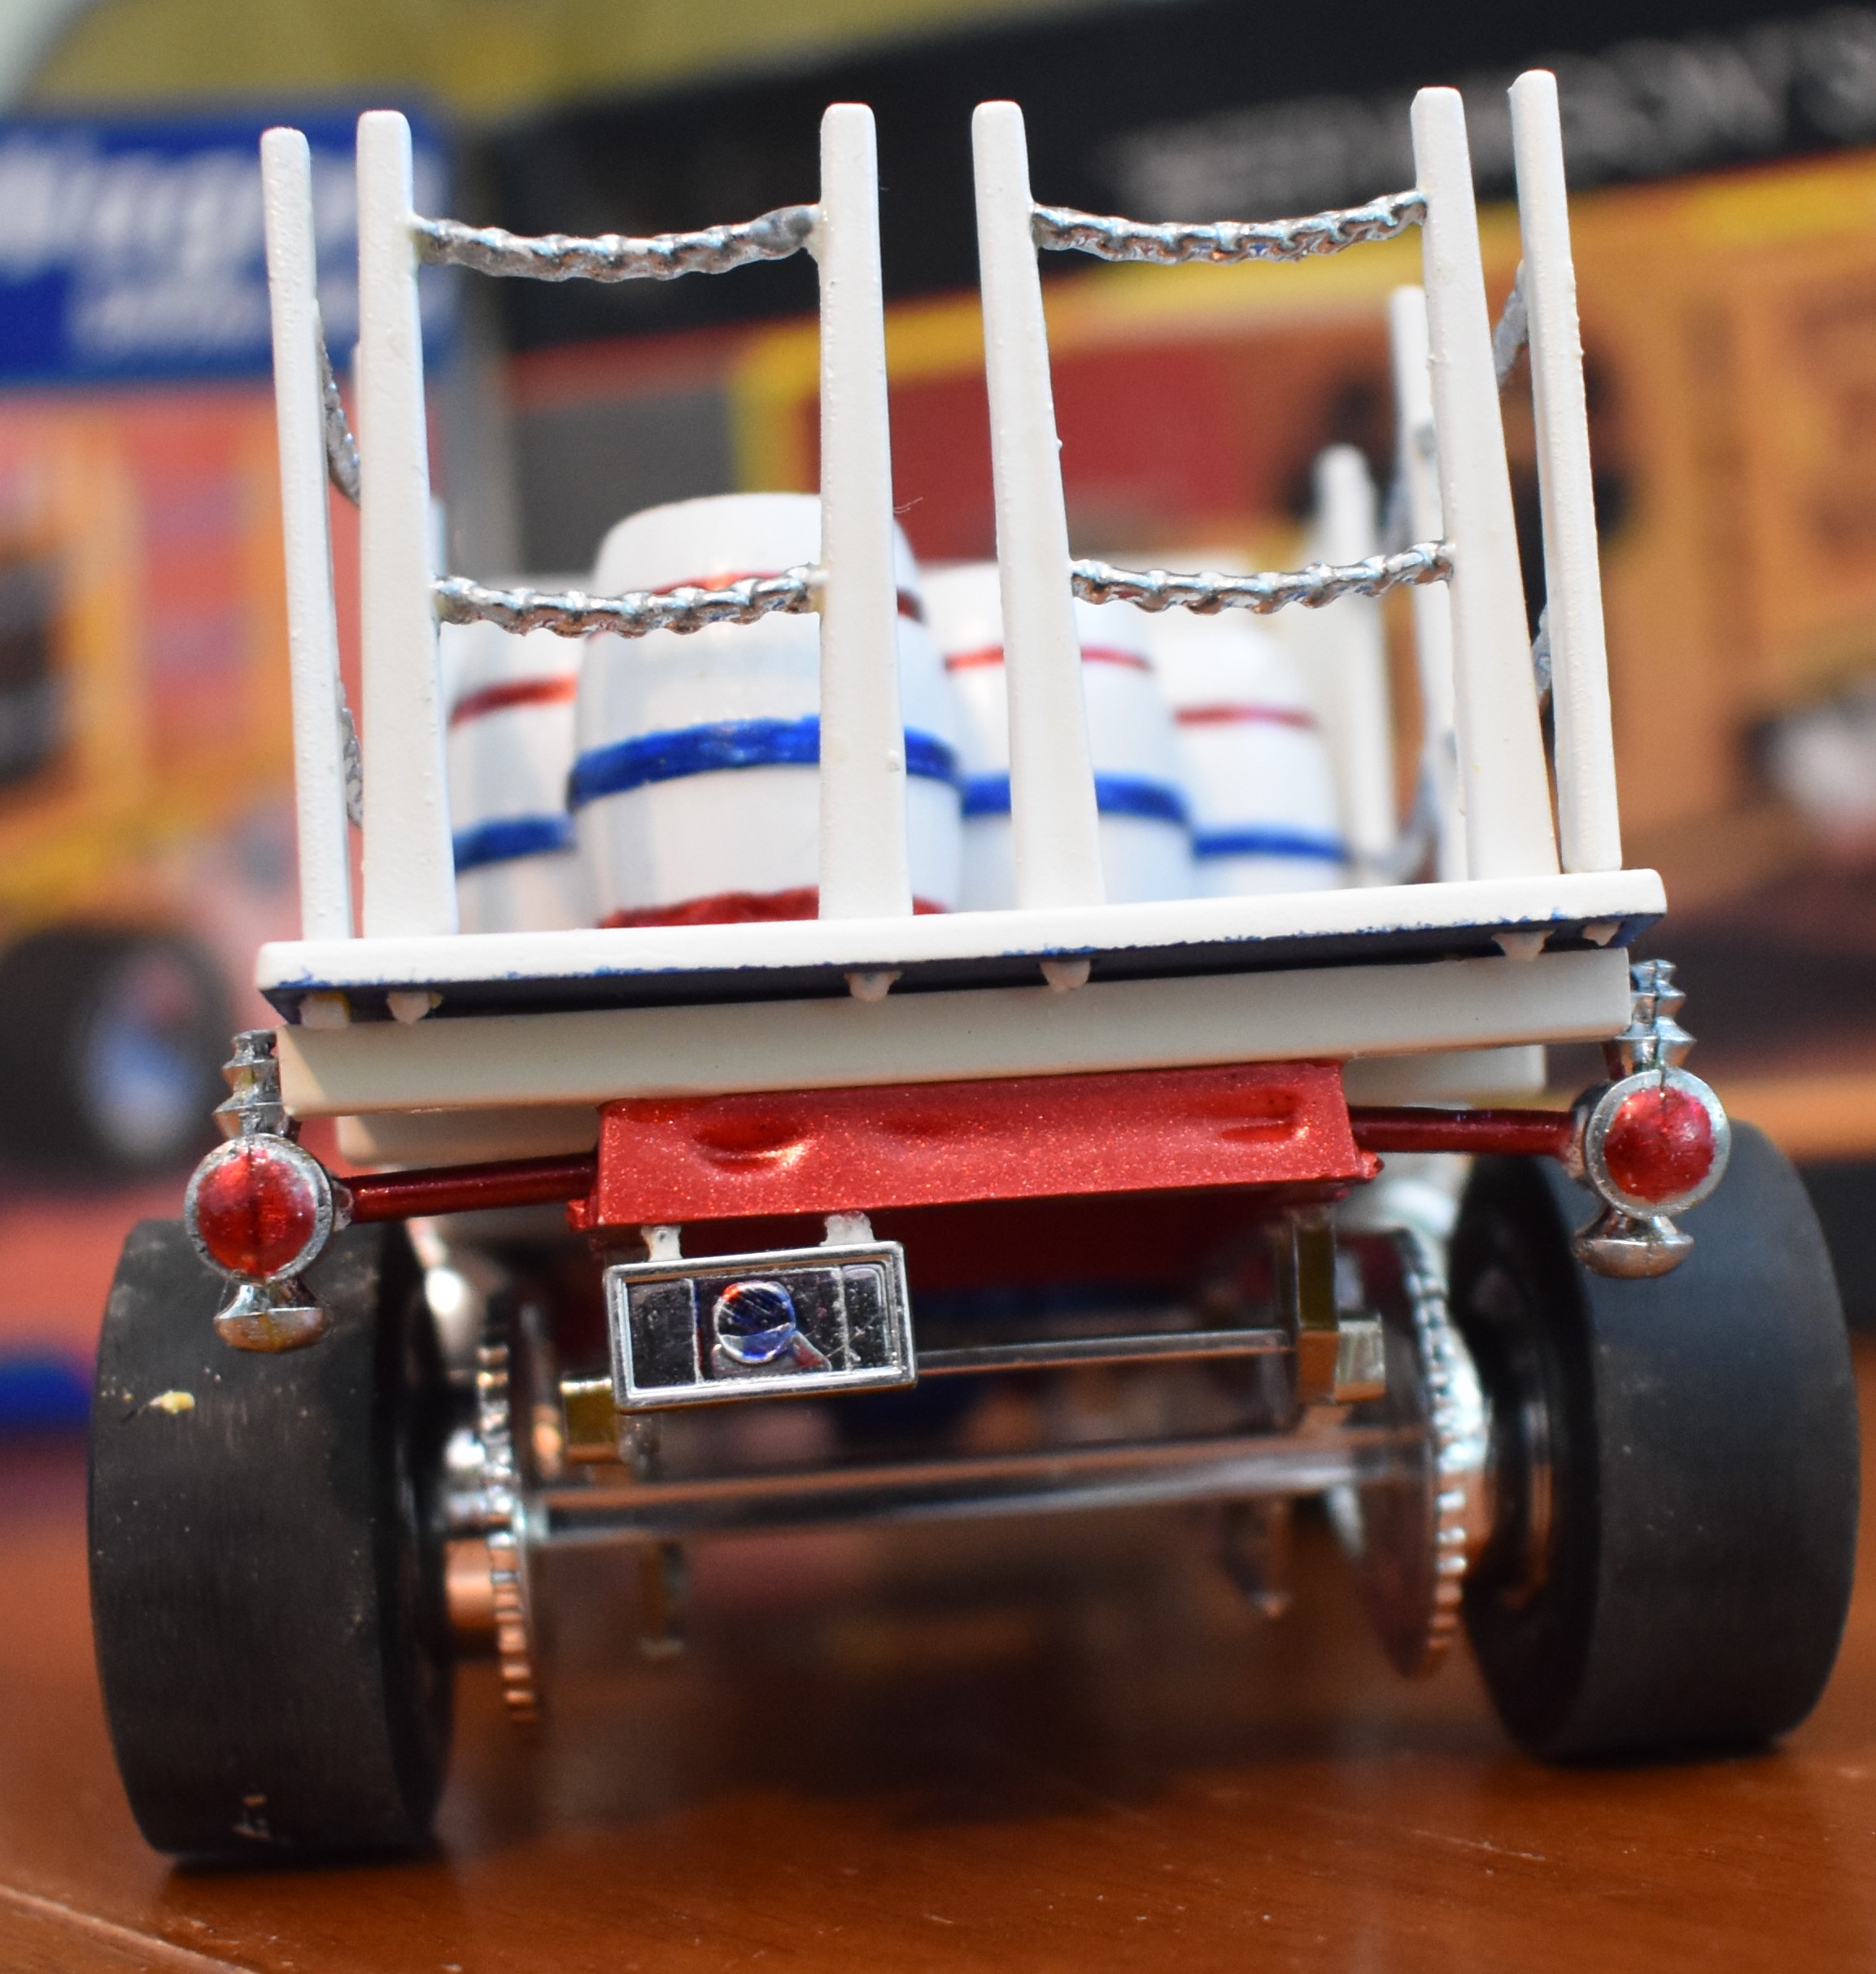
Notice that the front axle doesn’t sit properly on both kits.
Photo by me.
Photo by me.
Photo by me.
These old kits have a lot of fragile parts. Besides the plastic chains being prone to breakage, the rear light posts also like to break. On the Pabst Wagon I had to make new posts out of skinny plastic sprues. I drilled holes in the chassis to fix them in place, they turned out to be sturdier.
Photo by me.
I got this cool stretch version from a builder in Canada.
The kool thing about these old kits is that they’re great starting points for kool kustoms.
The hood got a clear coat of Plaid acrylic matte. The inner lip of the front fender wells had to be sanded slightly thinner so the Bullet Mustang tires would fit inside. I think the problem was caused by the way I mounted the disc breaks on the front suspension.
I’ve been able to get some 1:144 scale Boeing 777-200s (United Nations-International Civil Aviation Organization B772) for cheap; some Minicraft kits (made in China) being offered in an ‘as is’ grab bag sale (turned out they were complete, but one had a broken fuselage), and a two-for-one sale that got me Eastern Express issues (made in Russia) in both the -200 and -300 versions.
My biggest complaint about airliner kits is how much they cost versus what you get, that’s why I buy them only when I see them offered at great discount (and It’s really amazing that aftermarket decals can cost more than the kit, depending on the manufacturer). Airliner kits are basic, and even the nicer Revell Germany kits have fit problems. While the Minicraft airliners have fit problems the Eastern Express kits take the cake.
The Eastern ExpressGroup kit requires a lot of pre-assembly sanding down of parts due to the amount of flash and other problems. You must dry fit the parts in order to avoid nasty surprises, such as the lower wing trailing edge needs to be thinned down to size in order to fit, however, the trailing edge of the flaps/ailerons are molded as part of the upper wing, giving a nice sharp trailing edge. The MinicraftModel Kits’ wings have blunt trailing edges, you’d have to spend time thinning down both wing halves to get a sharp trailing edge. The wings of the Eastern Express and Minicraft kits are very close in shape, size and detailing. Eastern Express has no mounting points to attach the wing to the fuselage, you’ll have to make your own spar. Minicraft uses interlocking fingers, apparently their engineers thought it was a good idea but the fingers actually interfere with getting a tight fit against the fuselage, they have to be thinned down or removed.
The Eastern Express fuselage is in three sections, allowing for different length mid-sections to model the -200 or -300 (you only get the sections described on the box). I lined up the competing kits’ fuselages starting at the tail end, the vertical tail tip on the Eastern Express is more angled, the overall diameter and length of the Minicraft kit’s fuselage is larger. The Eastern Express nose section is smaller than the Minicraft kit, but it looks more Boeing-like to me.
The horizontal tails/elevators look similar in shape and detail, but Minicraft’s are noticeably larger.
While the Eastern Express fuselage is smaller than Minicraft’s the opposite is true for the turbine nacelles. I’m considering swapping the very large Eastern Express nacelles with the Minicraft nacelles, the size difference is painfully noticeable when you compare the diameter of the intake lips. Minicraft’s nacelles will need just a little work to fit them onto the Eastern Express wings, but the Eastern Express nacelle pylons will need to be thinned down to fit into the Minicraft slots.
Here’s some pictorial evidence, which you can see more of the image by clicking on it:
Eastern Express in the grey trunks, Minicraft in the white trunks
Minicraft is the heavy weight
Minicraft has longer reach
Eastern Express has the looks (not sure if it’s accurate, but it looks better)
Seem to be evenly matched
Uh-oh!
More work as Eastern Express gives no mounts for the wing-to-fuselage
Five fingers of death
Choose your weapon
More chopping power with Eastern Express
Minicraft is almost swallowed by Eastern Express
Again, Minicraft is the heavyweight
I didn’t mention landing gear, most airliner kits do a bad job of representing them anyway (example; the Minicraft’s doors don’t come close to matching the wheel well openings, as if they were meant for a different aircraft), plus I normally build airliners wheels up and condemn them to eternal flight by hanging from the ceiling.
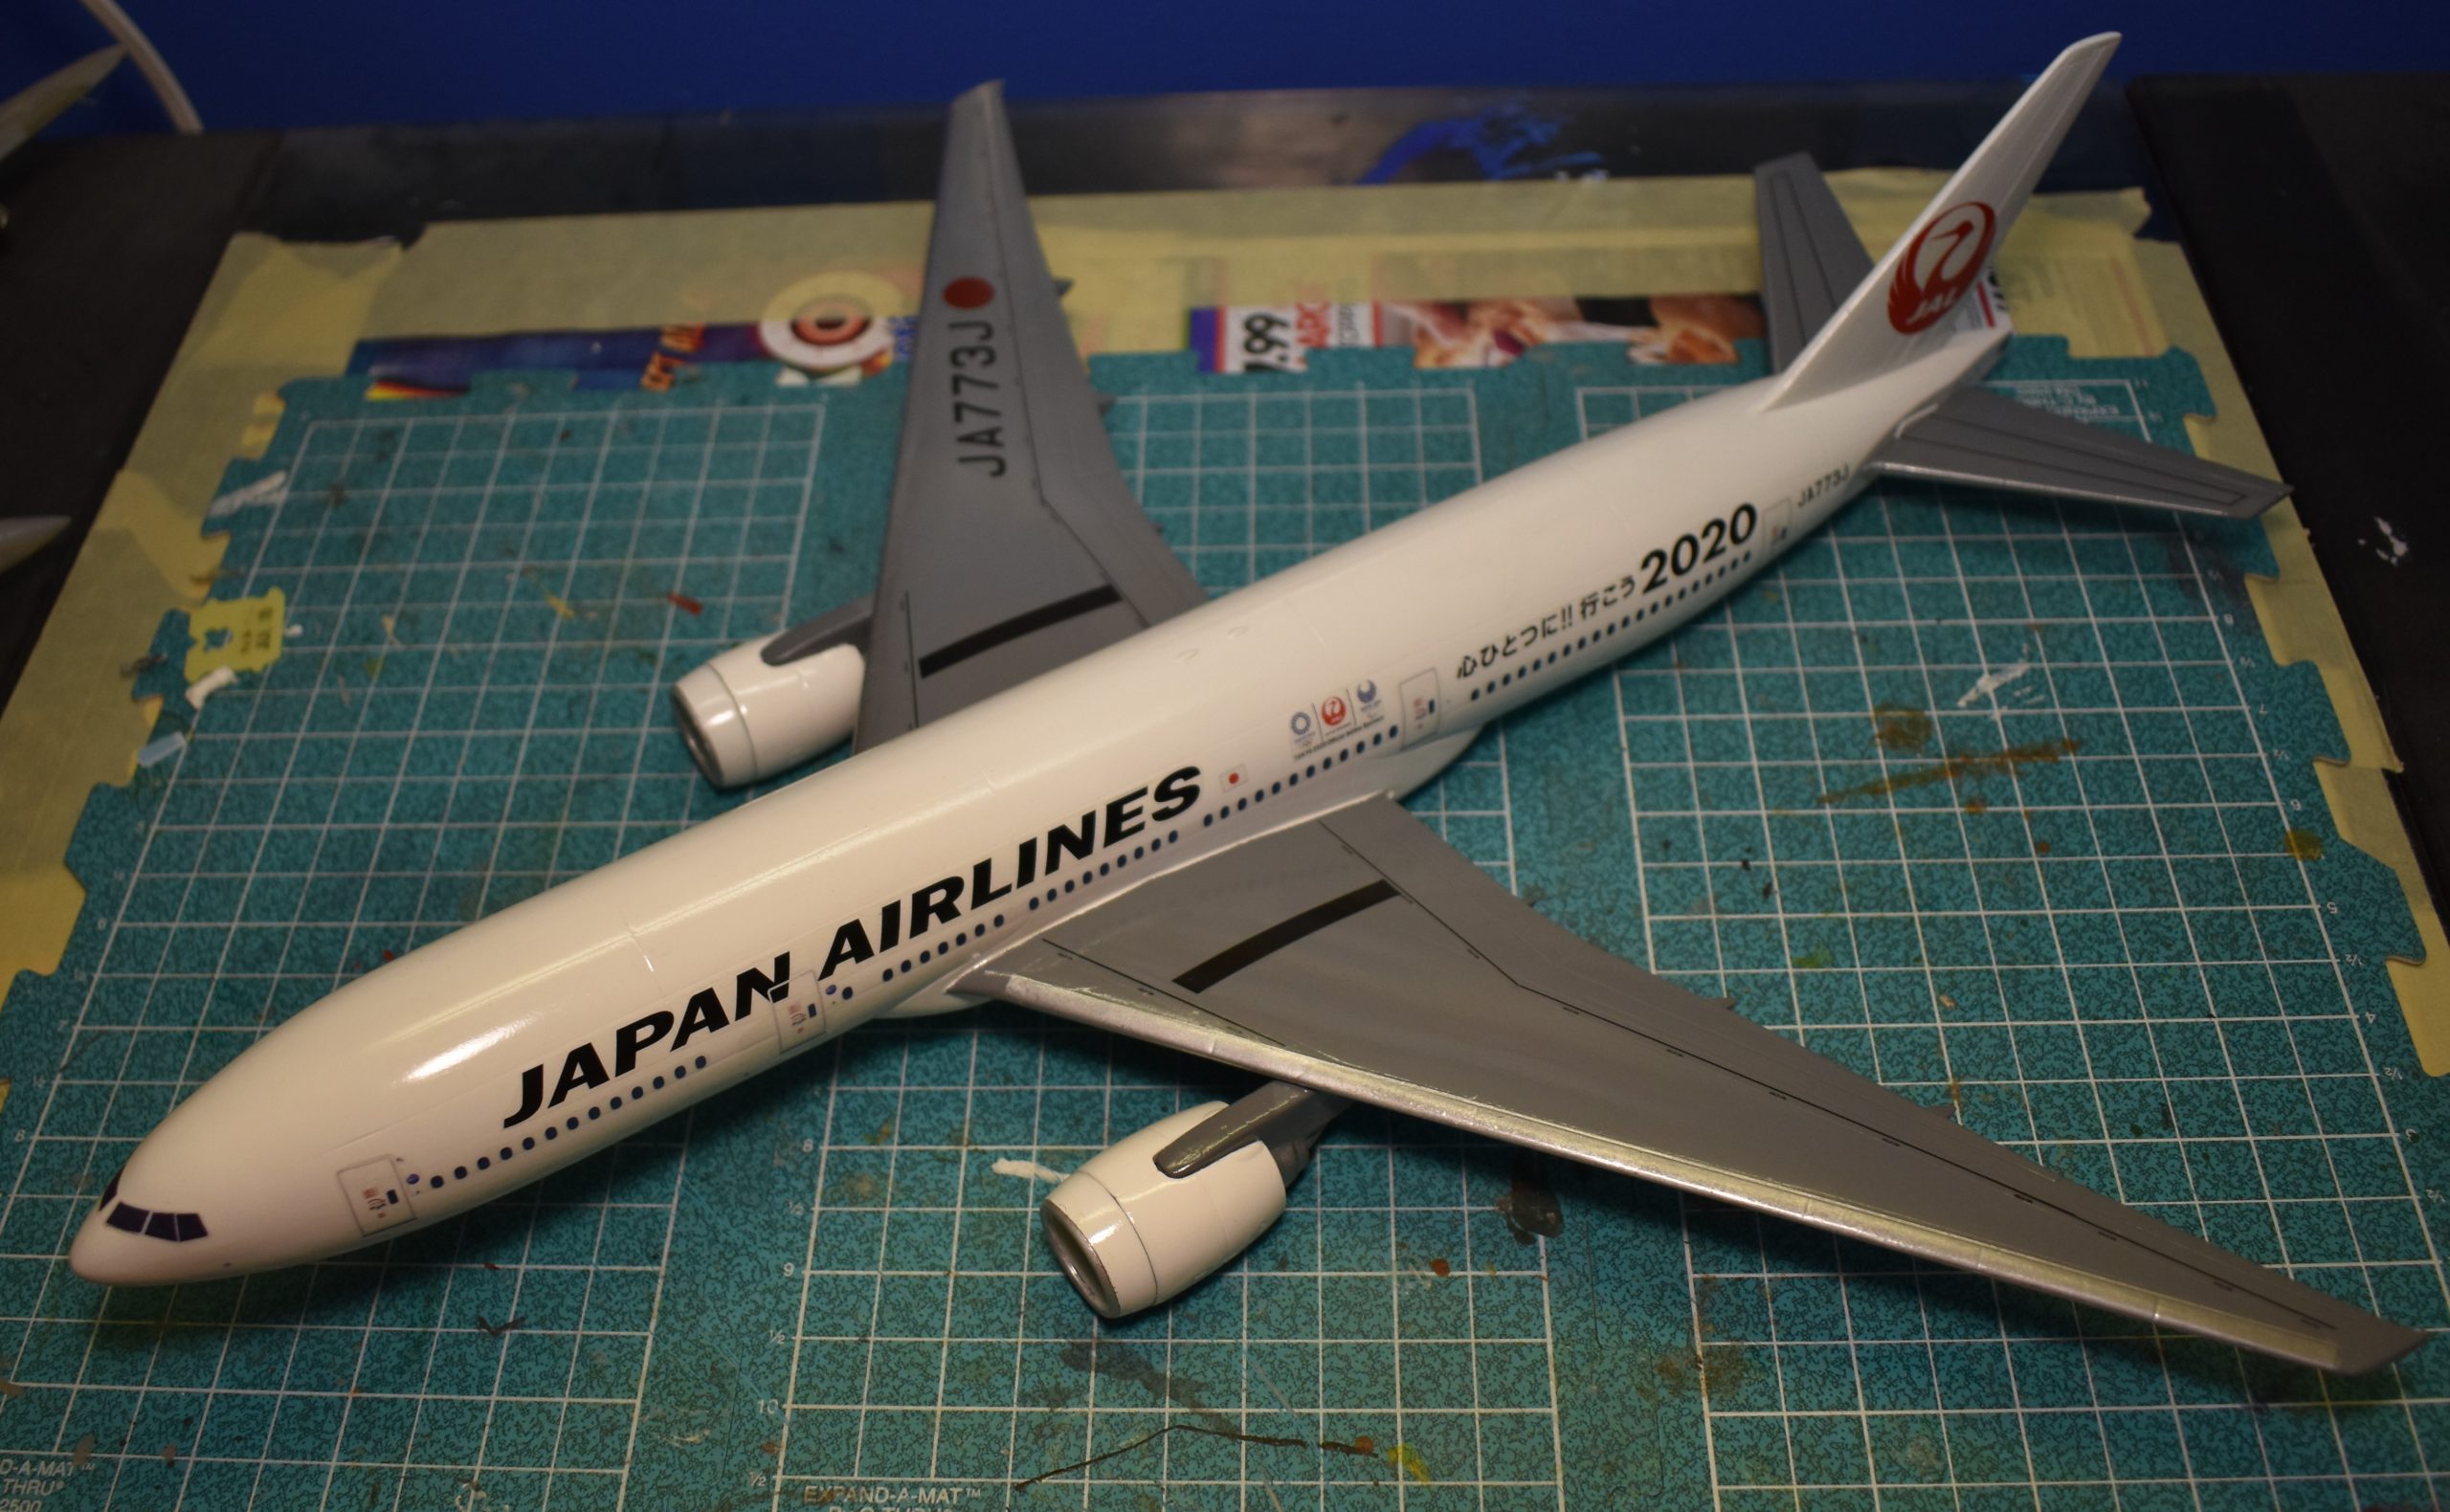
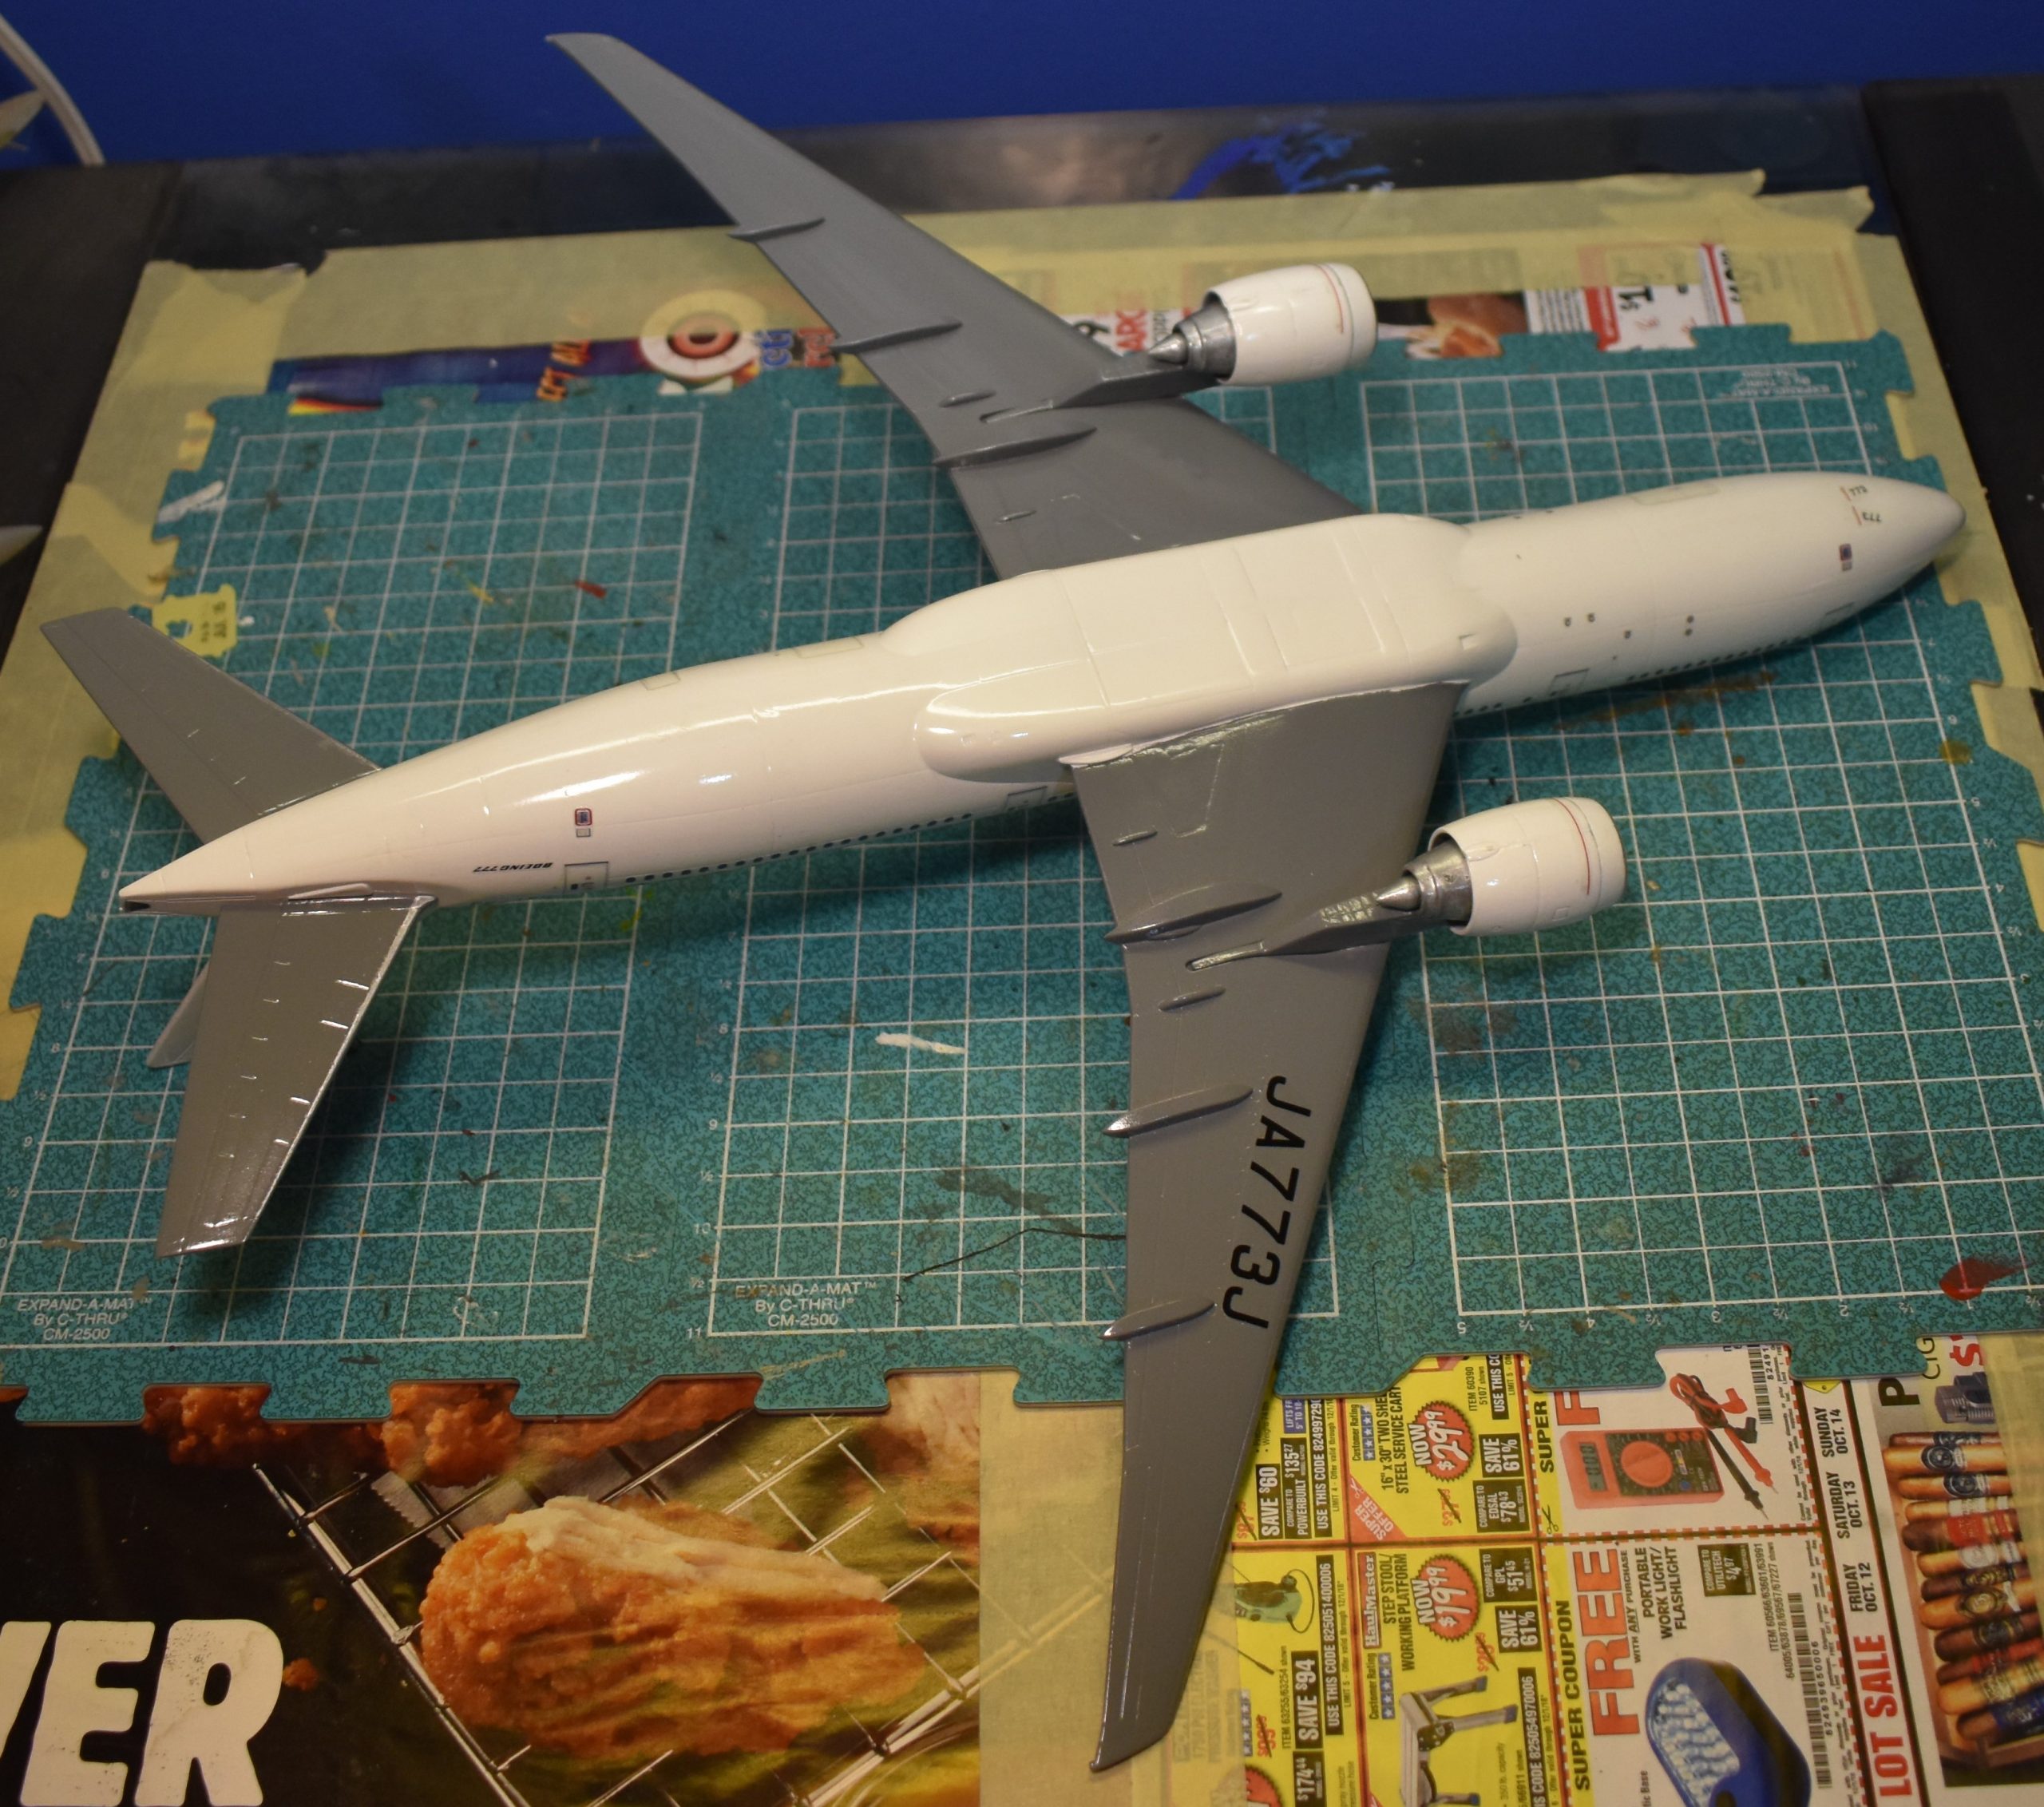
Update, December 2022: I finally finished building the Minicraft Boeing 777. I marked it with aftermarket decals for the 2020 Tokyo Olympics.
The aftermarket decals look good from a distance, up-close you can see how thick they are. I had to remove a couple of the smaller markings, because they curled-up and refused to lay down, no matter how much clear I coated them with.
It was going to be a gift for the couple who had spent big money reserving airline tickets, hotels and tickets to various Olympic venues.
The Minicraft turbine nacelles definitely look too small.
Of course, due to The Pandemic hyperbole, first the Japanese government delayed the games by a full year, then banned foreigners from coming into Japan altogether! The highly disappointed couple did get their money refunded, and this year they finally get their very own 777 Tokyo Olympics airliner.
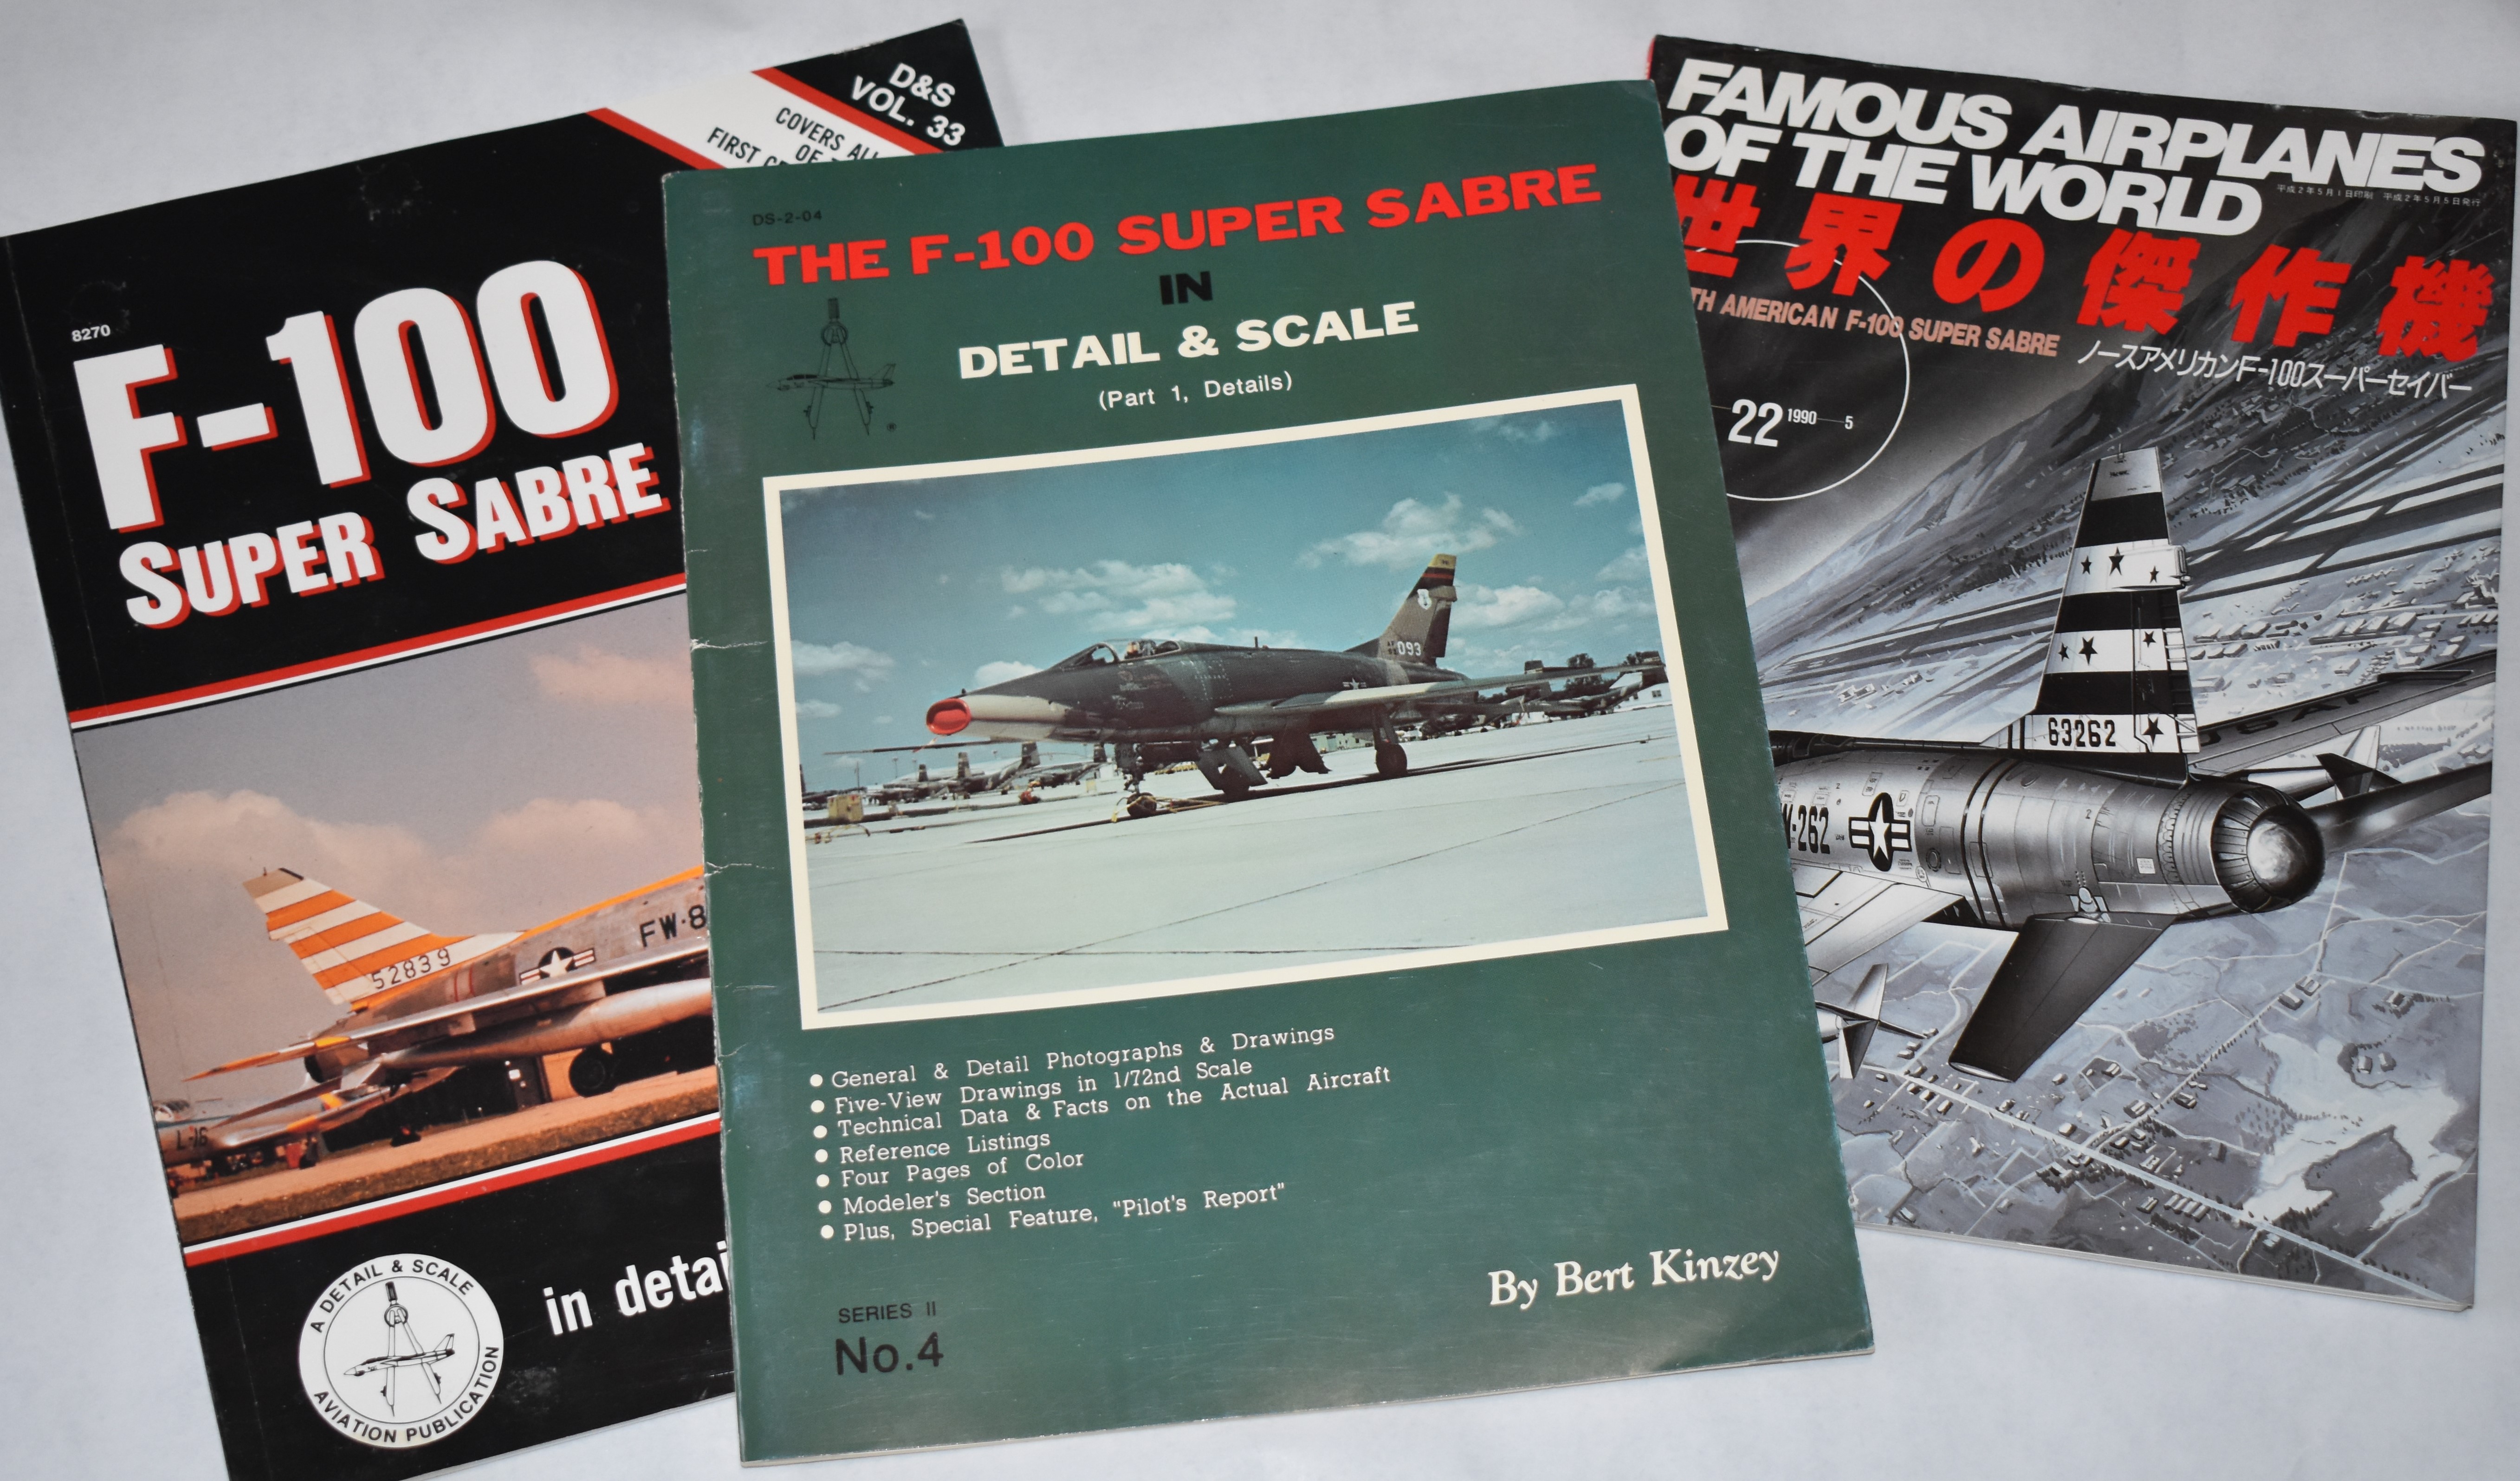
As far as I’m aware I’ve collected every North American F-100 Super Saber (I prefer the U.S. English spelling versus the Queen’s English spelling Sabre [for some unknown reason preferred by North American]) kit in 1/72 scale, I feel confident I can honestly direct you as to which F-100 kit to spend your hard earned cash on (please don’t make the Too Big to Jail banks rich by using credit).
I also have several books with scale drawings, and once again the ‘authoritative’ drawings themselves don’t match-up.
Detail & Scale Number 4 (1980) uses drawings by Rockwell/Ed Moore/Terry Smith. Detail & Scale Volume 33 (1989) uses drawings by Dana Bell and Terry Smith. Bunrin Do’s Famous Airplanes of the World Number 22 (May 1990) uses drawings that look like 1:72 but no scale is given.
Revell: According to Detail & Scale, this kit first came out in the 1950s and is a piece-o-crap (photos confirm this), it’s much larger than 1:72 scale. It’s supposed to represent a ‘A/C’ version of the F-100. According to Detail & Scale-33 it was last issued in 1987.
Detail & Scale-33 also talks about other ‘1:72’ scale F-100 kits issued by different companies in the 1960s-70s, apparently all actually being scales that are not 1:72.
IMC/Lindberg: According to Scalemates, the IMC kit was the first 1:72 scale Super Saber, out in 1965. Lindberg currently issues it. IMC marketed it as a ‘D’ version yet it has the wing of a ‘A/C’ version (Lindberg wisely dropped the reference to the ‘D’ version). The surface detailing is spurious. Detail & Scale-4 doesn’t mention it, and Detail & Scale-33 simply calls the kit a “gimmick with battle damaged parts”. I was surprised to find the wing, elevators and canopy matched dimension and shape of the Ed Moore and Terry Smith drawings! The vertical tail is too skinny, tall, and set too far back on the fuselage. The fuselage is a little long at the ass-end. The extra long external fuel tanks are too fat and the fins are grossly over-sized. You get separately molded air intake mouth and exhaust/afterburner butt-hole (this is the part that makes the fuselage too long). No weapons come with the kit. Compared to the Dana Bell drawings the fuselage and wing measures out the same as the previous drawings, but the elevators are narrower in span. The same can be said about the Bunrin Do drawings.
Hasegawa/Frog: According to Scalemates, the Hasegawa kit was issued first by Frog in 1970, then Hasegawa in 1971. According to the reviewers in Detail & Scale, it’s accurate shape-wise, but represents the F-100D before all the field mods were applied by the USAF, so it can’t accurately represent a service aircraft. Never-the-less Hasegawa continues to re-issue the thing, and people continue paying too much for it. Compared to the Ed Moore/Terry Smith drawings the fuselage, wing and elevators are a close match. The one piece canopy/windshield is smaller than in the drawings. Compared to the Dana Bell drawings the wing/elevators have too great a sweep-back. You get separately molded air intake mouth and exhaust/afterburner butt-hole, but the fuselage is too long at the air intake and afterburner. The canopy is even smaller compared to Dana Bell drawings. According to the Bunrin Do drawings the wing is very slightly narrower in chord, but good in span. The elevators have too great a sweep-back. The fuselage is too short and too skinny, the canopy is still small. The old kit comes with two styles of external fuel tanks, but not the extra long ones, plus what looks like napalm bombs and Bullpup missiles.
ESCI/AMT-Ertl: Scalemates says this kit first came out in 1982. Reviewers in Detail & Scale-33 praise the kit for being the most accurate F-100D at that time (yes, better than Hasegawa). ESCI was also the first to release a two seat ‘F’ version. It has detailed landing gear, extra long external fuel tanks, separately molded intake mouth, two styles of IFR probes and two styles of after burners. The only weapons are Bullpup and Sidewinder missiles. The wing is a close match to the Moore/Smith drawings, but the elevators are too narrow in span. The fuselage is slightly long at the mouth, the vertical tail is too tall. The canopy/windshield (molded as one) is the closest to matching these drawings. The wing is also a close match to the Bell drawings, but the elevator is not only too short in span, the sweep-back is too great. The fuselage is even longer, yet the tail is only slightly taller. The canopy looks good, but the windshield area looks small. Going by the Bunrin Do drawings the wing is just slightly narrower in span, the elevators match the shape and sweep but are slightly undersized in overall dimension. The fuselage is shorter and narrower, yet the tail matches the height of the drawing. The canopy/windshield looks like a good match.
Click the pics to make bigger:
Can you see the extra frame on the Italeri canopy from 1998?
Pioneer-PM: This monstrosity was unleashed in the early 1990s by British empire company Pioneer. It’s made by a company called PM, based in the NATO country of Turkey. The air intake mouth is molded as part of the fuselage halves. It’s marketed as a ‘C’ version but has the wing of the ‘D’ version. It comes with extra long fuel tanks, Bullpup missiles, blobs with fins that’re supposed to be bombs and an IFR probe that’s missing the receptacle end. Oddly the wing and elevators are a close match with the Detail & Scale drawings, yet the fuselage is too small in overall size (as is the canopy/windshield). Bunrin Do drawings show the wing to be slightly smaller in overall dimension, the elevators having too great a sweep-back, and the fuselage is even smaller, so small you’d think it was a different scale.
Italeri/Revell Germany/Tamiya/Academy: Time to set things straight. This kit is not a re-box of the ESCI kit, it is a re-tooled/so-called improved version of the ESCI kit, first coming out in 1998. The surface details, and the wheel well/air brake well details, are exactly the same. The sprue layout is different. The external fuel tanks are much shorter than the ESCI tanks. You get optional IFR probes and afterburners. For weapons you get two ‘dumb’ iron bombs and two rocket pods. For some odd reason Italeri added a spurious frame to the canopy, about two thirds of the way back on the canopy, rendering it useless. The most noticeable change (besides the canopy guffaw) Italeri made was to the length of the fuselage, which now matches the Moore/Smith drawings. The tail is still too tall. The wing is slightly shorter in span to the Moore/Smith drawings, but the elevators are a close match (the opposite of the ESCI kit). Compared to the Bell drawings the wing is a better match, still slightly short in span. The elevators match the shape but are also slightly short in span. Interestingly the fuselage is too long for the Bell drawings, at the mouth, and the tail is still slightly too tall. For the Bunrin Do drawings the wing is too short in span, slightly narrow in chord. The elevators match. The fuselage is too short, yet the tail matches the height of the drawing. Revell AG (Germany) re-boxed the kit at the same time Italeri first issued it. Beware, Tamiya re-boxed the kit starting in 2001, and I’ve seen it command prices over $20 U.S. (just because it has Tamiya’s name on the box), Academy re-boxed the kit in 2017 also commanding a high price for it, don’t do it!
Trumpeter: And the winner is! Starting in 2009 Trumpeter issued what every Super Saber builder wanted; super detailed kits in the ‘C’, ‘D’ and ‘F’ variants. The kit comes with separate flaps and slats for the wing. Optional IFR probes. Detailed exhaust/afterburner section (only the early non-f-102 style of afterburner). Air intake trunking (but the mouth is molded as part of the fuselage halves and is narrower than the other kits). Optional factory air brake or field modified air brake. Optional extended or folded nose pitot. Boarding ladder. Highly detailed interior parts. The instructions make it look like the canopy suffers from the now ubiquitous ‘parting line’ syndrome that most Asian kits are infected with, but the canopies that came with my kits (the ‘C’ and ‘F’ versions) were free of this parting line. For the ‘C’ version the instructions want you to attach the tail hook which, according to my references, the ‘C’ version did not have a tail hook. The weapons load is extremely limited (as is with all the kits reviewed); Sidewinders and ECM pods depending on the kit version. The external tanks are about the size of the Italeri kit’s. Detail & Scale-4’s drawings show the wing to be much too short in span, the elevators are a match. The fuselage is almost a direct hit with the tail being slightly too tall. The canopy and separately molded windshield both look slightly small. Compared to the Bell drawings, in Detail & Scale-33, the fuselage is almost a direct hit with the nose being too long. The canopy looks good, but the windshield still looks small. The wing is too short in span and slightly narrow in chord. The elevators look like a match. With the Bunrin Do drawings the wing is good span-wise but way too narrow in chord. The elevators are too long in span. The fuselage and tail are too short. The canopy is slightly small, but the windshield looks good.
Conclusion:Avoid the odd Pioneer F-100, with its 1:72 scale wings and 1:80(?) scale fuselage. If you want something cheap that you can assemble and paint in less than a day, then hang from the ceiling, then Lindberg’s re-issue of the ancient IMC kit is for you (sometimes you can find the Hasegawa kit for less cost than the IMC/Lindberg kit so go for that then). The old ESCI kit is still good-to-go for building something you want to proudly display on the shelf, but don’t waste your time and money on aftermarket detailing sets. If you want the most detailed F-100 kit available (and you were thinking of buying an ESCI kit plus detailing sets) then it’s the Trumpeter kit hands down, no need to buy aftermarket detail sets (but you can if you’re obsessive and rich ). Even with its flaws the Trumpeter kit is still better than all the other older kits available.
P.S. The most needed aftermarket item for these kits is a good variety weapons set.
One of the first ship kits I built was the 1:600 scale Aurora Moscow helicopter anti-submarine ship (not to be confused with the Moskva of the Atlant class of missile cruisers, aka Project 1164). I also built the Airfix version, and there are differences.
Back then it was the final two decades of the Cold War (unbeknownst to both NATO and Warsaw Pact) and we average kit builders in the United States didn’t have access to reliable information on Warsaw Pact vehicles. Most publications in English would only say that what we now know was Project 1123 Kondor couldn’t handle rough seas, and that production was halted after only two ships were launched. I always doubted such NATO propaganda because if the ships were so bad why were they in use until the mid-1990s?
Today we do have access to reliable info (including Kagero Top Drawings #55 book, with detailed scale drawings of things like missile launchers, for those of us who read English), and we have at least one aftermarket detailing set for the 1:600 scale Moskva. I spent a lot of money on a Russian magazine supplement before learning about the Kagero book. I also got a hold of the photo etched set #618 by White Ensign.
The Aurora Moscow was first issued in 1969, and for some reason last issued in 1972. Airfix issued their Moskva in 1973, and as far as I know last issued it in the late 1990s. In the early 1980s it was issued in the U.S. under the MPC brand.
The Aurora and Airfix hulls are just short of 13 inches (33cm) long, the Aurora being slightly shorter than Airfix. The Aurora hull is also taller and skinnier than the Airfix hull. The anchors are molded onto the Aurora hull and both kits have different shaped hull openings and portholes.
Both kits have chunky plastic for the radar antennae. Both kits do not come with missiles for the missile launchers. Both kits do not have the massive retractable sonar dome located towards the front of the bottom of the hull. It was this massive dome that was probably the reason the tall ship reportedly nose dived into the water during rough seas. Apparently NATO was unaware of this dome during the Cold War, or for some reason it was never mentioned in publications made available to the general public.
The Airfix Kamov helicopters are molded in two halves and don’t look good. The Aurora helicopters are molded in one piece, they look good but not quite like Kamovs (more like Kamovs than Airfix). The plus with the Aurora kit is you get optional retracted/folded rotor blades. The Aurora deck is one piece with more detailing than Airfix, and even has optional position hanger doors and space in the superstructure/funnel (molded in two pieces) area. The Airfix deck is in three pieces, it has optional position hanger doors but the space in the superstructure/funnel (molded in three pieces) is blanked off. The Airfix helicopter deck has recessed spaces to represent elevators.
The big open ass, I mean aft end, I mean stern of the ship is plane Jane in the Aurora kit, with two life boats. There’s some kind of blocky details in the Airfix kit. Aurora gives you davits to hang the life boats on, while Airfix gives you upside down ‘U’s to set them on. The propellers, I mean screws are different in shape and size between the two kits.
The ship has two large cranes, Aurora uses chunks of plastic to represent them while Airfix gives you a better looking multi-part system.
Click on the pics to make them bigger:
You get a big name plate with Aurora, Airfix gives you several hull numbers and netting for landing pads.
Aurora is slightly shorter than Airfix. The angle the pic was taken makes it look like the Aurora has the longer hull, but it’s the other way round.
Airfix is wider than Aurora.
Aurora is taller than Airfix.
Aurora’s one piece, Airfix’s three piece.
Aurora two piece, a little longer than Airfix’s three piece.
Aurora has retracted rotary wings.
Better looking, but still not correct.
Airfix has the better looking multi-part cranes.
Airfix on the left, Aurora on the right.
Airfix
Aurora
The White Ensign photo etched set has thin brass parts for the radars, railings, davits, cranes, hanger doors, missile launcher detailing, much better details for the ass end, ship name plates (Moscow & Leningrad) and parts for the Airfix helicopters (including tini-tiny landing gear parts which’l probably bend under the weight of the plastic). A major problem with White Ensign’s instructions is that they leave out where to use the differently shaped hand rails. Also, you get PE rotor blades in the extended position, but not retracted.
If you love 1:600 scale ships the best way to get a good looking and close to accurate Moskva/Leningrád is to kit bash the Airfix and Aurora kits, use the White Ensign Models PE set, and scratch build missiles, as well as the sonar domes under the hull.
Note: Research is also key to making as accurate a Project 1123 as you can. The ships had numerous different hull numbers and even different ‘paint jobs’ over the decades. You’ll need to find color photographs of a specific hull number, especially overhead views which’l reveal what color/colors the decks were painted.
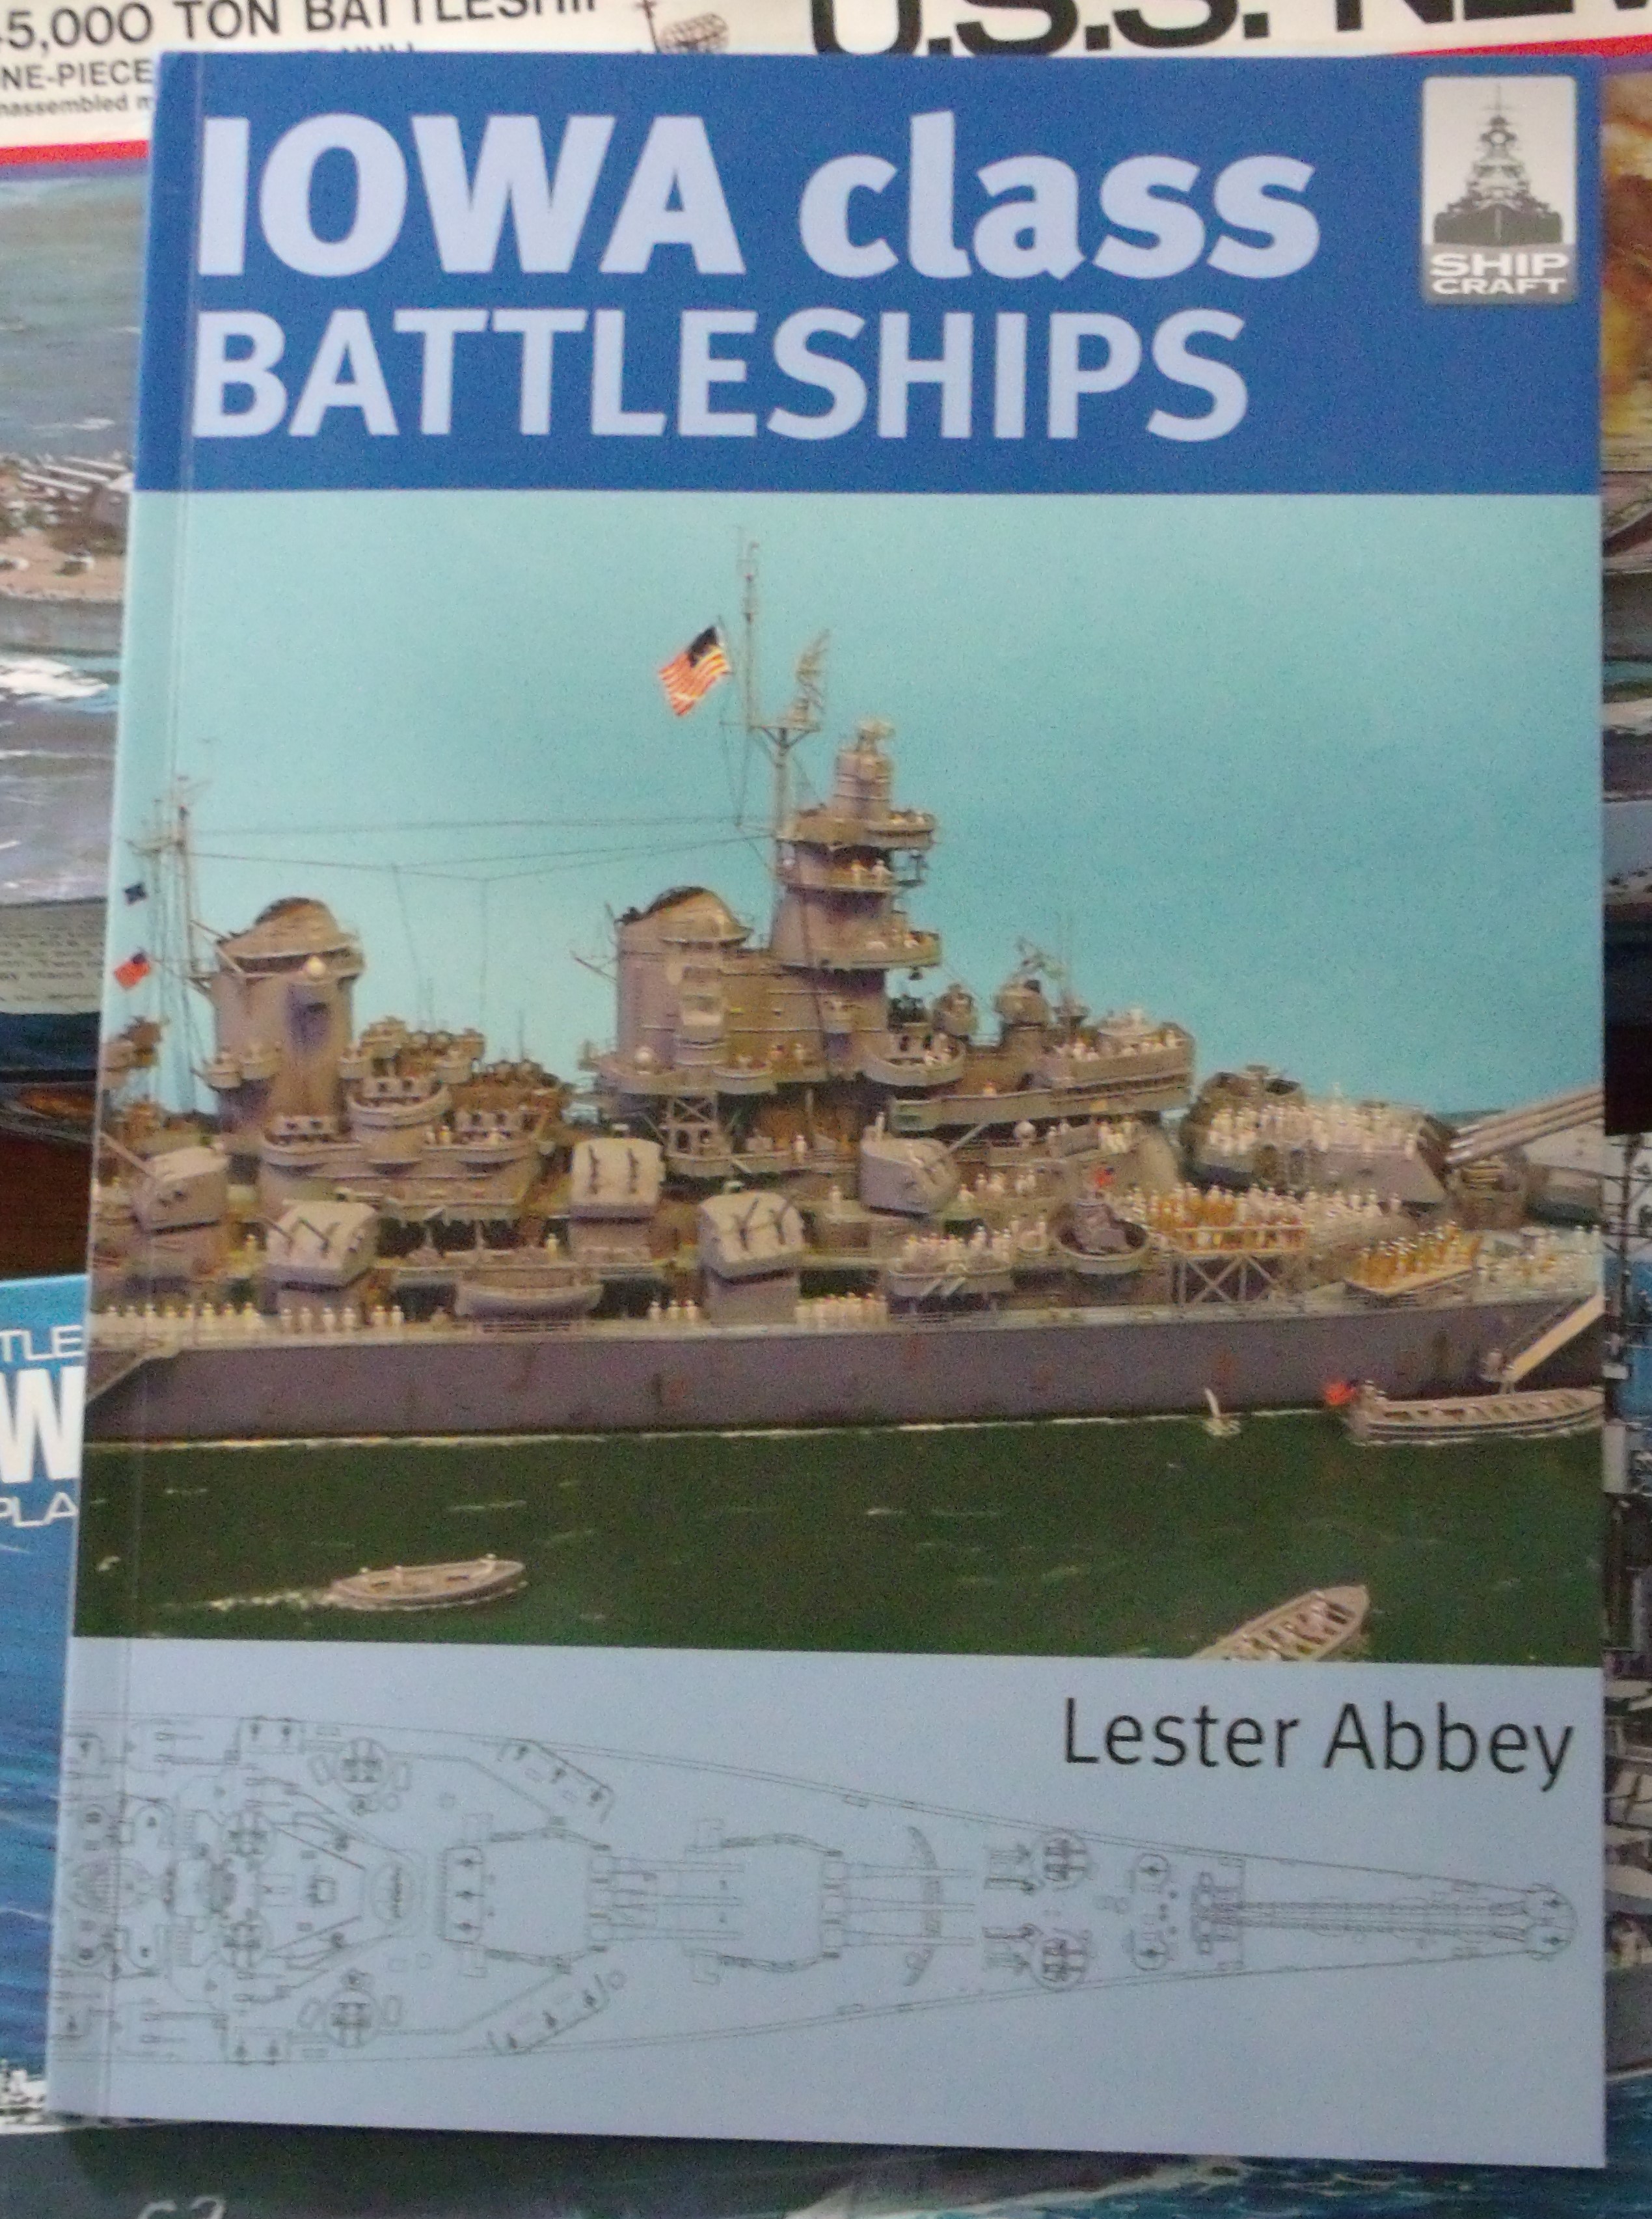
I am disappointed with Ship Craft 17 Iowa Class Battleships, while it is still a good overview for somebody just getting into building the iconic battleships it doesn’t pack the information that the excellent Ship Craft 16 Hipper Class Ships does, and in the same number of pages.
Ship Craft 17 (copyright 2012 Seaforth Publishing) fails in, among other areas, the kit review section, primarily in the 1:500 through 1:600 range. It also fails to mention the 1:350 scale Revell kit so I’ll mention it here; stay away from that kit as it is a revised version of the inaccurate Otaki-Life Like Hobbies kit first issued as a World War-2 Missouri in 1971 (revised in 1983 to look like a modernized ship, before being sold to Revell who’s been revising-reissuing it ever since, it was even issued under the Monogram label in the 1990s). Recently Revell-Germany re-issued it with a mass of aftermarket parts to make it look better, but the result is that you have to spend a crap-load of money and end up doing even more work on a kit to make it resemble a ‘modern’ Iowa Class ship.
I’m a fan of 1:600 scale battleships because they’re small enough you can display a lot of them on a single bookshelf and are still big enough that your guests don’t go blind looking at your handy-work. Plus, they were basically the only battleship kits I could get my hands on as a kid in the 1970s. Because the highly praised Ship Craft series failed to discuss these kits, and because I’m amazed at the high prices kit sellers on the internet are demanding for them, I feel compelled to do my own review of these now ancient, and unfortunately crappy kits.
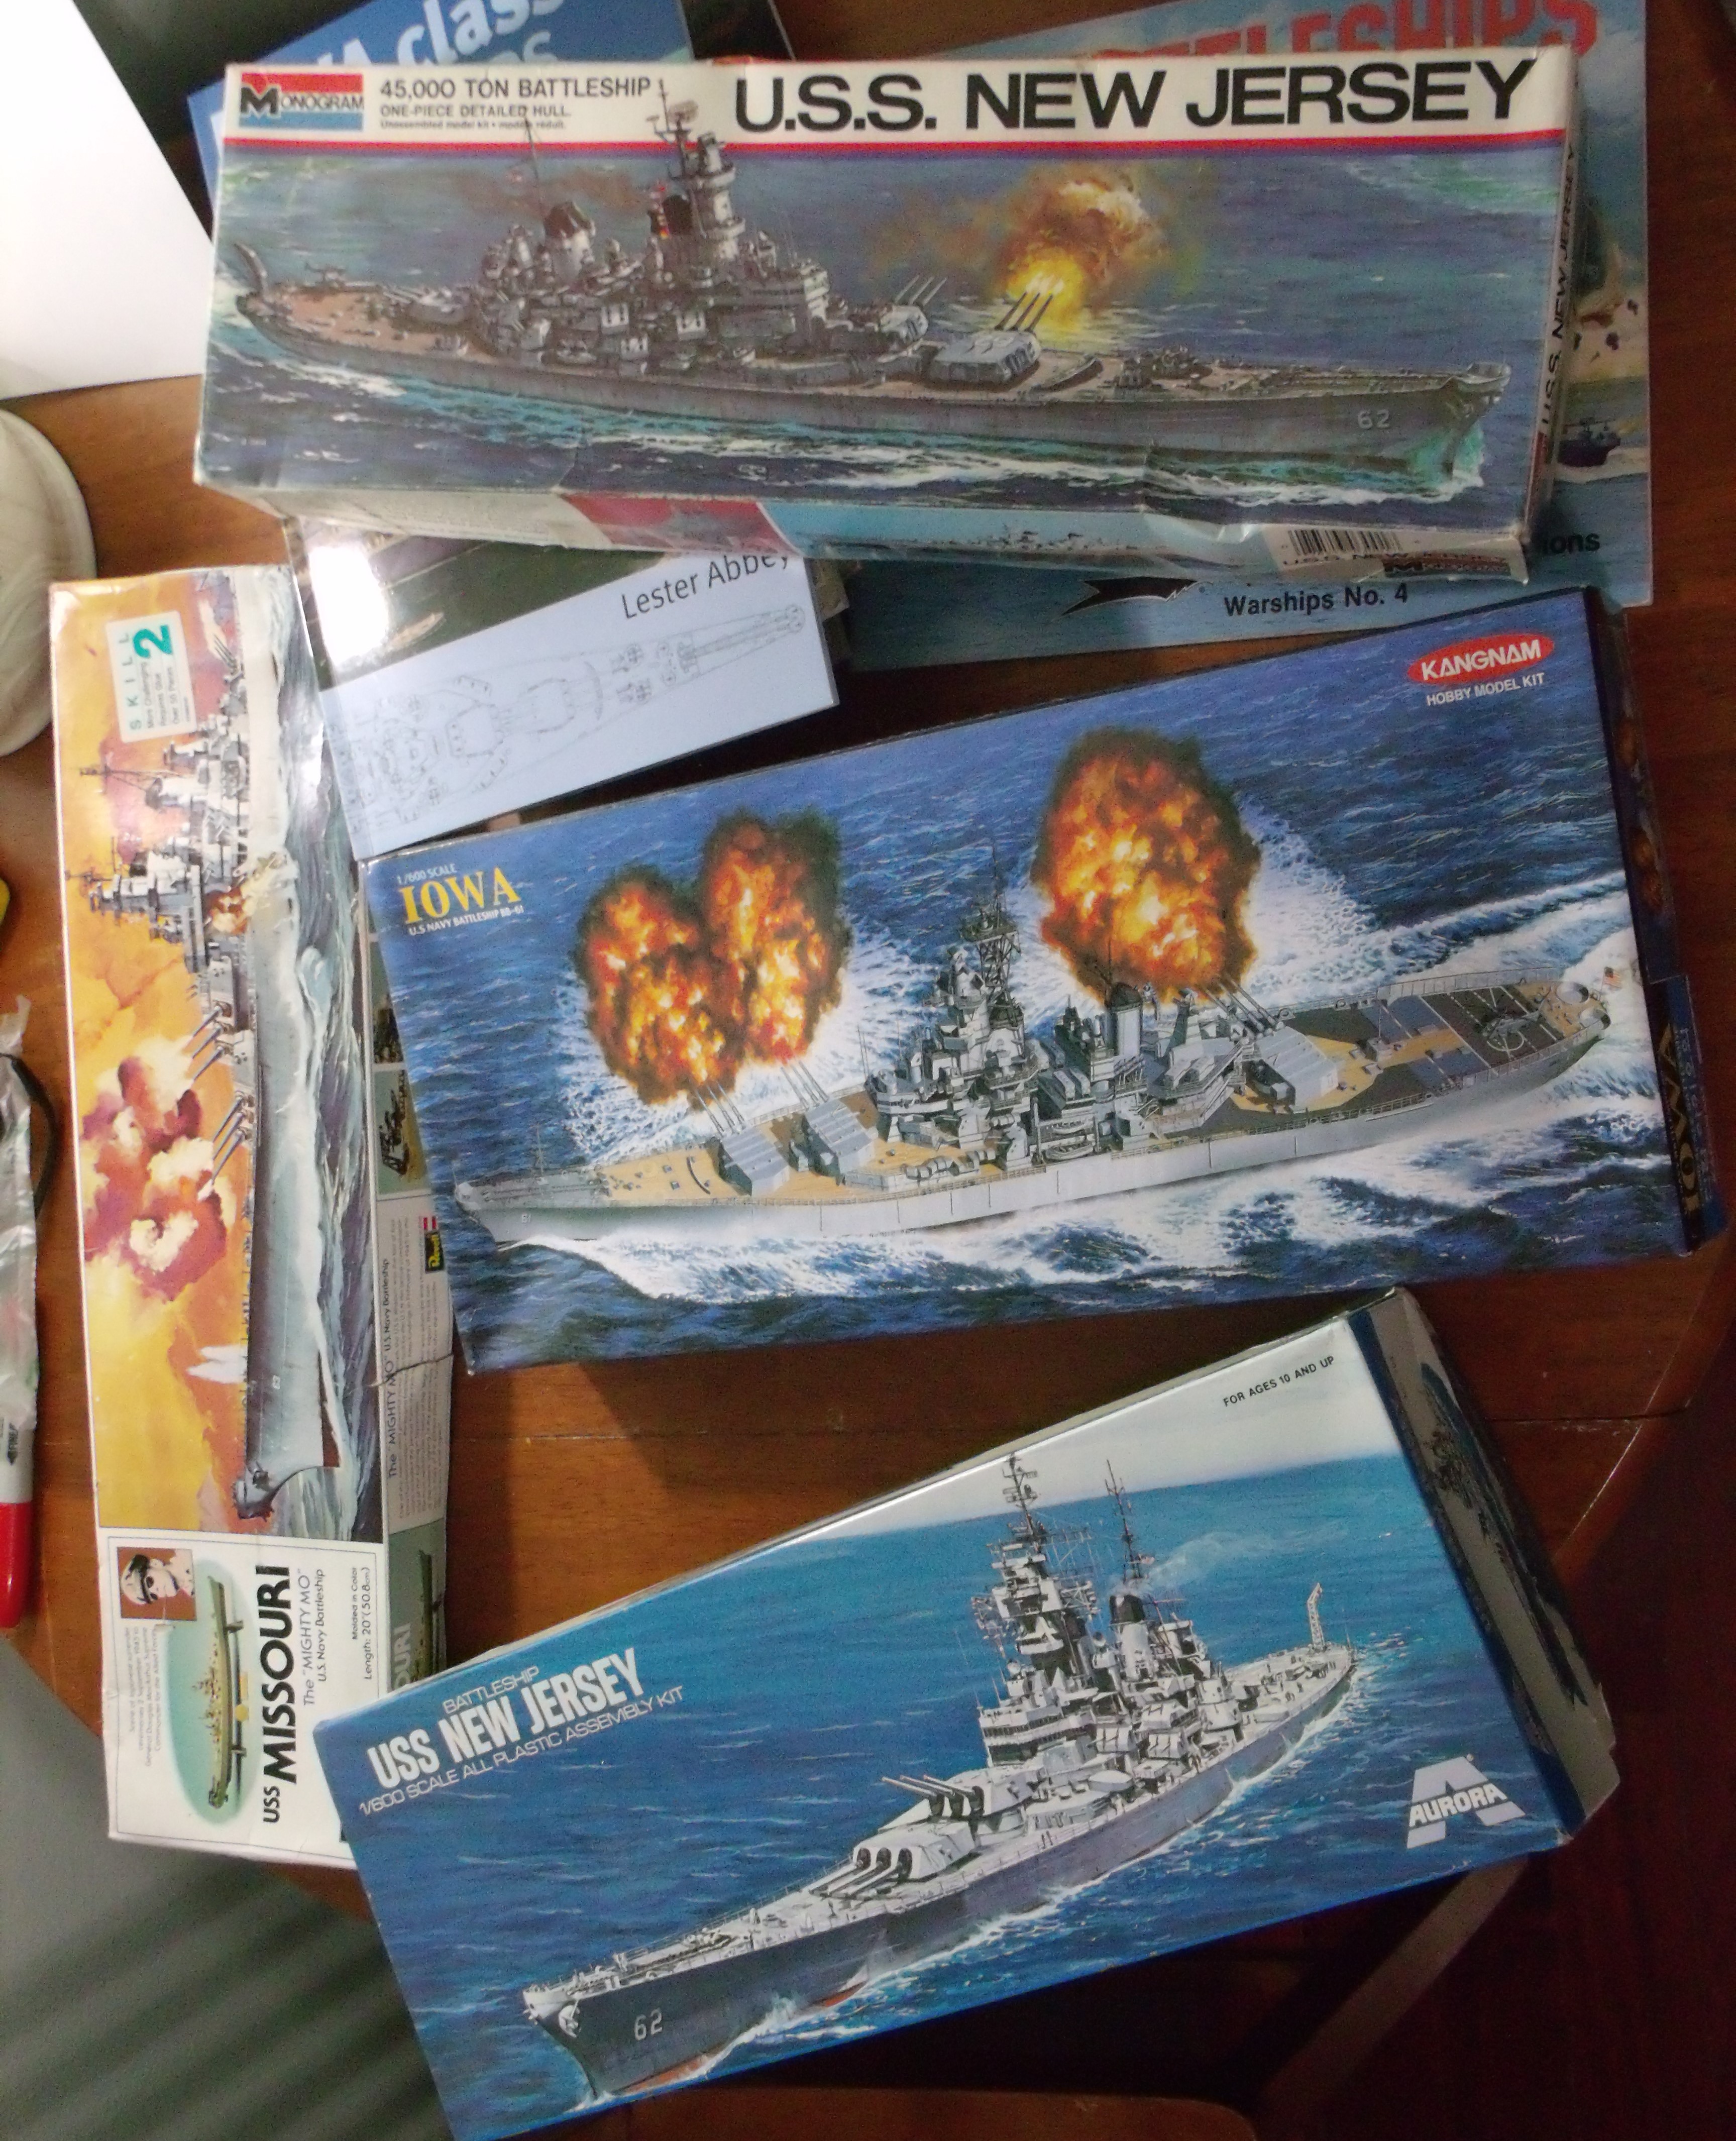
Iowa Class=Iowa, Missouri, New Jersey, Wisconsin
The first offender is Revell’s 1:535 offering.First released in 1953, terrible, inaccurate, does not come with water-screws (propellers) but has one rudder (the real ship has two rudders). Hull bow incorrectly angled, aft end of hull shaped like a step-pyramid. Wood planks on deck represented by continuous raised lines. Anti-aircraft .50 cal guns represented by molded-on crucifixes. Molded on life boats in the upside down position. Blocky looking Seahawk float-planes. The decals for the ship’s hull number are the large ‘shadowed’ post World War-2 type, yet the kit is supposed to be the World War-2 version. Amazingly Revell repeatedly re-issues the crappy kit, and for some odd reason people are willing to pay high prices for it. To make things more confusing, in the mid-1990s Revell began using the original artwork for Monogram’s 1:665 (16 inch) Missouri for its 1:535 Missouri.
Aurora’s 1:600 offering was first released in 1957 (Ship Craft 17 says “in the early 1960’s”), it looks like a scaled down version of Revell’s 1:535 kit. The hull bow has the same angle and the stern has the same stepped pyramid shape, except Aurora gives you four propellers. The propellers are incorrect as they have three blades per screw, the real ship has four bladed screws outboard and five bladed screws inboard. You get one big ugly rudder. The deck detailing is similar to Revell’s except for recessed wood plank lines (which are also continuous/unbroken) and molded on solid railing. The life boats are molded separate, the Seahawks look better than Revell’s. The main gun turrets look like scaled down Revell turrets. Interestingly the Aurora kits are the only ones in this review that provide boarding ladders, but there is no mention of them in the instructions.
From the mid-1960s to mid-1970s Aurora used some excellent artwork on their boxes. For the Iowa Class ships the artist actually did a better job representing the ships than the kit itself. The Missouri is painted in its post World War-2/Korean War guise, still bristling with anti-aircraft guns but minus its Seahawk float-planes. The Iowa also looks to be depicted as post World War-2/Korea, and the New Jersey (the best artwork of the bunch in my opinion) is in its Vietnam War livery with the big rectangular ECM box on its forward tower, and a helicopter pad on its aft deck (unfortunately the artist failed to mount the big antenna on the bow). Regardless of the box artwork each kit is the same World War-2 version, yet the decals for the ship’s hull numbers are the large ‘shadowed’ post World War-2 type (World War-2 hull numbers were small with no ‘shadowing’).
Monogram (not mentioned in Ship Craft 17) entered the Iowa Class race in 1976 with issues of Missouri, New Jersey and Wisconsin (in that order). THEY ARE NOT RE-ISSUES OF AURORA KITS, OR REVELL KITS! Also, I’ve seen them listed as 1:600 scale, they are a smaller 1:665 scale. The odd scale is the result of Monogram deciding to issue battleship kits based on a standard 16-inch (40cm) hull (as stated on the box), rather than a ‘constant scale’. The hull has the best looking bow of the bunch, even has the three ‘eyes’ for anchors and cables, however, there are mysterious vertical lines along the hull sides (the real ships have noticeable horizontal lines down the length of the hull), and the stern is still incorrectly shaped. You get four propellers but they’re all four bladed. The most accurate looking parts of this kit are the two rudders and the excellent looking secondary gun turrets-guns (which are the same size as 1:600 scale Aurora/Otaki). Amazingly for a late 1970s issued kit the deck looks like it came right outta the 1950s (which might explain why some people think its a revised issue of the Revell or Aurora kits), it even has the raised wood deck lines and crucifix .50 caliber machine guns similar to Revell’s. There are two Kingfisher float-planes and the hull number decals are the small WW-2 type, yet the main mast looks like the type fitted after WW-2.
In 1984 Japan’s Otaki issued a 1:600 scale motorized version of a modern Iowa Class ship (not mentioned in Ship Craft 17). In the mid-1980s Otaki became Arii and it was issued under that label. It has been ripped-off and issued by Korea’s Kangnam and China’s Lee (aka C.C. Lee, aka Shanghai C.C.Lee Model Company). It is currently issued by Japan’s MicroAce (the new Arii). From here on out I’ll refer to this kit as The Asian Kit. The kit is totally lacking in detail, and even though the hull and deck size is similar to Aurora’s 1:600 hull/deck the main gun turrets are as big as the bigger Revell kit’s turrets. The helicopters are crappy, the Harpoon anti-ship missile launchers are a bad joke, the secondary gun turrets are chunks with stubs for guns, the Phalanx gatling gun systems are fat and missing the barrels. The life boats are huge. The stern of the hull is close to being accurate, but the propellers are all four bladed, you get two rudders. The kit is not worth the full U.S. MSRP (Manufacture’s Suggested Retail Price) that the majority of internet sellers demand.
Here’s more depressing news; Main GunTurrets-Guns: Aurora’s turrets are the smallest yet resemble Revell’s, also the guns are as big as The Asian Kit’s. The Asian Kit’s turrets are almost as big in diameter as Revell’s, they are devoid of detailing, except for recessed ladders. Revell’s main gun tubes will not fit into Revell’s turrets. Monogram’s turrets are slightly bigger than Aurora’s, the guns look the most accurate, are the same diameter as the 1:600 scale kits, but shorter in length, the anti-aircraft gun enclosures on the top of the turrets are the wrong shape.
Superstructure: All kits lack detailing. The Asian Kit is the worst offender completely devoid of details, it is molded separately and look like that ancient underwater ‘structure’ known as Yonaguni Submarine Ruins.
Here’s some pictorial evidence to back up accusations against the offenders (click each pic to view more in the full-sized image):
Ignore the red paint on the Monogram kit, it doesn’t come that way.
The Asian Kit is best without being accurate.
The ‘eyes’ have it for Monogram.
From top to bottom: Monogram, Revell, Aurora, The Asian Kit.
Back to Front: Monogram, Revell, Aurora, The Asian Kit.
From right to left: Monogram, Aurora, The Asian Kit, Revell.
From left to right: Monogram, Aurora, The Asian Kit, Revell.
Floatplanes, rudder, crane, anchors.
Floatplane, crane, catapults, life boat.
Floatplanes, floats, crane, anchors.
Rudders
Water screws
Main mast
Helicopters
Water screws
Phalanx
Tomahawk cruise missile launcher boxes
Harpoon anti-ship missile launchers
The small one is Aurora’s, the big one is The Asian Kit’s.
Boarding ladders included but not talked about.
There’s no excuse for Revell’s continuous re-issuing of their crappy kit (in fact they’ve just re-issued it again). You’d think with the merging of Revell and Monogram, in the 1990s, they’d issue the better Monogram kit. It should be noted that Monogram’s 16 inch Iowa kits were rarely issued (for some unknown reason), along with Monogram’s 16 inch Bismarck/Tirpitz (which works out to about 1:615/17 scale, a 1:600 scale Bismarck hull is approximately 16 & 3/8th inches long). I remember reading an article, many years ago, that was talking about a train derailment and fire that destroyed many of the Aurora molds that had just been purchased by Monogram. I believe it happened in 1979, the Monogram 16 inch battleship kits were originally issued between 1976 and 1978. It would make sense that they were never issued again if their molds were also destroyed in that train fire, and it would explain why both the Monogram and Aurora kits command high prices on the internet, however, I’ve seen issues of the Monogram 1:665 (16 inch) Iowa kits in 1990s style boxes, and even the original late 1970s boxes but with 1990s style Skill Level 2 stickers on the shrink-wrap (you can’t trust the copyright date on boxes as being indicative of when that particular kit was issued).
Regarding Ship Craft 17, it’s still a great starting point for learning about the ship and has enough information in the text that you’d realize there isn’t, as yet, a model kit in any scale of the Iowa Class that doesn’t have some discrepancy (which is amazing considering the historical importance of the world’s last and best battleships).
It would take a lot of work to correct the old American kits. The Asian Kit’s near total lack of detail has an advantage; it makes it easier to detail-up with aftermarket parts and scratch building, you could even back date it to Vietnam, Korea or WW-2. There are plenty of aftermarket photo etched sets for 1:600 Fast U.S. Battleships, and a company called Model Monkey is producing 1:600 scale 3D printed ‘correction’ parts, including an early WW2 rounded bridge for the New Jersey.
I end this review by appealing to Hornby-Airfix to produce a new line of 1:600 scale Iowa Class ships, including options for World War-2, Korea, Vietnam and Desert Storm.
Is it time to kill-off the old Hasegawa Heinkel 51 kit?
ICM (aka ICM Holding of Ukraine, I’m not sure what ICM means as even in Cyrillic the company uses ICM as its identifier) has made great advances since its early days of chunky low pressure injection kits, and is producing the most accurate (so far) version of the German biplane in 1:72 scale.
The main improvements are detailing and the upper wing. Overall the ICM kit has better detailing and a main wing that has the correct dihedral (upward sweep). The ancient Hasegawa kit (first issued in the 1970s) has no dihedral. However, it seems the ICM wingtips are questionable as they taper back, they should be more evenly rounded.
Click on the pics to make them bigger:
Hasegawa has bigger rudder, both fuselages are approximately the same size.
This photo shows a large rudder similar to the Hasegawa kit.
This profile drawing of a He-51A is from the old Profile series, note the shape of the rudder.
This photo of an He-51B shows a rudder that appears to be like that in the ICM kit.
Hasegawa uses injection molded windshield, ICM requires you to cut and shape it from clear plastic sheet.
The ICM kit has cockpit details, the Hasegawa does not.
The Hasegawa cockpit opening matches the shape of drawings found in the old Profile series (but might be too big). The ICM kit does not match the drawings in shape, but maybe in size.
Drawing showing dihedral of upper wing and cockpit opening.
The wings area approximately the same size, but ICM’s wing tips are more ‘pointy’.
The ICM upper wing has dihedral, the Hasegawa does not.
Size & shape comparison of lower wings and horizontal tails. I don’t have true scale drawings of the aircraft so I don’t know which are correct.
Hasegawa has the manifold and exhaust pipes molded as one piece. ICM has fiddly individual pipes, but this means you can use just the manifold parts to model an early version of the plane with no exhaust pipes.
The ICM propeller (air-screw) and spinner is larger, but better shaped.
Hasegawa’s wheels-tires are molded integrally with the spats. ICM gives you nicely detailed wheels-tires molded separately, so you can build it with or without spats.
Rare Plane makes a vac-formed kit, the packaging photo looks to have dihedral in the upper wing but I’ve seen completed kits with no dihedral and oddly shaped horizontal tails. The problem with comparing vac-formed kits to injected kits is that a lot depends on the skill of the builder in cutting the parts from the plastic sheet and then shaping them to form a good join.
A drawback of the ICM kit is subtle, or no, attachment points. The old Hasegawa kit is easier to build. My conclusion in comparing the Hasegawa with the ICM He-51 is that while both can be built to look good the ICM has the better detailing and correct dihedral of the upper wing.
There are no major visual differences in the A, B or C versions of the Heinkel 51 (except with the float-plane version).
Italeri recently re-issued its old but nice looking Deutschland class heavy cruisers (they are not battleships) in 1:720 scale.
These kits represent the class before the 1939-40 rebuilds (refit). They were first issued in the late 1970s, and have excellent detail for the scale (which made some of the larger scale ship kits look even worse than they were; 1:600 Airfix, Aurora, 1:570 Revell, etc). In the 1980s Testors issued them in the United States. Italeri issued them again in the 1990s.
Deutschland: Parts distinct to the first ship and prior to the 1939 update and name change. Deutschland originally had ‘exposed’ torpedo tubes, but the Italeri kit comes with the armored tubes.
Scheer: Parts distinct to the second ship of the line, prior to its 1939-40 rebuild.
Graff Spee: Parts distinct to its final year of life, 1939, with one exception; the kit does not come with the ‘mattress/bed spring’ radar that should be mounted on the front of the tower range finder. Note that prior to 1939 Graf Spee was fitted out similar to Scheer, so if you want to model an earlier Graf Spee just buy the Scheer kit.
Lützow: Parts distinct to the 1939 update to Deutschland (when its name was changed to Lützow), but prior to its 1940 rebuild.
Click the pic to make bigger:
They all look like this. Can be built waterline or full hull.
At first glance they might look the same, but each sprue has parts unique to each ship.
Nice detail for 1:720 scale.
Turrets that look better than some 1:600 scale ships.
This 1:720 Heinkel 60 looks better than a 1:600 scale Airfix Arado 196.
Nice hull details. It can be built full-hull or waterline.
These Weimar era ship specifications show the original displacement marked out and replaced with a bogus displacement of 10,000 tonnes.
This pre-1939 photo shows Graf Spee and Scheer with identical towers.
1939 tower arraignment of Graf Spee, including mattress radar in front of new range finder.
1939-40’s Lützow. Small windshield (funnel cap) on smoke stack, new recovery cranes and range finders. Note missing anchor, and it looks like the middle main gun tube is missing. The photo was supposedly taken after Lützow was torpedoed in the ass.
For decades these ships were called battleships by the victors of World War Two, which is ridiculous since battleships ranged in the 30-thousand to 50-thousand tonnes standard displacement range. It’s the result of official British empire government backed news media propaganda (today called Fake News) coming up with the Fake News phrase Pocket Battleship. It was an attempt by the British government to rile up their subjects to support war with Nazi Germany. Nazi and Blitzkrieg were also Fake News terms made up by the British main stream news media, they were not German terms, although the Germans liked the word Blitzkrieg and used it themselves. What should be noted is that the Deutschland class of ships were not constructed by the ‘Nazis’, but by the western imposed Weimar government in the early 1930s, before the NSDAP (National Sozialistische Deutsche Arbeiter Partei) was democratically elected to power. While these ships violated treaties limiting warship sizes, the violation was initiated by the Weimar government, not the NSDAP (incorrectly called Nazi by the British Fake News Media).
Under treaty cruisers were limited to 10-thousand tonnes (metric tons) standard displacement. According to some sources we will never know the true displacement because Weimar bureaucrats altered the official data. Today it’s generally accepted that Deutschland was just over the 10-thousand tonnes limit, Scheer was closer to 13-thousand and Graf Spee closer to 14-thousand tonnes.
The differences in weight between the ‘sister’ ships is due to subtle alterations in the hulls of Scheer and Graf Spee to accommodate extra armor protection. Official suspect data give the same length and width for all ships, but hull height for Scheer and Graf Spee is 0.2 meter shorter that Deutschland. I would assume that with the extra armor the hull side thickness was greater than Deutschland’s (naval researcher H.T. Lenton says Spee/Scheer were about 1 meter [3 feet] wider than Deutschland-Lutzow).
Knowing that official data for the ships are suspect it’s no use getting knit-picky about accuracy. The best thing is to use photographs of the ship you want to depict at the time period your interested in.
Graf Spee was the first to go, sunk by its own crew in South America in 1939, after being damaged by three Royal Navy cruisers. During its South Atlantic adventure Graf Spee underwent attempts at deception, making itself look like a full fledged battleship with extra gun turret and exhaust funnel, and even painting the name Deutschland on the side of the hull.
Lützow and Scheer lived longer than anybody expected. Not only did the British want them sunk, but, at the protests of the Deutsche KriegsMarine (DKM), Adolph Hitler ordered them scrapped in 1943.
Scheer ended up being used as a training ship and artillery platform against Soviet ground forces. Scheer was sunk in April 1945 by Royal Air Force bombers, a month before Germany surrendered.
Lützow was disabled and used as an artillery platform against the Soviets, supposedly destroyed by its crew as the Soviets overran the port. Western news sources reported that the Soviets had raised Lützow for the purpose of scrapping it. In 2000 it was discovered the Soviets used Lützow for target practice, sinking it in 1947.
The only disappointing thing I find about these Italeri kits is that no decals come with them. It would be nice to have each ship’s bow shield/crest and the Coronel nameplate on the front of Graf Spee’s tower. (you can adapt 1:700 aftermarket decals to these 1:720 scale kits, as well as PE sets)
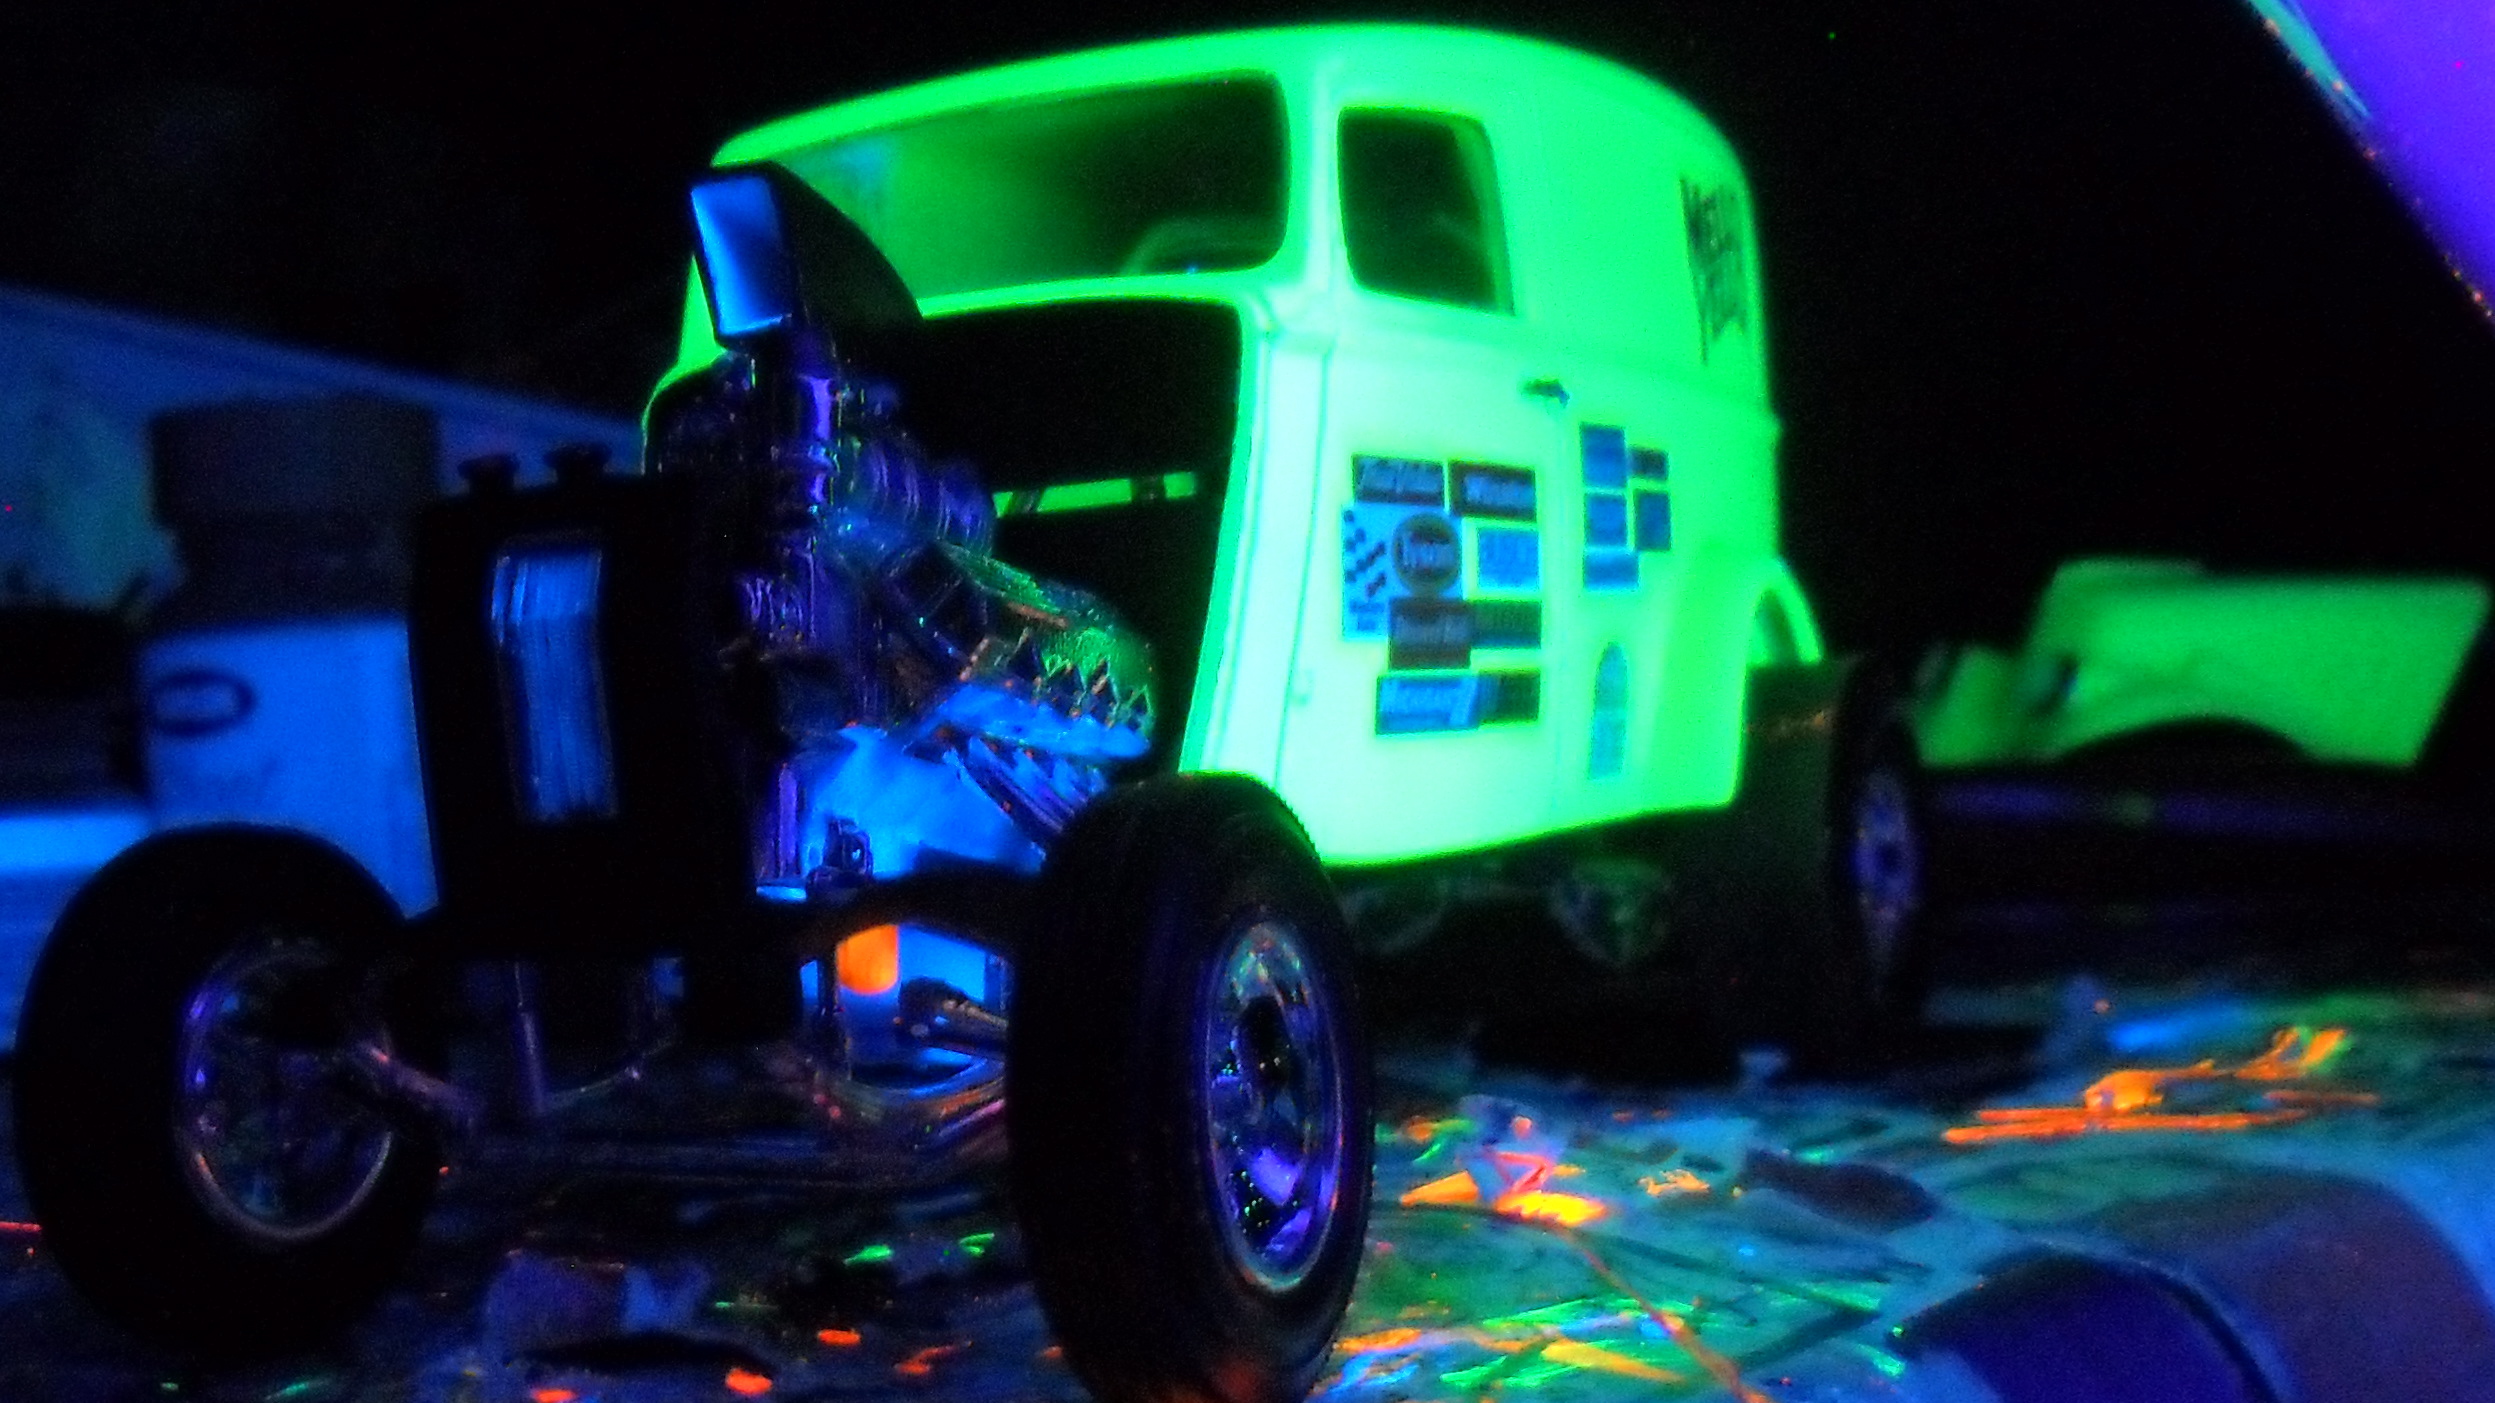
Retro issue of early 1970s kit. It was also issued as the ’33 Willys Panel Truck.
It should have been an easy build, not quite.
They even re-issued the original instructions, which reminded me why I had so much trouble building car kits as a kid in the mid-1970s.
Exploded view instructions are vague, lack sequential steps (which turn out to be important) and actually leave out required parts. Hence the mantra Always Dry Fit before glueing.
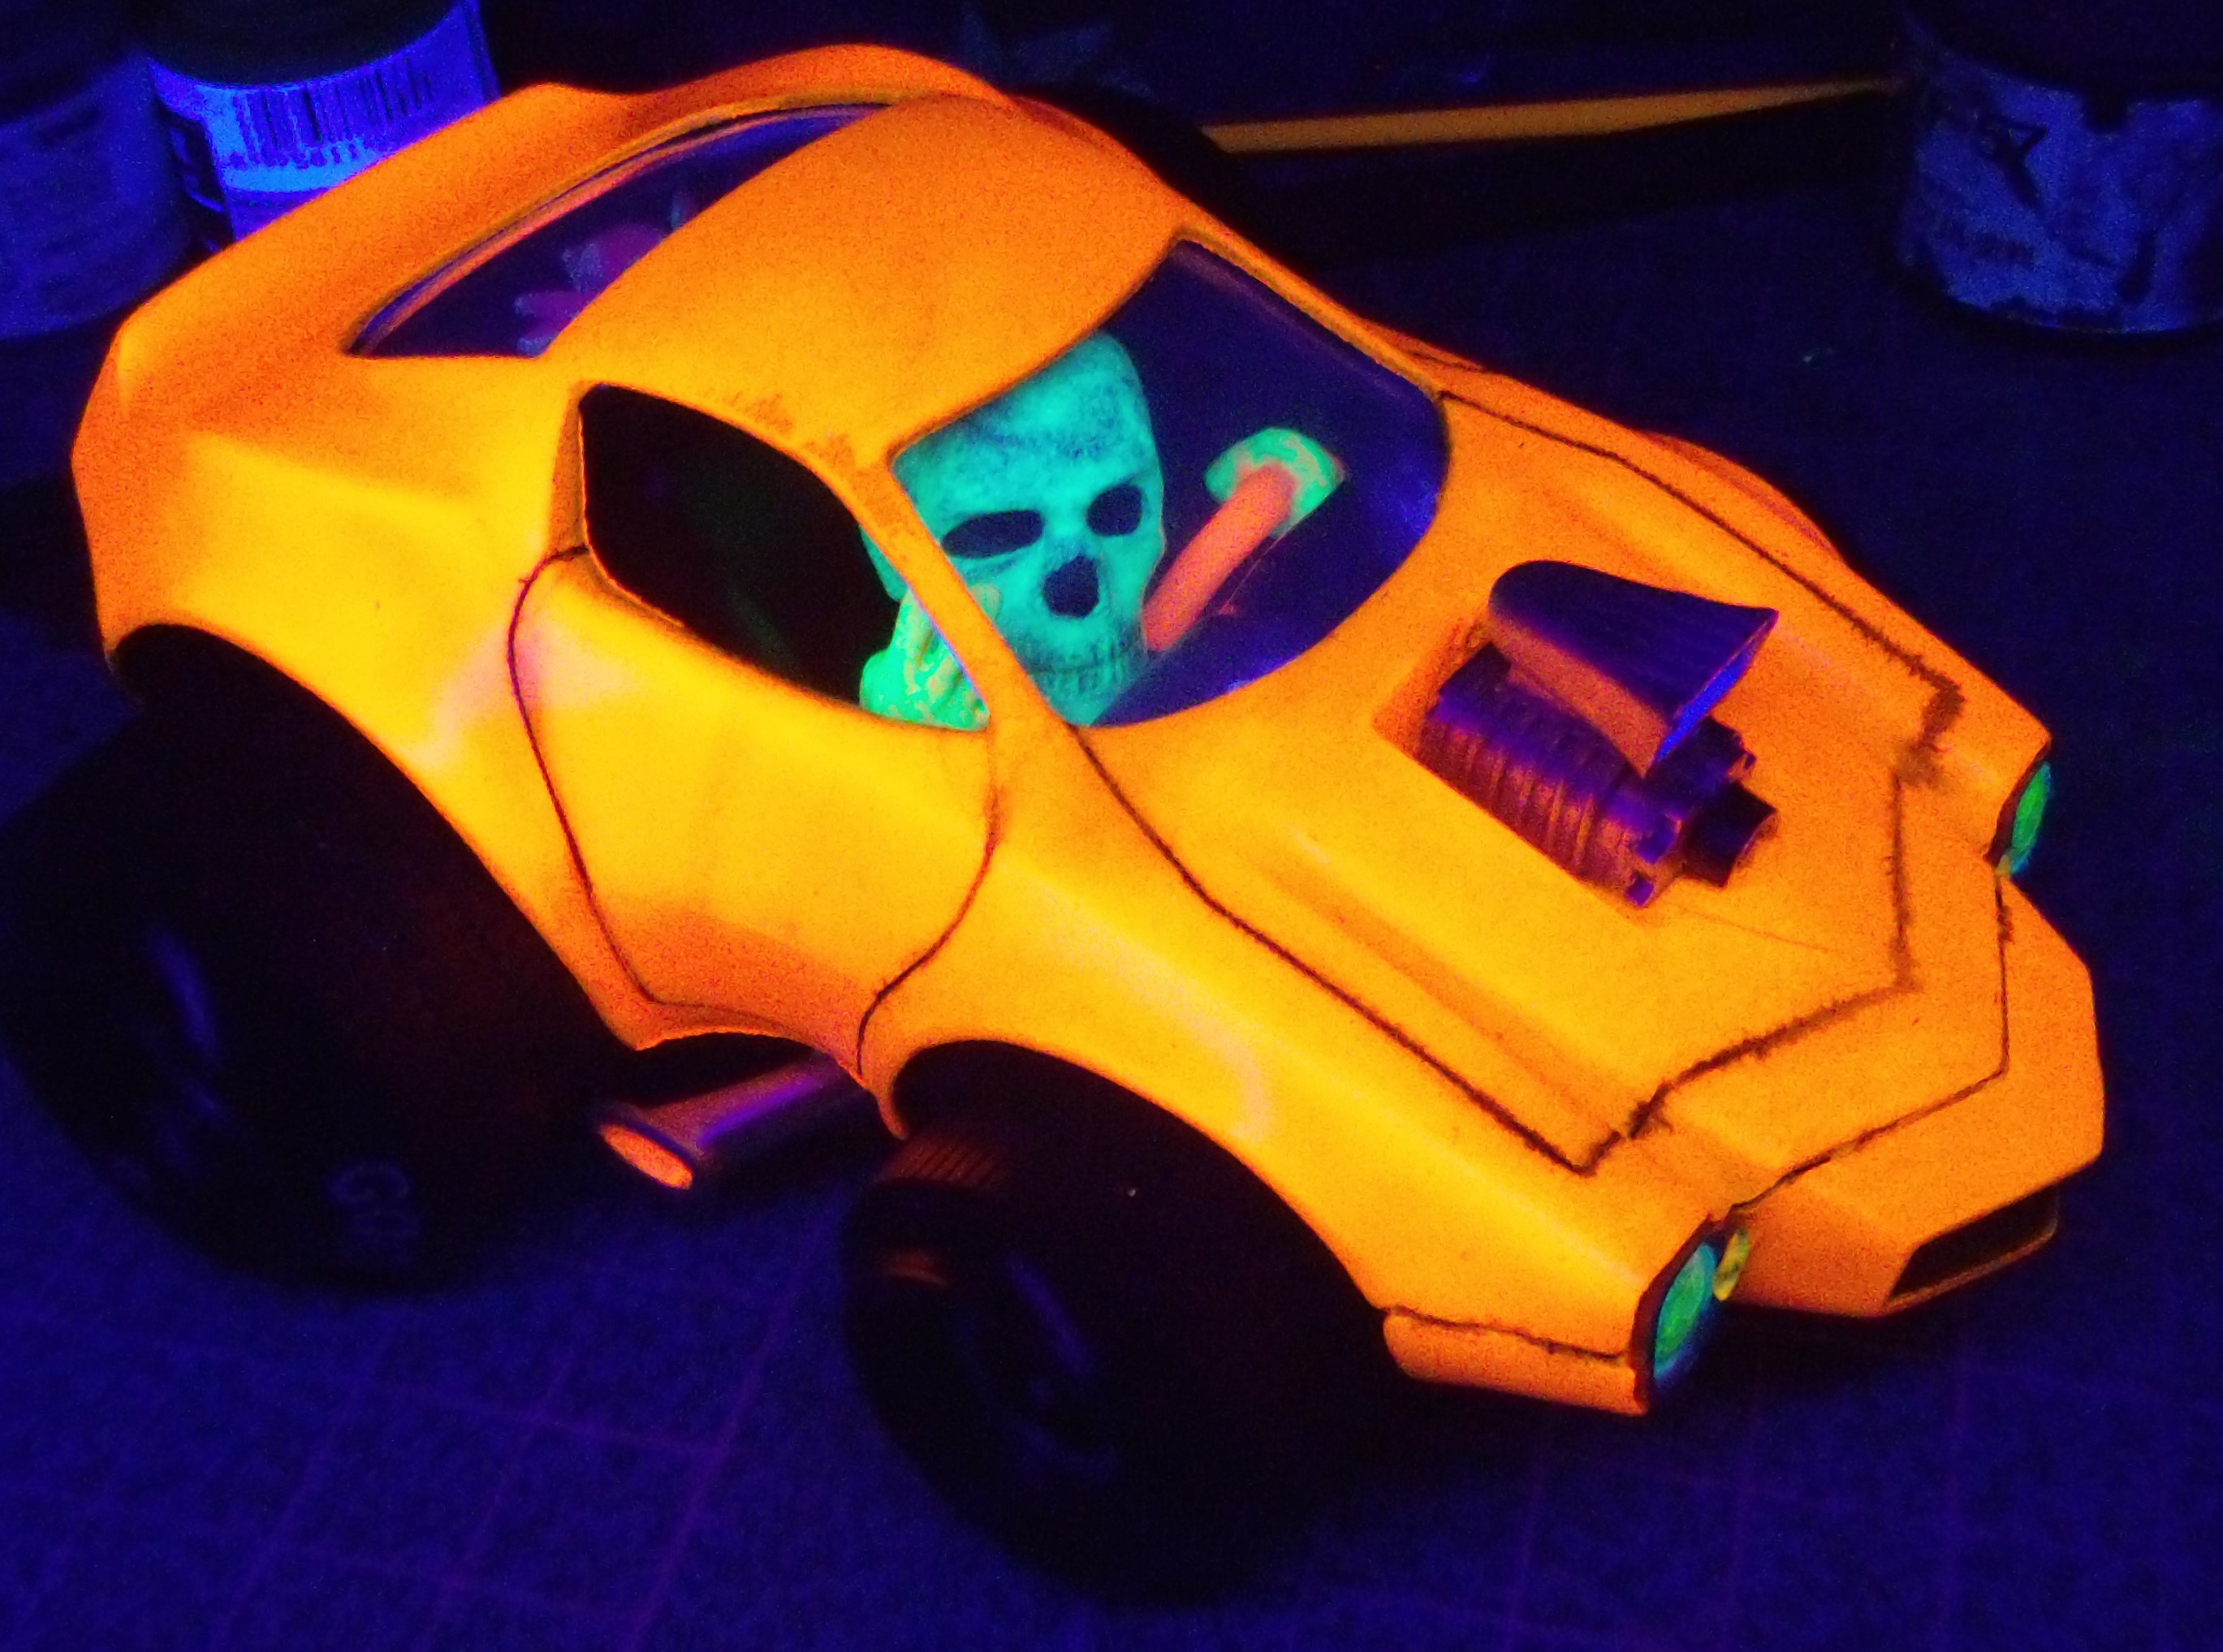
I used black light reactive paint.
Supposed to have tilting hood, but not really (unless you want to spend more time scratch building a true hinge system).
Not only does the hood not tilt, the tires-wheels don’t rotate. You have to scratch build your own axle rod/pin system.
Black light kool.
Without and…
…with the hood.
The decals came from a NASCAR kit.
Spartan drag race interior, but there’s plenty of room for kustom kar ideas.
 If you look at war time photos of bare metal versions of the real thing you will see clearly that the Liberator is covered in noticeable raised rivets, and the old Airfix engineers were obviously obsessed with capturing that look.


 Late Model Gift Build for somebody born on Xmas; Airfix Birthday Bomber